Wednesday, October 31, 2012

Lemon Thyme Chicken With Oven Baked Risotto

Good evening everyone! Risotto is an often used base to many of our recipes. This creamy concoction, made from Arborio rice and a broth base (usually chicken but vegetable is acceptable as well) blends the properties of rice with the consistency of pasta – which is why it works so well as a foundation for many dishes.


The downside to risotto is that it is a time consuming dish. (The ‘diva’ of the cooking world, if you will). Risotto takes 30 minutes at least to complete and much of that time must be spent stirring monitoring the rice so it doesn’t stick and making sure it cooks evenly. (For those that are fans of Food Network’s “Chopped” –you may recall that many chefs try to make risotto during the entrĂ©e round – and the judges cringe because risotto ALWAYS takes a little more than 30 minutes from start to end – time the chefs on that show typically do not have).

This week, as I was taking stock of our pantry and trying to create a recipe for this week (more on that a little later on) I saw our Arborio rice and thought “Risotto!” I didn’t really feel like babysitting the dish, however, and decided to find an alternative method for cooking risotto.

I found a few different ways before finally settling on a process I felt comfortable with. By pulling out a few more ingredients from the freezer and pantry, I had a full blown recipe just waiting to be made. Let’s get cooking!

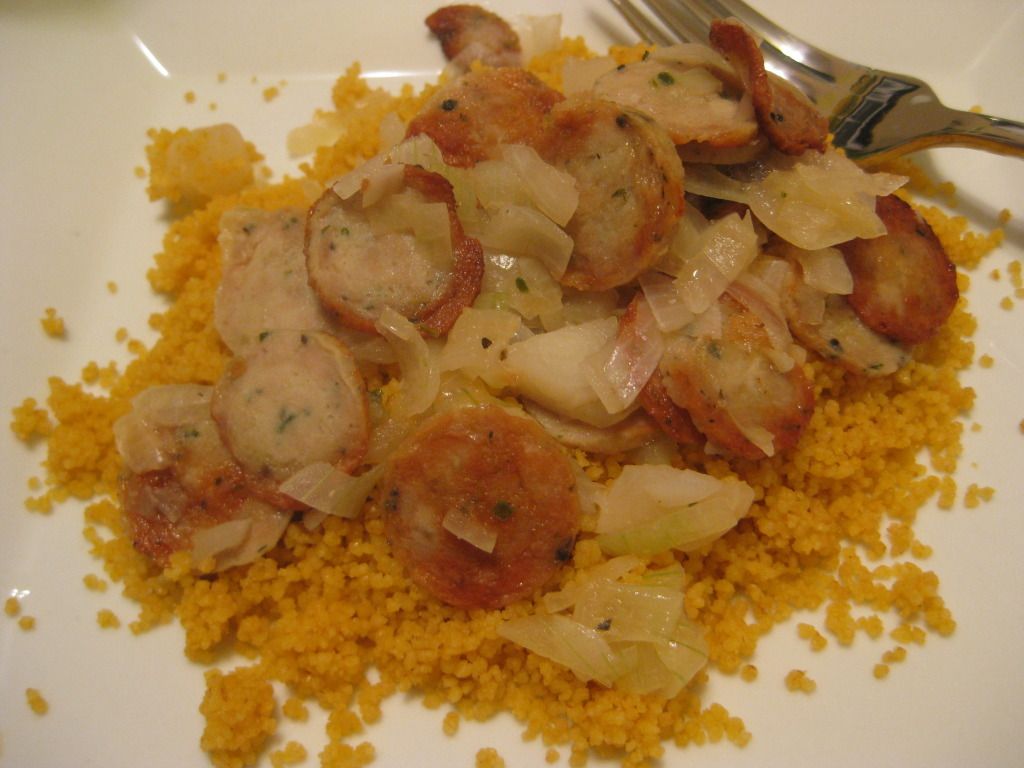
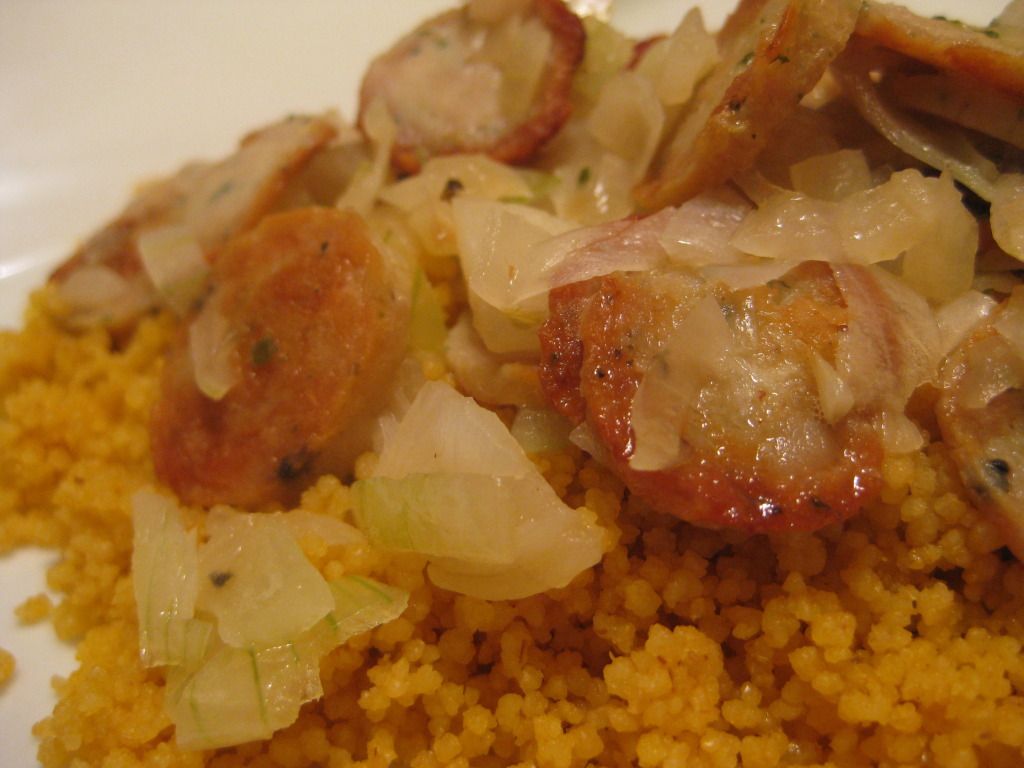
The Recipe: Lemon Thyme Chicken With Oven Baked Risotto
This is an Out of the Culinary Original Recipe!

What You’ll Need:
(Serves 4)

4 Boneless, Skinless Chicken Breasts (Cooked)*
1 Cup Arborio Rice
2 Tablespoons Unsalted Butter
2 ½ Cups Low Sodium Chicken Broth
1 Small Red Onion (Diced)
2 Tablespoons Fresh Basil (2 Teaspoons Dried)
Shredded Mozzarella


* You can choose to cook your chicken breasts however you’d like. Grill them, pan fry, oven roast – it doesn’t matter how you get there, just get them to the cooked stage. For this dish, I wrapped our chicken breasts in individual foil pouches and added a splash of lemon juice with a few sprigs of thyme. I placed the chicken on a rimmed baking sheet and baked them in the oven at 425 degrees for 30 minutes. This flavor combination blends well with the risotto we’re making – but you’re free to be creative with this aspect of the recipe.

Preheat your oven to 425 degrees.

To begin, add the unsalted butter to a large oven safe baking dish or Dutch oven. Pop the baking dish into the oven (covered) for 3 to 5 minutes to allow the butter to melt. Next, add the risotto, red onion (and yellow onion works too – you just won’t have as much color in your dish) and a pinch of salt and pepper. Finally, add the chicken broth and give everything a soft stir to incorporate all of the ingredients.

Once everything is mixed, place the lid back on the baking dish and return the dish to the oven. Allow the risotto to cook for 35 minutes undisturbed.

After 35 minutes, remove the baking dish from the oven and use a wooden spoon to fluff up the risotto (it’s going to look flat and dehydrated – but resist the urge to add more fluids right away). After you “fluff” the risotto give it a taste – it should be creamy and soft. If it’s at all chewy or otherwise undercooked, add a splash of chicken broth and return it to the oven for 5 minutes. (It shouldn’t be undercooked, however).

Once your risotto is creamy and soft, add in the shredded mozzarella (the amount is based on your own preferences) stir the cheese in until it’s fully melted. Finally, add in the basil and stir until it’s incorporated.

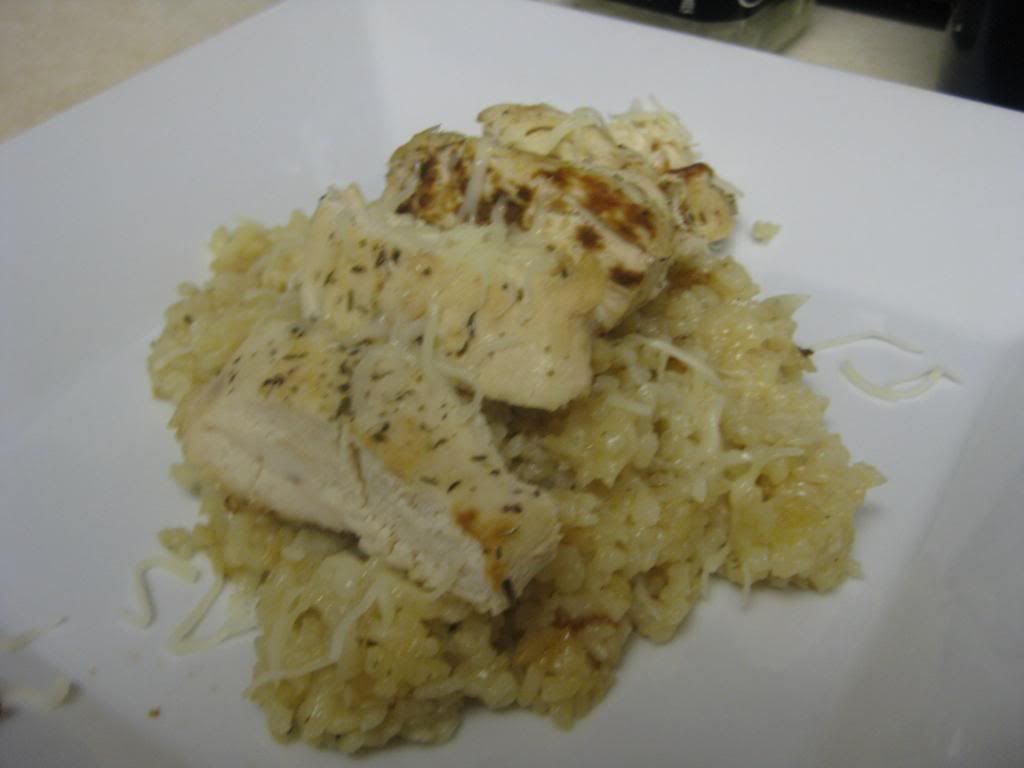
Spoon the risotto onto your plates and top with sliced pieces of your cooked chicken breasts. Top this with a sprinkling of cheese (if it goes with the preparation of your chicken – if the flavor clashes, obviously omit that last step). Serve and enjoy!


The Results:

The big question here was “Will this new cooking method take the fuss out of risotto?” I’m happy to say that the answer is a resounding yes. 35 minutes in the oven and the risotto was creamy and smooth just like I spent 30 minutes babysitting it on the stove top. While it’s probably not fast enough for you to cook up risotto on “Chopped”, it is a relatively low maintenance way to make a great recipe base.

Combined with a flavorful cut of chicken breast, this recipe is low cal, low sodium and high flavor.

That’s all we have for you this week. We’re back next week with some more new recipes and culinary adventures.

One last thing – I alluded to us clearing up the panty earlier in this post – there is a method for our madness; one that we will be revealing next week. Until then,

~Cheers

Thursday, October 25, 2012

Add A Little "Pepian" To Dinner

Good evening everyone! We've said it countless times on the blog - and I'll say it again tonight, there's nothing like breading to completely change a dish. From basic whitefish fillets to chicken pieces to whatever you can dream up, adding a basic layer of breading turns an otherwise ordinary dish into something a little more special.

Up until this point, we thought we had tried nearly everything there was to offer when it came to the wide world of breading. From panko to almonds to standard bread crumbs, if it's a potential breading component, we've given it a shot. My recipe tonight takes a breading we've used before (cornbread) and applies it to chicken while pairing it with a unique hispanic inspired sauce. Just when we thought we'd done it all - we find something new! Let's get cooking!

The Recipe: Cornmeal Crusted Chicken With Pepian Sauce
Original Recipe From: Eatingwell.com

What You'll Need:
(Serves 4)

4 Tomatillos (Husked and rinsed) OR 4 Roma Tomatoes (Diced)
1/4 Cup Diced Onion
4 Tablespoons Pepitas (Pumpkin seeds - check your bulk grain aisle)
3 Tablespoons Chopped Fresh Cilantro
1 Garlic Clove (Peeled)
1/2 Cup Reduced Sodium Chicken Broth
2 Tablespoons Low Fat Sour Cream
4 Boneless Skinless Chicken Breasts (Pounded to 1/4 inch thickness)
1 Large Egg White
2 Tablespoons Water
1/2 Cup Yellow Cornmeal
3 Teaspoons Canola Oil (Divided)

Preheat your oven to 400 degrees.

To begin, place your tomatillos (green Spanish tomatoes - or simply use Roma if you can't find tomatillos) in a food processor along with the garlic, broth, 1/4 teaspoon salt, 3 tablespoons of the pepitas and 2 tablespoons of the cilantro. Pulse until the mixture is smooth. Transfer this mixture to a small sauce pan and cook over medium high heat for 10 to 15 minutes, or until the sauce has reduced to approximately 3/4 of a cup and has thicken to a paste like substance. Once thickened, remove the sauce from heat and stir in the sour cream. Set this sauce aside.


While you sauce is cooking, begin breading your chicken breasts. Begin by whisking the egg white and water together in a small bowl. Meanwhile, place the cornmeal on a shallow plate, season with a pinch of salt and whisk together. As we've done countless times before on breading recipes, construct an assembly line with your ingredients. (Egg white mixture, followed by the bread crumbs and finally the plate.)

Dip the breasts into the egg white mixture, allowing the excess to drip off, then roll them in the cornmeal, ensuring that all sides and crevices of the breast are evenly covered.

Next, add 1 1/2 teaspoons of canola oil to a large (12 inch) non stick skillet and bring the oil to a shimmer over medium high heat. Place two chicken pieces in the oil and cook until the cornmeal breading turns golden brown - approximately 4 minutes per side. Remove the chicken, wipe out the skillet and repeat the process above to finish cooking all of the chicken.


Now, for some reason every cookbook and cooking website out there seems to think 5-10 minutes on a stovetop completely cooks a piece of chicken. I don't know about the rest of you, but we've NEVER had that work. Each time, the chicken is vastly undercooked and usually needs a lot more skillet time. I know that thickness of the chicken breast has a lot to do with this, but even when we've beaten our chicken to paper thin levels, we've never hit 165 degrees after only 5 to 10 minutes. That's why I'm adapting this recipe and adding another step.

Place a wire baking rack on top of rimmed baking sheet. Place your breaded (and browned) chicken on this baking rack and into the 400 degree oven for 10 to 15 minutes. Check the chicken's internal temperature with an instant read thermometer - once you hit 165 degrees, serve with the sauce you cooked up earlier (top with the extra peptias) and enjoy!

The Results:


Breading continues to be a way to add a little flair to any weeknight meal. The combination of a nice crunchy out shell and tender moist chicken underneath is always going to a great result on your plate. The pepian sauce, however, was a little 'off'. The pepitas add a nice nutty flavor to the tomato base and the sour cream completely changes the complexion of the final flavor. The end result is a sauce that is 'okay' but not quite what this chicken needs. I'm surprised because all of the reviews of this recipe online lauded the 'amazing' sauce. Maggie and I were less than impressed. I'd like to return to this recipe and use pepitas - but tweak the sauce's other inputs to create a new flavor. All in all, this is still a good dish - even with the sauce being a little "off".

That's all we have for you this week, we're back next week with yet another set of brand new recipes. Until then,

~Cheers

Tuesday, October 23, 2012

Fresh Flavors from Our Pantry

Good evening everyone!  It's great when you can look inside a pantry and immediately find items that you can combine and create something great.  Tonight is no exception: with one look to our pantry and one look to our freezer, I picked out two items that I might thought would go together.  With a little brainstorming, and a few more ingredients added to the pot, I whipped up something delicious that wasn't too much on our grocery bill.

The Recipe:  Orecchiette with Turkey and Pesto
Another Out of the Culinary original!

What You'll Need:
(serves two)

8 Ounces Orecchiette
1 Pound Ground Turkey
1 Teaspoon Olive Oil
1 1/2 Teaspoons Garlic, minced
1/3 Cup premade Pesto
1/2 Cup grated Parmesan, plus more for serving

To start, bring a medium saucepan with water to boil over medium high heat.  Once the water is at a boil, add the orecchiette and cook to package directions, anywhere between 10-15 minutes, depending on size of the pasta.  Once cooked, drain the pasta in a colander.  Shake the excess water from the orecchiette and keep in the colander.

Meanwhile, heat a nonstick skillet over medium heat and add the olive oil.  Once the pan is heated, add the minced garlic and saute the garlic until it becomes fragrant, about 30 seconds to a minute.  After this, add the ground turkey and cook.  If you haven't cooked with ground turkey, it won't brown up like ground beef.  Instead, it will become sort of a gray color.  Don't let this dismay you, this is the color it's supposed to look like.  Also, turkey will take a little bit shorter than ground beef to cook, about 10-12 minutes.  Definitely keep an eye on it, because you don't want your turkey to go brown.

After the turkey is cooked, add the pasta to the skillet and stir.  Add the pesto and Parmesan cheese to this combination and stir again until everything is well combined.  Turn the heat to low and let this mixture have the opportunity to meld all the flavors, about three minutes.  Top with extra Parmesan cheese (if you choose,) serve, and enjoy!

The End Result:


The flavors from this recipe are incredibly delectable and very easy on the palette.  The pesto isn't too heavy in this dish, which I was surprised, because I was going to add more, but the 1/3 cup was just the right amount of pesto.  Also, the cheese amount was great as well - letting the dish meld at the end let the cheese melt and it was extremely delicious.  The orecchiette captured bits of both the pesto and the turkey and made every bite very yummy.  Overall, a great dish with ingredients that were already available and were ready to be made into something delicious!

Join us Thursday as Tyler takes on a not-so typical breaded chicken dish.  Until then,

~Cheers!

Thursday, October 18, 2012

Going Cuban, Without The Travel

Good evening everyone! We have a multitude of reasons for trying out a dish on the blog – it’s healthy, it looks good, it’s a challenge – but every now and again we try our a recipe simply because we’ve never had it before. That’s the case with my recipe tonight. I was browsing for recipes last week and stumbled across a dish titled “Stuffed Pork Chop Sandwiches”. Further browsing revealed that this sandwich was a simple adaptation on the classic ‘Cuban’ sandwich.


I’ve never had a Cuban sandwich before and was interested in giving it a try. For those who are in the same place I am, a Cuban sandwich is a blending of ham, Swiss cheese and a dill pickle. It can be accompanied by mustard, lettuce and tomato and is typically pressed and cooked on a griddle to fuse everything together.

Tonight’s dish takes that concept and flips the ham for a pork chop – thereby reducing the sodium intake, and creating a heartier sandwich. Let’s get cooking and find out just what this Cuban sandwich has to offer!


The Recipe: Stuffed Pork Sandwiches (AKA Pork Chop Cuban Sandwich)
Original Recipe Found On: Eatingwell.com

What You’ll Need:
(Serves 2 but easily adapted to any number)

2 X 4 Ounce Boneless Pork Chops (1/2 inch thick, trimmed of fat)
1 Slice Swiss Cheese (Cut in half)
2 Dill Pickle Slices*
1 Tablespoon Canola Oil
2 Whole Wheat Hamburger Buns (Toasted)
1 Teaspoon Dijon Mustard
2 Slices Tomato
1 Romaine Lettuce Leaf (Cut in half)

* Pickle manufacturers / sellers make a “hamburger” style pickle that is flat (also known as a sandwich pickle) that’s the kind you’ll need for this recipe.


If you’re using a thick cut pork chop, begin by butterflying the pork chop with a sharp chef’s knife. To butterfly the pork chop simply slice the chop through the center, cutting all the way from one edge to within ¼ inch of the other edge, spread the chop open like a book.

The pork chops we’re using this evening are fairly thing and butterflying them would be a) difficult and b) unnecessary (you’re butterflying them to speed up cooking – when they’re thin, they’ll already cook fast). So, we’re not butterflying our chops. Depending on the thickness of your chops you may not have to either.

If you’ve butterflied your chops, the original recipes calls for you to put the half cheese slice inside the chop and press it back together (like closing a book). I’m going to argue against this due to the simple laws of physics. That cheese is going to melt prior to the chop being done and odds are the cheese is going to ooze out from inside the chop while cooking. The cheese will burn, you’ll have a gooey mess in the pan and it won’t be a very fun time.

Instead, if you’re butterflying your chops or not, simple season both sides of the pork chop with salt and pepper (close the ‘book’ if you’re butterflying) and heat your canola oil in a large non stick skillet over medium high heat until it shimmers lightly. Cook the pork chop for 3 to 5 minutes per side until it’s golden brown and cooked through.

During the final minutes of cooking, carefully pop open the pork chop (with a spatula or tongs!) and insert the cheese slice in the center. Close the chop and allow the cheese to melt while the pork chop finishes cooking. The cheese should melt within a minute or so – and by adding it at the end, you’re making sure the cheese stays INSIDE the chop. Alternatively, for those not butterflying, simply add the half cheese slice to the top of the chop and allow it to melt.

Begin constructing your sandwich by spreading the Dijon mustard on the toasted bun, add the chop, top it with the pickle, lettuce and tomato and serve!


The Results:


As I mentioned in the opening, I’ve never tried a Cuban sandwich before, but if this adapted version of the recipe is any indicator I think I like them. Pork chops and Dijon mustard go well together, they’re classic flavors that blend beautifully on this bun. The nice twist is the addition of the creamy Swiss cheese and the bite of the dill pickle. All the flavors work well together and create a flavorful little adventure on a bun. At only 350 calories per serving, this is a quick, easy and healthy weeknight dish that the whole family can enjoy.

That’s all we have for you this week. We’re back next week with more recipes and adventures. Until then,

~Cheers


Tuesday, October 16, 2012

Savory, Yet Simple

Good evening everyone!  A few weeks ago, we introduced you to the multifaceted ingredient known as couscous.  No matter what you put with it, it seems to enhance the other ingredients it surrounds.  As we continue to experiment with this versatile ingredient, it'll always be exciting to see what will turn out and tonight we will continue to find brand new ways to showcase this simple, yet extraordinary ingredient.

The Recipe:  Chicken Sausage with Whole Wheat Couscous
An Out of the Culinary Original!

What You'll Need:
1 Cup Whole Wheat Couscous
1 Cup Vegetable Broth
2 Tablespoons Olive Oil
3/4 Cup sliced Chicken Sausage
1 Onion, chopped
1 1/4 Cup Chicken Broth

To start, prepare the couscous with the vegetable broth according to package directions.  This typically involves combining the liquid (in most cases, it would be water, but for tonight, it's vegetable broth,) two tablespoons of butter, and 1/2 teaspoon of salt and bringing this to a boil.  Once this combination is at a boil, remove from heat.  Pour the dry couscous into the sauce pan.  Stir until everything is well mixed.  Cover the sauce pan and let stand for five minutes.  Fluff the couscous with a fork and you're read to serve!

Next, in a large nonstick skillet, heat the olive oil over medium high heat.  Stir fry the chicken sausage until lightly browned, about three to four minutes.  Remove the chicken with a slotted spoon and place on a paper towel lined plate.  Add the onion to the oil left in the skillet and cook for five to six minutes, until the onions begin to soften.  Pour in the chicken broth and return the chicken sausage back to the skillet and simmer for two minutes.

Stir fried chicken sausage - tasty!

Spoon this mixture over the couscous, serve, and enjoy!

The End Result:


The entire dish had an incredible savory flavor to it.  I think this was mostly in part to the vegetable broth we use for the couscous.  Those little buggers soaked up all that flavor from the broth and retained it for the dish.  Using the chicken sausage also amped up the savory flavor.  There were versions of this dish that included chorizo, but I thought it would give too much heat for this simplistic dish.  The chicken sausage gave it a boost of flavor, without knocking your socks off.  Overall, a great and simple recipe to add to your menu any night of the week.

Join us Thursday as Tyler takes a new approach to a classic sandwich.  Until then,

~Cheers!

Thursday, October 11, 2012

Stroganoff With A Twist


Good evening everyone! As Maggie mentioned earlier this week, we try very hard here to find recipes that are not only good – but good for you. The balance between flavorful and healthy is a fine line, one that some people don’t exactly believe in (I.E. you can’t have anything that tastes good if it’s healthy). As Maggie showed with her flavorful turkey burgers and I hope to show with my dish tonight, flavorful meals with low caloric intake are not actually that scarce. Just like Maggie’s recipe earlier this week, I’m taking a traditionally popular dish – stroganoff – and making it a whole lot healthier. Let’s get cooking!

The Recipe: Chicken Stroganoff
Original Recipe Found In: Food Network Magazine October 2012 Issue

What You’ll Need:
(Serves 4)

12 Ounces Egg Noodles
3 Tablespoons Unsalted Butter
1 Small Onion (Chopped)
4 Ounces White Mushrooms (Approximately 2 Cups)
1 ½ Pounds Boneless, Skinless Chicken Breasts or Thighs (Cut into chunks)
2 Tablespoons All Purpose Flour
1 Teaspoon Paprika
1 Cup Low Sodium Chicken Broth
1 Tablespoon Worcestershire Sauce
½ Cup Low Fat Sour Cream (Plus additional for serving)
2 Tablespoons Fresh Chopped Parsely

Begin by preparing your egg noodle according to package instructions. Once cooked, drain and set aside until needed.

While you noodles are cooking, melt 2 tablespoons of butter in a large (12 inch) non-stick skillet over medium-high heat. Add the onion and cook until it becomes slightly soft (this takes about 2 minutes). Next, add the mushrooms and cook until they begin to lightly brown. (Depending on the heat of your skillet, this will take between 2 and 5 minutes).

Once the mushrooms have begun to brown, add the remaining tablespoon of butter, the chicken chunks, flour, paprika, 1 teaspoon of salt and ¼ teaspoon of pepper. Cook this mixture, making sure to stir frequently, until the chicken begins to brown, about 3 to 5 minutes.

Finally, add the Worcestershire sauce and the chicken broth. Allow the mixture to come to a light simmer and cook until the sauce thickens, which will take around 5 minutes. Next, stir in the sour cream and season with salt and pepper as needed. Allow this mixture to simmer for an additional 2 to 5 minutes, or until the chicken is cooked through (use an instant read thermometer if you’re unsure – remember, you’re looking for 165 degrees at the thickest part of the chicken).
Once the chicken is cooked through, spoon the mixture over the egg noodles you prepared earlier and top with sour cream and a sprinkle of paprika. Enjoy!


The Results:


Stroganoff is a great fall dish; it’s warm and filling, making it the perfect companion to cool fall evenings. This chicken stroganoff is a wonderful adaptation to the traditional beef dish. The rich and creamy sauce compliments the chicken and egg noodles while the paprika adds just enough kick to spice up the flavor. At only 500-600 calories per serving (depending on portion size) this is a relatively low calorie option for the fall time menu.

That’s all we have for you this week. We’re back next week with more brand new recipes and culinary adventures. Until then,

~Cheers

Tuesday, October 9, 2012

Hamburgers and Fries, with a Slight Tweak

Good evening everyone!  Here on the blog, we strive to bring you healthier options for meals.  When we find a healthy version of a popular meal, it's doubly as exciting.  Tonight, I'm taking a classic American dish, cheeseburger and fries, adding a bit of zing, and making it nutritious and oh so delicious.

The Recipe:  Salsa Verde Turkey Burgers
Recipe Found From Various Sources

What You'll Need:
1 Pound Ground Turkey
1 Egg (lightly beaten)
1/4 Cup Bread Crumbs
1/2 Cup Salsa Verde
4 Slices Pepperjack Cheese
1 Cup Pre-Made Guacamole
4 Buns


The Recipe:  Baked Zucchini Chips
Recipe Found From Various Sources

What You'll Need:
1 Zucchini
Seasoned Salt, (or other seasonings of your choice)

Let's start with the Zucchini Chips:  Preheat an oven to 225 degrees.  Line a baking sheet with parchment paper, spray with cooking spray, and set aside.  Using a mandoline slicer, slice the zucchini into 1/4 inch slices and place the slices on a plate.  As always, be careful using a mandoline, especially towards the end of the zucchini.  As we've noted before, it can be a dangerous item in the kitchen.

Place the zucchini slices on the baking sheet and lightly top with cooking spray.  You can sprinkle the zucchini with seasoned salt, but a little goes a long way.  The zucchini will shrink in the oven and the flavor from the seasoned salt with increase greatly once the slices will bake.

Place the baking sheet in the oven and bake for 45 minutes.  Once the 45 minutes are done, rotate the baking sheet in the oven and bake for an additional 30-50 minutes, or until the chips are crispy and browned to your liking.  Let the chips cool and serve with the burgers.

Zucchini Chips - some a little crispier than others

To make the Salsa Verde Turkey Burgers, place the turkey, egg, bread crumbs, and salsa verde in a large mixing bowl.  With your (clean) hands, mix these four ingredients until they are well combined.  Form this mixture into four, well-rounded patties and set on a broiling pan.  Place the broiling pan in the oven and broil the patties for 15-18 minutes, until they are browned and cut into the center, it is no longer pink.

Top the burgers with the pepperjack cheese and place back under the broiler.  Cook the burgers until the cheese is melted, about one minute and take out of the oven.  Spread the guacamole evenly over the four buns.  Place each cooked patty on one bun and top with the other end of the bun.  Serve with the zucchini chips and enjoy!

The End Result:


The chips are delightfully tasty.  They had the perfect amount of crunch and the right amount of seasoning which made them a perfect side dish.  You can whip these up with any meal, or if you want to create a perfect snack, these chips are for you.

The burgers were incredibly moist, due to the breadcrumbs and the salsa verde and that's what made it so delicious.  Granted, the salsa verde and the pepperjack cheese amped up the spicy factor, the guacamole helped cool the burgers down and eased the palate from burning incessantly.  Personally, I like turkey burgers a lot better than hamburgers, but they have to have the right amount of seasoning and ingredients to keep it moist, and that's what this recipe did.  The pairing of these two made a great, healthy alternative to the traditional burgers and fries that you can create any night of the week!

That's all we have for you tonight.  Join us tomorrow as Tyler continues on the alternative healthy route with another traditional dish that won't weigh too much on the waistline.  Until then,

~Cheers!

Thursday, October 4, 2012

An Original Take on an Old Favorite

Good evening everyone!  Sometimes when we're looking for recipes to duplicate, it's difficult to find inspiration to create these dishes.  Whether it's the complexity of a dish or it seems too plain, cooking can be, more often than not, uninspired.  Tonight's dish will shatter that lull of dullness.  It's a first for me and will inspire me to create something completely different and not be afraid of the end results.

The Recipe:  Italian Pasta Bake
An Out of the Culinary Original!

What You'll Need:
8 Ounces dry Elbow Macaroni
1 1/2 Cups thinly sliced Red Bell Pepper
2 Cups sliced Zucchini
8 Ounces thinly sliced Chicken Sausage
1/2 Cup shredded Mozzarella cheese

For the Sauce:
1 1/2 Teaspoon Olive Oil
2 Teaspoons Garlic
3/4 Cup Chicken Broth
2 Ounces 1/3-less-fat Cream Cheese
1/4 Cup grated Parmesan Cheese
1 Tablespoon Flour
1/4 Teaspoon Salt
1/4 Teaspoon Pepper

To start, preheat an oven to 350 degrees and bring a pot of water to boil and add the dry elbow macaroni.  Do not add any salt, to reduce the caloric value, and cook according to package directions.  Once cooked, drain the pasta in a colander.  The pasta may have to sit a while, due to the next couple of instructions.  Just make sure to shake the pasta every now and then to make sure it doesn't clump together.

Next, heat 2 teaspoons of olive oil in a large, nonstick skillet.  Add the chicken sausage and saute until the sausage is cooked through, 7 to 9 minutes.  With 3 minutes left to cook, add the red bell pepper and zucchini and sautĂ© until they soften.  After the vegetables and sausage is heated through, bring the heat to low and add the noodles.  Stir together and keep warm by placing a lid over the skillet.

So, chicken sausage, red bell pepper, zucchini, and elbow macaroni walk into a bar...

To make the sauce, heat the oil in a saucepan over medium high heat.  Add the garlic and cook until fragrant, about two minutes.  Once the garlic is cooked, add the chicken broth and bring to a boil  Whisk in the cream cheese, Parmesan cheese, flour, salt, and pepper.  Cook this mixture for three minutes and stir constantly as so there are no clumps in the sauce.

After the sauce is cooked, add it to the macaroni, chicken sausage, and vegetable mixture so the sauce is coated throughout.  Add this entire mixture to a large baking dish.  Sprinkle the top with the mozzarella cheese with a even coat.  Place in the oven and cook for 25 to 30 minutes, or until the cheese is slightly browned and bubbling.  Remove from the oven, serve, and enjoy!

Adding the saucy goodness

The End Result:


This is a great filling meal and great tasting at that.  The chicken sausage has an incredibly savory flavor and cooking the zucchini and red pepper makes the flavor pop even more.  The sauce is cheesy, but not overly cheesy, which will please any palette.  The mozzarella topping makes for a nice, even coating and doesn't weigh the dish down.  Overall, I'm pleasantly surprised at how well this dish turned out and how great it tastes.  

Thanks for joining us this week.  Tune in next week as we continue to venture into the culinary world.  Until then,

~Cheers!

Wednesday, October 3, 2012

Using Old Inventory - Creating New Flavors

Good evening everyone! Every now and again Maggie and I like to do something we call “The Great Pantry Cleanout”. Despite its epic name – it’s really not that exciting. Essentially, you dig through your freezer, pantry – etc, and make a few recipes that week based on the ‘extras’ you already had laying around. It’s a great way to save money on your grocery bill and a nice way to clean out your cabinets.


I happened across tonight’s recipe a few months back but never got around to giving it a try. After sorting through our excess food items, this dish came to mind. Nearly everything on the ingredient list we had tucked away in a cabinet or freezer (outside the leeks – which don’t exactly ‘keep’ in a cabinet).

The Recipe: Pan Roasted Chicken With Leeks
Original Recipe Found In: Food Network Magazine

What You’ll Need:
(Serves 4)

3 Slices Bacon (Thick cut works well) chopped into ¼ inch pieces
8 Chicken Drumsticks (or 2 pounds chicken – we’re using breasts)
3 Cloves Garlic (Smashed)
1 Bunch Leeks (White & light green only) halved and sliced thinly
2 Tablespoons All Purpose Flour
1 Cup Low Sodium Chicken Broth
½ Cup Half and Half
2 Tablespoons Chopped Fresh Parsley (2 Teaspoons dried)


Begin by preheating your oven to 425 degrees. Place a large (heavy bottom) oven safe skillet on the stovetop over medium high heat. Add the bacon to the skillet and cook until some of the bacon fat has rendered and the bacon begins to brown lightly. Slide the bacon to the side of the pan and add the chicken (lightly seasoned with salt and pepper) to the skillet.


Allow the chicken to cook for 3 to 5 minutes per side – just long enough to develop a nice browning on the outside of the chicken. Remove the chicken from the skillet and set aside. Add the garlic and leeks to the skillet, stirring well to make sure everything is evenly incorporated. Once mixed, return the chicken to the skillet, making sure the chicken is setting atop the leek / bacon mixture.


Place the skillet in the oven and allow the chicken to roast for 25 to 30 minutes, or until the thickest part of the chicken registers 160-165 degrees on an instant read thermometer. Once the chicken has reached the perfect temperature, transfer the chicken to a platter and set aside.

(Carefully) return the skillet to the stove top over medium heat and sprinkle in the flour. Stir in the flour and allow the mixture to simmer for a minute before adding the chicken broth and half and half. Stir the mixture well and allow it to cook for 2 minutes. Increase the heat to medium high and bring the mixture to a boil and allow the liquid to reduce. This should take around 5 minutes. Finally, stir in the parsley and a squeeze of lemon juice – serve the leek mixture over the chicken and enjoy!


The Results:


Chicken is one of my favorite foods to cook with because it’s simply so agreeable with a multitude of flavors. The leek sauce is a true star of this dish – adding a great, onion like flavor with a fresh hint (thanks to the lemon) to the delicacy that is oven roasted chicken. At only 400 calories per serving, this flavorful and healthy meal has something for everyone. Give it a try yourself and see just how good this dish is!

That’s all we have for you tonight. Maggie takes to the kitchen tomorrow night continuing our theme of the ‘Great Pantry Cleanout’. Until then,


~Cheers