Thursday, June 20, 2013

Mango Marinade Makes for a Marvelous Meal


Good evening everyone! We’re one day away from it “officially” being summer, but the weather in the greater Midwest has already taken a turn for the hot. While I’m not a big fan of hot weather, the warmer days do signal the return of some things I greatly enjoy – including tropical fruits that tend to make their best appearances in the summertime. One particular favorite of mine is the mango. We’ve used mango as an ingredient in previous recipes, and have even featured how to cut, slice and clean your very own mango. It’s somewhat surprising that I’ve never tried using this bright citrus in a marinade, since its flavors lend so well to grill season. Well, that trend ends tonight. Mangoes make it to the grill!

The Recipe: Mango Grill Chicken
Recipe (Heavily) Adapted From: Food Network Magazine, July 2012 Issue

What You’ll Need:
(Serves 4)

2 Mangoes, cleaned and diced (alternatively, buy a package of mango chunks from your grocer – it’s easier)
4 Bone in, skin-on chicken breasts
1 Cup Fresh Cilantro (stems, leaves  and all)
4 Tablespoons Chipotle Based Salsa

*The original version of this recipe appears in the July / August 2012 issue of Food Network Magazine as “Chipotle Mango Chicken with Chimichurri” and it differs greatly from the version I’m writing about tonight. I gave credit to the recipe for “inspiring” tonight’s dish, but if you want to try the original, understand it will be vastly different from what I’m sharing.

In a large food processor, add the mango, cilantro and chipotle based salsa (it doesn’t really matter what kind of salsa, just as long as it is tomato based and lists chipotle as it’s main pepper. You can increase or decrease the heat to your liking by choosing varying levels of salsa heat). Pulse the mixture until everything becomes a nice puree (there will be some chunks left behind, and that’s okay, but make sure the pieces are fairly small).

Pat your chicken breasts dry with a paper towel, then work about 1 tablespoon of the marinade under the skin of each chicken breasts. Next, scoop between three to four heaping tablespoons of the marinade into a plastic sealable baggy (repeat for each chicken breast you’re cooking). Place one breast into each bag, seal tightly, then jumble and jostle the chicken around until it is evenly coated in the marinade. Store the chicken in the baggies, in the refrigerator for at least 6 hours. It works best if you make this before you leave for work in the morning and let the little buggers marinate all day until you come home.

Next, preheat your grill to 350-400 degrees. Lightly oil the grates and place the chicken, skin side up, on the grates (directly over the heat) Cook for 5 minutes before turning the breasts (skin side now down) and allowing them to cook for an additional 5 to 7 minutes. Leaving the skin side down for so long is sacrilege to many ‘chicken skin aficionados’, but by doing this you’ll create a great crispy skin that crackles after you’ve pulled it off the grill. This skin almost becomes one with the marinade and produces a nice, lightly crispy exterior full of marinade flavor while allowing most of the fat to burn off on the direct heat.  

Check your chicken to make sure it registers 165 degrees at the thickest part of the breast. If not, turn it once more (skin side up) and allow it to cook for an additional 3 to 5 minutes, or until you reach the target temperature. Remove from the grill and serve immediately!


The Results


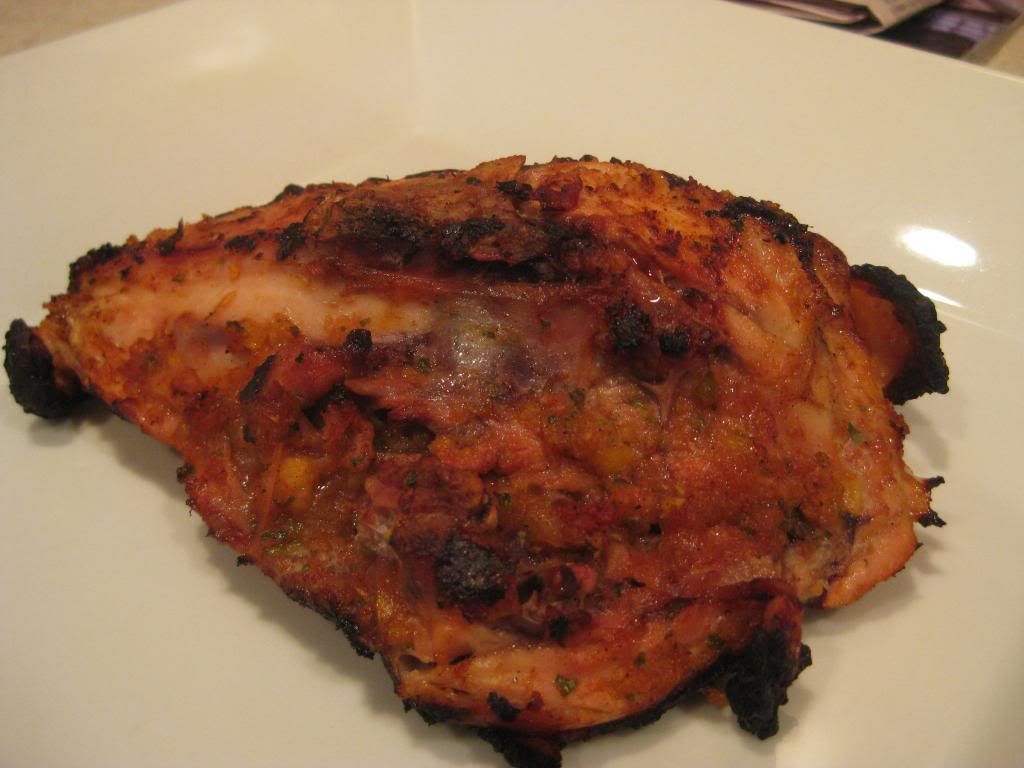
It’s a rare feat to create a BBQ style chicken, fresh off the grill, that doesn’t need BBQ sauce. This recipe manages to do just that. The chicken is moist and full of flavor, thanks to an all day session with the marinade – which is OUTSTANDING! The slight heat of the chipotle blends beautifully with the sweetness from the mango and everything is tied together wonderfully with the fresh undertones of cilantro. This dish is simple, looks great off the grill and is full of delicious flavor. That’s a win, win, win situation! Give this one a try at your next summer cookout – it’s sure to be a favorite.

That’s all we have for you this week. We’re back next week with two brand new recipes. Until then,

~Cheers

Tuesday, June 18, 2013

The Classic Tale of Pork and Fruit

Good evening everyone!  With grilling, the possibilities are endless.  It's great to know that cooking some variation of meat with a vegetable (or fruit,) will yield you with tasty end product that has a great smokey flavor to it that you wouldn't normally get with a dish cooked from an oven.  With that, tonight's dish has all those great qualities that you expect from a grilled dish, plus incorporating a new ingredient makes tonight's recipe all that more great.

The Recipe:  Grilled Pork Chops with Nectarines
Original Recipe Found In:  Cooking Light, June 2013

What You'll Need:
1 Tablespoon chopped fresh Thyme
3 1/2 Tablespoons Extra-Virgin Olive Oil, divided
2 Teaspoons minced Garlic
4 (6 ounce) bone-in center-cut Pork Chops
1/4 Teaspoon Salt
1/4 Teaspoon Black Pepper
2 ripe Nectarines
1/2 Teaspoon Sugar
1/4 Teaspoon ground Cumin
1/8 Teaspoon ground Red Pepper
4 Teaspoons Mascarpone Cheese

To start, preheat a grill to medium-high heat.  Once the grill begins to warm up, you can prepare the pork chops.  In a small bowl, combine the thyme, one tablespoon olive oil, and garlic; mix these ingredients until well-combined.  Place the pork chops on a clean plate and rub the oil mixture evenly over the pork chops until they are completely covered in the oil mixture.  Once the pork chops are seasoned, sprinkle with salt and pepper.

Once the grill is heated, place the pork chops directly on the grill rack.  Grill the pork chops for three to five minutes on each side, depending on desired degree of doneness and thickness of the chop.  We like to cook our meat until it is well done, with a little hint of pink.  Alternatively, you can cook it until the pork is at a cooked temperature, which is 145 degrees.  Once cooked, transfer the pork chops to a clean plate, cover with aluminum foil, and let stand for 10 minutes.

While the pork stands, transfer the nectarines to a clean plate.  Cut these in half and discard the pits.  In a small bowl, combine the sugar, remaining 1/2 teaspoon of oil, cumin, and red pepper until well mixed.  Rub the sugar mixture evenly over the cut halves of the nectarines.  Immediately transfer over to a grill.  Grill the nectarines for two to three minutes on each side or until tender.  Transfer the nectarines back to a clean plate and let cool.  Once cooled, cut the nectarines in wedges and serve with mascarpone cheese.  Serve the nectarines with the pork chops and enjoy!

The End Result:


The pork tastes great rubbed in olive oil, garlic, and thyme.  It creates a delicious flavor that is only enhanced by the grill.  Letting the pork stand keeps all those juices in the meat and gives it a really juicy texture.  The nectarines were also enhanced by the grill.  You can barely taste the sugar mixture that was rubbed before the grill, but by using the grill, it made the nectarines super tender, almost melt-in-your-mouth quality.  The nectarines also offset the pure power of the garlic and thyme in the pork, so it's a must have when cooking this dish.  

Thanks for joining us tonight.  Check back later this week when Tyler presents a brand new dish.  Until then,

~Cheers!

Tuesday, June 11, 2013

Marvelous Mahi-Mahi

Good evening everyone! We've often discussed how much we enjoy cooking with the ubiquitous 'white fish'. This generic term applies to a wide swath of the fish 'genre', including cod, halibut, swordfish, perch and much more. It came as a bit of a surprise, given how much we enjoy using white fish fillets, that we had not combined our summertime cooking method of choice (grilling) with our fondness for fish. Well, tonight that (culinary) atrocity ends!


The Recipe: Beer Marinaded Mahi-Mahi
Original Recipe From: Time To Grill (Weber Grill e-book)

What You'll Need:
(Serves 2)

1 Cup Beer
1 Medium jalapeños (Sliced thin)
3 Tablespoons Lime Juice
2 Boneless, Skinless Mahi-Mahi fillets


In a glass baking dish (preferably one that has a lid), combine the beer (you can use any variety you like - we opted to use Summit's extra pale ale - because it's one of the beers we had in the fridge...plus, you get to drink the 'extra' while you're preparing the recipe. Life's too short to use crummy beer, even if it's for a marinade) jalapeños and lime juice. Add the fillets, making sure to cover them as well as you can in the marinade. Cover the baking dish and allow the fillets to rest at room temperature for 15 minutes, making sure to turn them halfway through.


It's important to stick to that 15 minute marinade time, as the acidic lime juice will actual begin "cooking" the fish after 15 minutes - obviously leading to a dryer than desired fillet.


Remove the fillets from the marinade (discard the marinade) and season them lightly with salt and pepper. On a clean, preheated (400-450 degrees) grill, add the fillets and cook for 8 minutes, flipping them halfway through. Make sure the fillets have are nice and flaky before removing them from the grill by lightly prodding them with a metal spatula or fork.

Transfer the fillets to your serving platter and enjoy! These fillets pair nicely with a green veggie (brean beans or asparagus are the best choices). Since we were already using the grill, we opted to toss some asparagus in olive oil, sprinkle it with salt and grill it alongside the fillets (8 to 10 minutes). But the side dish is up to your personal preference!


The Results:


Delicious! The mahi-mahi was incredibly tender and juicy thanks in part to the marinade. The fish picked up a very small hint of heat from the jalapeños (slight - not enough to deter even those who HATE heat in their food) but was otherwise unaffected (flavor wise) from the marinade. In this case, that's a good thing as mahi-mahi has great flavor on its own. Clocking in at just under 150 calories, this delicious dish is PERFECT for summertime. Give it a shot today!


That's all we have for you this evening. Stop in later this week as Maggie takes to the kitchen with a brand new recipe, featuring a brand new ingredient! Until then,

~Cheers

Saturday, June 8, 2013

On The Sweeter Side

Hello again everyone! One of the perks of summertime cooking is the ability to grill fruit. If you've never tried a pineapple slice or watermelon chunk on the grill, you really should give it a shot. The natural sugars of the fruit caramelize, greatly intensifying the fruit's natural sweetness.

 As I mentioned in last week's post, we had a big grill out over the Memorial Day weekend. One of the dishes we tried involved grilling up pineapple slices and combining them with frozen yogurt. Intrigued? You should be!

The Recipe: Caramelized Pineapple Fro-Yo

What You'll Need:

1 Pineapple (Cored, peeled, sliced into rounds)
1/4 Cup Brown Sugar
1 Tablespoon Cinnamon
Vanilla Frozen Yogurt

In a small bowl, combine the brown sugar and cinnamon. Next, dip each pineapple slice into the brown sugar / cinnamon mixture. Make sure each slice has an even coating of the mixture before transferring them to a plate. Allow the slices to rest for 5 to 10 minutes before adding them to the grill.

Cover 1/2 of the grill with aluminum foil, and bring the temperature to 350 degrees. Add the pineapple slices to the foil and allow them to cook for 5 minutes per side. This allows the brown sugar to caramelize, creating a thick, sticky glaze on the pineapple. After both sides of the pineapple have been coated in this lovely glaze, transfer the slices directly onto the grates for 1 minute per side. This creates the great char lines on the pineapple slice and adds a little more depth to the final flavors.

Once charred, remove the pineapple from the grill and dice it into smaller pieces. Scoop a few pieces of the pineapple into the bottom of a bowl, top with vanilla frozen yogurt and scoop a few slices of pineapple on top of the frozen yogurt. Serve and enjoy!


The Results:


This is one sweet little treat! Pineapple is already packed with natural sugars, so caramelized pineapple is predictably sweet. (That's a subtle way of warning you that a little of this dish is better than a lot - good things come in small serving sizes). But warm pineapple blended with cool vanilla frozen yogurt is one of summertime's most simple and decadent flavors. The next time you're firing up the grill, throw a few slices of pineapple on there and give this dessert a try for yourself.

Thursday, June 6, 2013

Go a Bit on the Wild Side

Good evening everyone!  As we've mentioned here on the blog before that using a grill can transform a simple dish to something extraordinary.  We've done the grill trick for quite a few recipes already (and I'm sure we'll have more up our sleeve in the next coming months.)  Tonight, I'll take a type of meat that is ranked in the "non-traditional American" sense, but give it the grill technique and it's something completely different.

The Recipe:  Lamb with Tzatziki Sauce
Original Recipe Found In:  Eat This, Not That No-Diet Diet

What You'll Need:
1 Cucumber; peeled, halved, and seeded
1 Cup plain Greek Yogurt
Juice of 1 Lemon (about three tablespoons)
2 Tablespoons Olive Oil
2 Cloves Garlic, finely minced
2 Teaspoons fresh Dill
4 loin or shoulder Lamb Chops (about four ounces each)

To start, preheat a grill to medium-high temperature.  Once the grill begins to warm, make the Tzatziki sauce:  using a cheese grater, grate the cucumber halves into small pieces.  Once the cucumber is grated, wring out the excess liquid from the cucumber.  This can be done by squeezing the cucumber to the inside of the bowl and pouring the excess liquid into a sink.  Keep wringing out the cucumber until it is barely moist.  Next, in a medium mixing bowl, combine the cucumber, yogurt, lemon juice, one tablespoon of olive oil, garlic, dill, and a pinch of salt and pepper.  Mix all these ingredients until well combined, then set aside.


By the time the sauce is made, the grill will be ready to use.  On a clean plate, rub the remaining tablespoon of olive oil on the lamb chops and season with salt and pepper.  Once seasoned, lay the chops on the grill; cook them on five to six minutes on each side.  Using a meat thermometer, insert into the thickest part of the chop.  Once it reads 135 degrees, they are medium to well done.  Place the lamb chops on a serving plate, serve with the Tzatziki sauce, and enjoy!

The End Result:


Now, admittedly, not everyone is a fan of lamb.  I wasn't a fan until about ten years ago until I had my first gyro, and I had my reservations when someone told me that I was eating meat from a cute and fuzzy animal.  But I think grilling the lamb chops, like they were a piece of steak or a pork chop, would help those who are nervous about trying lamb.  The coat of olive oil, seasoned with salt and pepper, doesn't particularly enhance anything about the meat, but it gives an even playing field for the way its prepared.  The true winner of this dish is definitely the Tzatziki sauce.  There is something so incredibly fresh about this sauce and how well it pairs with lamb that cannot be missed.  You would think that one ingredient would stand out amongst the others, but everything works so well together that it's not hard to miss.  If you haven't tried lamb, I would recommend that this be the recipe to start enjoying this great grilled meat.

We didn't forget our dessert recipe!  It might have been a week, but we will showcase this fantastic dish.  Until then,

~Cheers!

Wednesday, June 5, 2013

Baked Beans Take Center Stage

Good evening everyone! Tonight we're taking a look at the unsung heroes of the grilling season - the side dishes. From veggies, to fruit to the classic beans, side dishes can really enhance the final meal. Traditional banked beans are sort of a ho-hum affair, but the recipe we're trying tonight puts a unique spin on the classic side. These aren't your father's baked beans.

The Recipe: Tuscan Stovetop Baked Beans
Original Recipe Found In: Food Network Magazine June 2013 Issue

What You'll Need
(Serves 8)

1/2 Pound Thick Cut Pancetta (Diced)
1 Medium Onion (Diced)
1 Stalk Celery (Diced)
1 Large Carrot (Diced)
1 Teaspoon Italian Seasoning
1/2 Teaspoon Red Pepper Flakes
4 Cloves Garlic (Minced)
3/4 Cup Dry White Wine
4 x 15 Ounce Cans Great Northern Beans (Drained, Rinsed)
15 Ounces Canned Crushed Tomatoes
2 Cups Low Sodium Chicken Broth
1 Tablespoon Fresh Lemon juice
1/2 Cup Shaved Parmesan Cheese


Begin by placing a large dutch oven over medium high heat and add the pancetta. Cook, stirring occasionally until the pancetta is crisp and lightly browned. Remove the pancetta with a slotted spoon and transfer the pieces to a plated lined with a paper towel. Leaving the grease in the dutch oven, add the carrot, onion and celery along with the italian seasoning and the red pepper flakes.


Cook, stirring occasionally until the vegetables have softened - this takes about 8 to 10 minutes. Next, add a dash of salt and pepper and the garlic and cook for 30 seconds to 1 minute. Add the white wine and deglaze the pan, working off any browned on bits from the bottom of the dutch oven. Allow the mixture to simmer until it reduces by half, then add the beans, tomatoes and chicken broth. Stir well and allow the mixture to simmer for 20 minutes. After 20 minutes, stir in the lemon juice and return the pancetta to the dutch oven.

Transfer the mixture to a serving dish and top with the parmesan cheese - serve and enjoy!

The Results:


Baked beans are a staple of summertime cookouts - but the traditional canned variety can be a bit bland and underwhelming. This recipe is essentially pork and beans, but kicked up to a whole new level of flavor. The pancetta adds a great, salty "bacon-like" flavor to the beans which are not as heavy as their canned cousins due to the chicken broth / white wine base. Paired with a good burger or pork chop - these beans will really shine.

That's all we have for you this evening, but be sure to stop back each night this week as we'll be featuring a brand new mini-recipe (plus Maggie has a full fledged recipe of her own). Until tomorrow,

~Cheers