Thursday, March 27, 2014

"Leftover" Pot Pie

Good evening everyone! One of my favorite aspects of cooking is the opportunity to be creative. As you cook more frequently at home, you begin to get more comfortable with the simple concepts behind cooking - thereby allowing you to take even bigger and bolder steps in making creative recipes. Even now, when we use a recipe, it acts as mostly a guideline or a jumping off point to create our own dish.

Where I'm most content, however, is creating a recipe from scratch. Even better is when I can turn elements from previous dishes (I.E. leftovers) into a brand new dish. That was the plan this week. As I was surveying our freezer and pantry, I saw the elements of a new recipe beginning to take shape. Chicken in the freezer, frozen veggies, leftover rice, shredded mozzarella - and I was pretty sure there was some puff pastry in the freezer too. It wasn't long before I had tonight's recipe designed in my head - a chicken turnover of sorts - golden, flaky crust with a chicken/veggie/rice filling. Perfect!

That is, until I set out to actually make the recipe this evening. I pulled everything from the freezer only to find that my puff pastry wasn't puff pastry at all. It was pie crust. Given my goal of making a puffy, flaky filled turnover, pie crust wouldn't do at all. So, what's left to do? Scrap the dish? Postpone until you have puff pastry?

Nope. You simply adapt. Okay, I have pie crust so instead of a turnover, I'll make a form of pot pie.

The creative wheels get rolling again and you adapt on the fly - but the larger lesson here is simple. Never let one ingredient stand in the way of your creative. Adapt and learn something new instead.

Let's get cooking!


The Recipe: Miniature Chicken Pot Pies
This is an Out of the Culinary original recipe

What You'll Need:

2 Chicken Breasts (Boneless, Skinless)
1 Cup Mixed Frozen Vegetables
1 Cup Cooked Rice (Wild rice)
3/4 Cup Vegetable Broth
1 Sheet Frozen Pie Crust
Lemon Juice

Remember, this recipe was constructed of things we had leftover from other recipes, so feel free to adapt as needed. So long as you follow the basic premise (chicken + veggies+ grain/pasta) you'll be okay.


Preheat your oven to the temperature instructed on the pie crust packaging (likely 450 degrees).

While the oven preheats, you can begin to prepare  the dough. The easiest way to make a pot pie "lid" that fits your ramekin perfectly is to simply spread the dough on your counter, flip the ramekin upside down and press it into the dough. The indentation should allow the dough to easily "pop" free of the sheet and the circle will be perfectly sized to fit atop the ramekin.

After preparing lids for all of your ramekins, combine the extra dough into a ball and roll it out once more (You're likely to have lots of odds and ends leftover from the dough, combining it and re-rolling is the best way to get a consistent sheet to use once again). Cut out a circle roughly 25% larger than the lid you made before. Place this into a lightly greased ramekin and press it along the sides and bottom of the dish until you've formed an inner "bowl" that covers all of the sides and bottom.

Once dough has been worked into all of your ramekins, place them on a rimmed baking sheet and into the oven for 10 to 15 minutes, or until the dough turns golden brown. While the ramekins bake, you can begin to prepare the filling.

Begin by placing  a large skillet or dutch oven over medium high heat. Add a splash of vegetable oil and bring it to a shimmer before adding the chicken breast to the pan. Cook for 5 minutes on each side, or until the breast is cooked through. Remove the breasts and slice them into 1/4 to 1/2 inch pieces.

Return the chicken pieces to the skillet. Add in the rice, vegetables, lemon juice (just a splash) and vegetable broth and bring the mixture to a simmer. Reduce the heat and allow the pot to simmer until the vegetables have cooked through. By the time this happens, your ramekins should be ready to pull from the oven.

Carefully spoon the mixture into each ramekin (remember, they've been in a 450 degree oven and are therefore very HOT) Once all of your ramekins are filled take the lids you made earlier and place them atop the mixture. Most ramekins have a sunken inner lip, just a shot distance inside the dish - carefully press the dough lid down, atop the lid to create a seal. (Again, remember that they're hot - press the dough delicately)

Finally, use a paring knife to slice two slits in the top of each ramekin lid before returning the ramekins to the rimmed baking sheet and placing them in the oven for an additional 10 to 15 minutes, or until the lid turns a golden brown color. Once the dough has reached the golden hue you're looking for, simply serve and enjoy!

The Results:


For a bunch of stuff just sitting in our fridge, this turned into one delectable dish. The rice, lemon juice and veggies all blended beautifully around the moist chicken and the pie crust worked wonderfully as a crispy, crunchy vessel to deliver all of the flavors. All in all, one tasty dish!

That's all we have for you this week. Maggie is fighting off the last grasps of a cold and won't be taking to the kitchen until he's healthy. We're back next week with more culinary adventures. Until then,

~Cheers


Tuesday, March 25, 2014

Quick Hit: Lemon Herb Chicken

Good evening everyone! As the weather turns warmer (I swear, it will get warmer eventually…) we tend to find ourselves grilling out more frequently. After enjoying an afternoon outdoors or simply working on projects around the house, the phrase “Let’s throw something on the grill” becomes to the go-to when dinner time rolls around. The problem is, while grilling is quick and relatively easy, the recipe options surrounding it can be rather simple and limited – due in large part to the off the cuff nature of grilling (you decide to grill 20 minutes before dinner – for example). That’s why it’s handy to have a few “Go-to” recipes on standby. A simple marinade or side dish can truly transform grilled chicken / steaks / veggies into a fulfilling recipe.

Tonight’s recipe fits that description to the letter. It’s easy to throw together, is low on required prep time and includes ingredients you’re likely to have in your pantry already. Oh, and it’s quite delicious too (which really is the entire point, after all).

The Recipe: Lemon Herb Chicken
Original Recipe Inspired by: ‘Lemon Grilled Chicken’ – The Best of Food Network Cookbook

What You’ll Need:
2-4 Boneless, Skinless Chicken Breasts
2 Garlic Cloves (Minced)
2 Lemons (Juiced)
2 Cups Fresh Parsley, Thyme, Oregano (A blending of all or one of them)
½ Teaspoon Red Pepper Flakes
½ Teaspoon Onion Powder

If you look at your spice rack, you may find that you have a seasoning called “Chicken Seasoning” this rather innocuous sounding spice could make your life even easier for this recipe. Most chicken seasonings are composed of parley, thyme, sage, red pepper flakes, garlic seasoning – and a few other proprietary spices (depending on the brand) as you can see, those are all things required in our recipe. Long story short – if you have chicken seasoning on hand, simply substitute the last three items above with 2 tablespoons of the dried spice.

To begin, add the juice from the lemons into a large zip top bag. Add the chicken breasts to the bag along with the minced garlic, herbs, red pepper flakes and onion powder (Or the chicken seasoning, if you have it). Seal the bag and give it a few good “tosses” until the seasoning and lemon juice are well blended and the chicken is evenly coated in the marinade. Place the sealed bag in your refrigerator for at least an hour (up to 4 hours) before grilling.

To prepare the chicken, simply set your grill to 300 degrees and cook the breast for 5 to 7 minutes per side, or until the internal temperature reaches 165 degrees. Serve with a side of your choice and enjoy the fresh lemon, herb flavor of a well prepared (and grill seared) chicken breast.


Friday, March 21, 2014

Not So Typical Lasagna

Good evening everyone!  Growing up, one of my favorite recipes was my mom's lasagna.  The layers of red, meat sauce, cheese, and pasta was the perfect trifecta of deliciousness.  Unfortunately, after having several portions, the pasta had expanded and I was stuffed!  Since I moved on my own, I've always wanted to create a lasagna dish that would be equally as tasty.  But, since Tyler can't handle red sauce that well, it almost seemed like lasagna dreams were out of reach.  Until I found this recipe and needless to say, we were not disappointed.

The Recipe:  Creamy Artichoke & Asparagus Lasagna
Original Recipe Found In:  Cooking Light, April 2014 Issue

What You'll Need:
1 Tablespoon Olive Oil
2 Cups thinly sliced Leek (about 2 large)
1 Pound Asparagus, trimmed and cut into 1-inch pieces
2 Teaspoons minced Garlic
2 Teaspoons chopped fresh Thyme
7 Ounces frozen Artichokes, thawed and coarsely chopped (about 2 cups)
1 1/2 cups 1% Low-Fat Milk, divided
3 Tablespoons All-Purpose Flour
1 Cup organic Vegetable Broth
1/2 Teaspoon kosher Salt
1/2 Teaspoon Black Pepper
1/8 Teaspoon ground Nutmeg
4 Ounces part-skim shredded Mozzarella Cheese (about 1 cup)
2 Ounces grated Parmesan Cheese (about 1/2 cup)
6 no-boil Lasagna noodles

To start, heat a large nonstick skillet over medium heat.  Add oil to the pan and swirl once the oil has heated.  Add the leek and cook for three minutes, or just until softened and stirring occasionally.  Next, add the asparagus and cook for an additional three minutes, just until the asparagus begins to turn a bright green.  Stir in the garlic and thyme and cook until fragrant, about one minute.  Add the artichokes, stir to combine, and remove from heat.


In a medium saucepan, combine 1/2 cup milk and flour and stir until smooth with a whisk.  Stir in the remaining one cup of milk and broth.  Put the saucepan on the stovetop and heat over medium heat.  Bring to a simmer, stirring frequently to prevent the milk from overheating and the flour to stick on the bottom of the saucepan.  Simmer the milk mixture for one minute or until just thickened. Add the salt, pepper, and nutmeg and remove the saucepan from the heat.  Add the cheeses in a small bowl and toss to combine.

Next, preheat an oven to 375 degrees and begin to construct the lasagna.  In an 8x8 inch glass baking dish, spray the bottom with cooking spray and coat with a 1/2 cup of the milk mixture.  On top of the milk mixture, add two lasagna noodles.


On top of the lasagna noodles, top with one-third of the vegetable mixture and spread to evenly coat.


On top of the vegetable mixture, spoon one third of the remaining milk mixture and one-third of the cheese mixture.


Repeat the lasagna noodle, vegetable mixture, milk mixture, and cheese mixture twice, ending with cheese.  Place the baking dish in the oven and cook for 30 minutes, until the lasagna has heated through and  cheese is melted and has just begun to brown.  Once cooked, let stand for five minutes, serve, and enjoy!

The End Result:


In a word, this lasagna was heavenly.  The asparagus, leek, and artichokes added a real heartiness to this dish that can definitely be a stand in for any sort of meat.  The milk/flour sauce wasn't too heavy and was a good binder for the noodles and vegetables.  There was enough cheese in this dish to satisfy this cheese fanatic.  Overall, it was a great tasting dish - not to mention 276 calories per serving!  It's the perfect alternative for any traditional lasagna!

Thanks for joining us this week.  Check back on Sunday as Tyler presents another Sunday Special recipe.  Until then,

~Cheers!

Sunday, March 16, 2014

Sunday Special: Steak & Potato Hash

Hello everyone! We've got a super simple recipe lined up for this week's Sunday Special. Just because it's simple to prepare, that doesn't mean it isn't full of amazing flavor. This recipe piggy-backs off of our hickory smoked steak and potato wedge recipe from earlier this week. However, if you have any form of leftover steak and potato side, it can be easily adapted towards this dish as well.

The Recipe: Steak & Potato Hash

What You'll Need:

Leftover Steak (Like our hickory smoked steak from Thursday)
Russet Potatoes (Cooked, cubed - leftover potato wedges work well)
Eggs (Quantity varies on the number of mouths you have to feed)


To begin, cube your steak and potatoes into equal size (1/4 to 1/2 inch) pieces, as pictured:


Place a large (12 inch) non stick skillet over medium high heat. Once the skillet becomes hot, add the steak and potatoes to the skillet and bring them up to temperature. Remember, you don't really need to cook the ingredients, since they were cooked previously - instead, we're just bringing them up to temperature - so keep stirring and lower the heat if you start to see excessive browning. 

While you're bringing the steak and potatoes up to heat, beat 4-6 eggs (depending how many you're feeding) with a splash of milk until everything is well combined. Add this mixture to a second large (12 inch skillet) over medium heat. Allow the mixture to simmer until bubbles begin to form before working up the mixture vigorously with a rubber spatula. Keep the mixture moving until the eggs have set up and are nicely scrambled. 

Once the eggs are ready, add them to the skillet with the steak and potatoes, giving everything one last good stir before serving. If you're feeling extra adventurous, you can top the mixture with some of the salsa from this week's recipe as well. Enjoy! 


Thursday, March 13, 2014

Hip-hip-hoo-hickory!

Good evening everyone! We were graced with one 24 hour taste of spring earlier this week and I decided to take advantage of it. With the temperature reaching a pleasant 70 degrees, it was time to roll the grill out from the corner of the porch, clean it up and get the fire roaring once again. This will be a theme for much of the spring in summer here on the blog. We’ve got a feature lined up that we’ll be running all summer long that will focus exclusively on grilling…but that’s an announcement for another day.

Tonight, let’s focus on a pair of new recipes with a few new cooking methods tossed in as well.

The Recipe: California Barbeque Tri-Tip Steak
Original Recipe From: America’s Test Kitchen – Cook’s Country

What You’ll Need:
2 Pounds Tri-Tip Roast*
6 Garlic Cloves (Minced)
2 Tablespoons Olive Oil
2 Cups Wood Chips (We used hickory)
1 Teaspoon Pepper
¾ Teaspoon Salt
¾ Teaspoon Garlic Salt

*If you cannot find tri-tip roast, bottom round roast works as a substitute. (We used bottom round for our version of this dish). Just be sure to trim most of the fat from the bottom round, which can have a decently thick fat cap on the side / bottom of the roast.

This steak traditionally pairs with a fresh salsa called “Santa Maria Salsa”

What You’ll Need:
2 Pounds Ripe Tomatoes (Cored, chopped)
2 Teaspoons Salt
2 Jalapeno Chiles (Chopped)
1 Small Red Onion (Diced fine)
¼ Cup Fresh Lime Juice (2 Limes)
¼ Cup Fresh Cilantro (Roughly chopped)
¼ Teaspoon Dried Oregano
¼ Teaspoon Worcestershire Sauce

Finally, we’re pairing out steaks with a side of potato wedges. We were initially inspired by a recipe found in the same Cook’s Country cookbook but eventually changed it to the point where it became an original creation.

The Recipe: Fried Potato Wedges

What You’ll Need:
3-4 Medium Russet Potatoes
3 Cups Peanut Oil
Garlic Salt (To taste)
Onion Powder (To taste)
Cayenne Pepper (To taste)

To make these wedges, you’ll need to have a candy thermometer or a long probe thermometer like the one pictured below. Since we’ll be frying in oil, you’ll need to be able to tell the exact temperature of the oil before and during cooking. We just bought the product in the photo and will have a review for it in the coming weeks (after putting it through its paces).


An "action" shot of the thermometer 


Advance Prep:
You can prepare the salsa up to 24 hours ahead of time if needed, so I found it was easier to start here and then move on to the rest of the dishes. To prepare the salsa: add the chopped tomatoes to a strainer or colander and place over a bowl or in your sink (make sure your sink cannot be easily stained by tomato juices if you’re using this method). Season the tomatoes with the salt and allow them to rest for 30 minutes. The salt will pull most of the moisture from the tomatoes and allow it to drain into the bowl or sink. The salsa we’re making is a thicker variety and excess moisture would only serve to make things messy. Don’t skip this step!

Once the tomatoes have most of the moisture worked out of them, add them to a large bowl with the remaining ingredients and stir well to incorporate. Store in the refrigerator until you’re ready to serve. Allow the salsa to rest at room temperature for one hour prior to serving.

Now, let’s turn our attention to the steak. In a small bowl, combine the olive oil and minced garlic until it forms a thick paste. Using a fork, pierce each side of the steak roughly 20 times (so there is an even distribution of holes across the steak). If your steak has a side taller than 1 inch (bottom round roasts typically will) pierce the side a few times with a fork as well. Next, spread the garlic paste on the steak, making sure to cover all the surfaces evenly. Wrap the steak tightly in plastic wrap and store it in the refrigerator for at least an hour or up to 24 hours. (The longer, the better).

The Main Event:

How well do you multitask in the kitchen? Be honest. If you don’t do so well keeping an eye on two things at once, you’ll want to break the potato wedges and the steak into two separate undertakings. I can easily monitor multiple things while cooking, so I tackled both items at once. Maggie doesn’t do so well when two things need her attention, so she would opt to prepare this recipe differently. There’s no wrong way to approach it – but given what we’re working with here (frying oil and a steak on a grill) I thought it was good to have an honest assessment step here. Think about it, come up with a result and tackle these next two dishes as you feel most comfortable – I don’t want any emails about house fires or overdone steak.

In reality, it’s not hard prepare these dishes separately. If you’d rather cook the wedges, then cook the steak, simply preheat your oven to 200 degree and set a rimmed baking sheet aside. As you finish your wedges, simply add them to the baking sheet, then place the sheet in the oven. The oven will keep the wedges hot and crispy without further cooking them. (In fact, it’s not a bad idea to have the oven on 200 even if you’re multitasking – you’ll likely have to cook the wedges in batches and the oven will help keep the completed batches warm).

To prepare the wedges, slice your potatoes in half (lengthwise) and then cut each half into wedges. The thickness is entirely up to your preference. Just remember, a thicker wedge takes longer to fry. Meanwhile, heat the peanut oil over high heat. Set your thermometer to alert you when the temperature hits 340 degrees. (If your thermometer doesn’t have that feature – find one that does.)

Once the oil is at 340 degrees, carefully add a handful of wedges to the pot (don’t overcrowd the pot or it will slow the cooking process). Allow the wedges to fry in the oil for 5 to 10 minutes or until they turn a deep golden brown. Use a slotted spoon to remove the wedges and place them on your baking sheet. Season them with a blend of the garlic salt, onion powder and cayenne pepper before moving the baking sheet to the oven to keep warm.
Now we're frying 

Repeat this process until all of your wedges have been cooked. It’s important to keep your thermometer in the oil so you can monitor the temperature. As you add wedges, the oil’s temperature will drop. The further below 340 it falls, the longer it will take for them to cook. Conversely, if you don’t monitor the temperature and the heat on the stovetop, you could heat the oil beyond the smoke point of peanut oil (450 degrees) and cause a whole mess of problems in the kitchen. In short – keep the thermometer in the pot, you’ll need it.

You can store your wedges in a 200 degree oven to keep them warm until your steak is prepared. If you’re multitasking, the last batch of wedges should be done right as the steak is ready to serve.

Finally, let’s move our attention to the main event – the steak. Place the hickory chips in a bowl of water and allow them to soak for at least 15 minutes. Next, drain the excess water and place the wood chips into a foil pouch. Slice a few holes in the top of the pouch to allow the smoke to escape. Finally, carefully lay the pouch across the heating element in your grill (below the grates) and then light the grill. Prepare your grill by brining it to 500 degrees and cleaning the grates. Once it reaches 500 degrees, lower the temperature to 300.

Remove the steak from the refrigerator and carefully wipe away the excess garlic paste. Lightly season both sides of the steak with salt, pepper and garlic salt before placing it on the grill, directly above the foil packet with the wood chips. Close the lid and allow the steak to sear for 5 minutes before flipping the steak and searing the other side. Once both sides have established a nice crust, turn off the burners directly below your steak (If you’re using charcoal, you’ll need to employ the two zone cooking method) while leaving on the burners on the other side.

Now, here’s the hard part – especially if you like to meddle with your meats while they’re on the grill. Walk away. Just close the lid and walk away. Allow the steak to cook via the indirect heat of the second burner for 10 minutes before flipping it and allowing another 10 minutes of cooking.

After the steak has been on the grill for 20 minutes, use an instant read thermometer to check the thickest part of the steak. You’re looking for 130 degrees, which is medium rare. After 20 minutes, you should be either very close or right at 130 degrees. If you prefer your steak to be a little more done, add 10 minutes to the cooking time, which should yield a medium doneness and a temperature of 140 degrees.
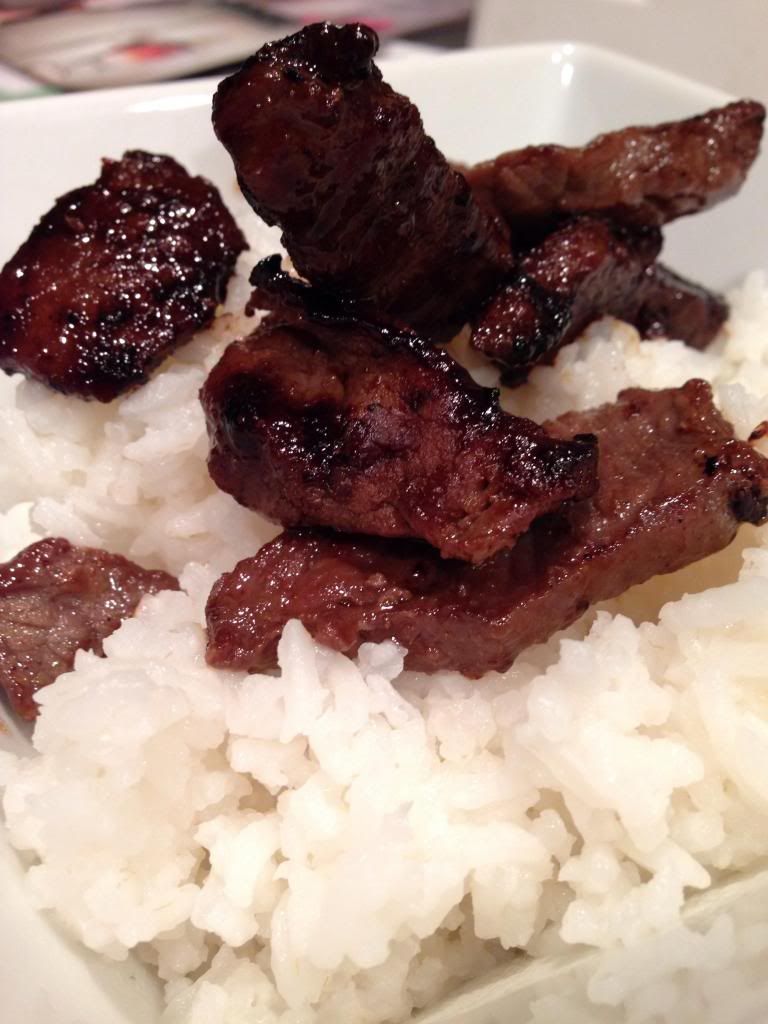
Gorgeous 

Remove the steak from the grill and transfer it to a cutting board. Tent the steak with aluminum foil and allow it to rest for 10 minutes prior to slicing. (This allows the juices to return to the center of the meat, rather than run all over your cutting board). Slice the steak thin and serve with salsa on the side (don’t forget about the potatoes wedges!) Enjoy!

The Results:

This was my first time smoking any meat on our grill and it certainly won’t be the last.
Oh.
My.
Goodness.
The hickory smoke added an amazing layer of depth and flavor to the steak. The flavor penetrated into every bite and made the steak simply succulent. You don’t even need the salsa (or a steak sauce) – which is a shame because the salsa is very good in its own right. But when the steak is this flavorful, it doesn’t make any sense to burry the flavor.
The potato wedges were the perfect blend of crispy, yet soft in the center. You’re certainly free to use any seasoning on the wedges you’d like, but the blending of garlic salt, onion powder and cayenne pepper is a good place to start. These delightful little wedges complimented the steak beautifully. With our new probe thermometer, it was exceptionally easy to fry these beauties up.

Admittedly, this recipe tips the scales a little higher on the calorie front (750) than we typically like – but so long as you’re using fresh ingredients and not making up big feasts like this every night of the week, you’re perfectly fine treating yourself every now and again.

The bonus to this recipe is that you’ll likely have leftovers if you’re cooking for two. We’ll have a post this weekend showing you a creative way to use them for a whole new recipe. (Look for that on Sunday).

That’s all we have for you this evening, stop on by Sunday for another edition of our "Sunday special". Until then, 

~Cheers

Wednesday, March 12, 2014

Pasta...The Ultimate Medium

Good evening everyone!  There is just something about spring and the feeling of fresh and new that inspires so many during this changing of the seasons.  I would include myself in this category: the strong majority of snow has melted and temperatures are finally above freezing.  Keeping that in mind, creating a fresh and clean dish was my main motive for this week's recipe and it definitely did not disappoint!

The Recipe:  Chicken, Bacon, and Asparagus Pasta Bake
Original Recipe Found In:  Quick Cook Pasta

What You'll Need:
2 Teaspoons Olive Oil
2 boneless, skinless Chicken Breasts
4 Bacon slices
11 Ounces uncooked Penne
5 Ounces Asparagus spears, trimmed and thickly sliced
2/3 Cup Sour Cream
6 Tablespoons Milk
1/4 Cup grated Parmesan Cheese, plus extra for topping

To start, preheat a oven to high broil.  While the oven heats up, place the chicken breasts on a clean plate and rub the olive oil over the breasts and season well with salt and pepper.  Place the chicken on a broil safe pan and place in the oven, cooking seven minutes or until golden brown.  Take the pan out of the oven and flip the chicken over and add the bacon slices.  Cook for another five minutes until the bacon is crispy and the internal temperature of the chicken has reached 165 degrees.  Cool the chicken and bacon slightly and chop into bite-size pieces.

Meanwhile, heat a large sauce pot of water to a boil.  Once at a boil, add the uncooked penne, and cook to al dente, according to package directions.  Add the asparagus three minutes before the pasta is to be done cooking and cook until tender.  Drain the penne and asparagus well and return to the pan.

In a small bowl, mix the sour cream and milk together, then stir into the pasta.  Add the chicken, bacon, and Parmesan cheese until well combined and season with salt and pepper.

Spoon the pasta mixture into a large, oven proof dish and sprinkle with Parmesan cheese.  Place the dish in the oven and cook in a 200 degree oven for five minutes or until the cheese has melted and is heated through.  Serve and enjoy!

The End Result:


This dish was inspired by spring flavors and it showed!  The asparagus was cooked perfectly and enhanced the pasta by those last three minutes of cooking the two together.  I ended up shredding the pieces of chicken and it mixed so well together with the sauce and the pasta, it's hard to even tell there is chicken in the dish!  The sauce wasn't too heavy, yet didn't overpower the dish, which made it even better.  The bacon is definitely a nice addition also, with a bit of a salty bite and nice crunch that this recipe needed.  Overall, a great light pasta dish, that is suitable for any night of the week!

That's all we have for you this evening.  Check back tomorrow as Tyler hits the grill for the first time this year and has one heck of a delicious dish to present to you.  Until then,

~Cheers!

Sunday, March 9, 2014

Sunday Special: Hamburger Gravy & Mashed Potatoes

Good afternoon everyone! If you're anything like us, your weekends at home can turn out some great "spur of the moment" recipes. We call up old favorites, get creative with new ideas or simply make some good old fashioned homestyle dishes. Our Saturday nights or Sunday afternoons have turned out some great culinary adventures over the past few years and I thought it was about time we started sharing some of them.

So, we're introducing a new feature to the blog to run on a fairly regular basis (at least a couple weekends a month) that we're calling "Sunday Specials". The concept is simple, we'll share a quick, creative or otherwise new recipe that we normally wouldn't feature during the week. It's weekend cooking perfect for taking it easy and feeding the whole family (or just yourself a few times over).


The Recipe: Hamburger Gravy & Mashed Potatoes
This is an Out of the Culinary original recipe

What You'll Need:

1 Pound Ground Beef (80/20)
1 Small White Onion (Chopped)
1 Cup Frozen Corn
1 Cup Frozen Peas
2 Cups Beef Broth (Low sodium)
4 Tablespoons Flour
3-4 Medium Russet Potatoes (Peeled, boiled, mashed)


Hamburger gravy is a weekend cooking staple. It's easy to throw together, goes with just about any starch you have on hand and is easily adaptable to a number of seasonings and spices, meaning it can please even the pickiest pallets. The issue we had is that standard hamburger gravy recipes are "white sauce" heavy (I.E. they include heavy cream or milk). Being less than lactose inclined - I set out to change the dish without losing the concept - thus the inclusion of beef broth.

Begin by browning the hamburger in a large non stick skillet. Drain the excess fat and return the hamburger to the skillet over medium high heat. Add the onion and cook for 3 to 5 minutes, or until it becomes translucent. Add the frozen peas and corn to the skillet and cook for an additional 3 to 5 minutes or until the veggies have softened.


Next, slowly stir in the beef broth and then cover. Bring the mixture to a simmer and allow it to cook (covered) for roughly 5 minutes. The veggies should now be cooked completely through. Finally, slowly stir in one tablespoon of flour, stirring constantly to incorporate it evenly in the mixture. Continue adding flour until your mixture becomes thick and gravy like. The amount of flour you'll need will vary depending on how much liquid was in your skillet and how thick you like your gravy.

Before serving, give the gravy a taste. Season with salt and pepper as you prefer. You can also add a little bit something more if you'd like. I added a few shakes of onion powder, just to make the gravy "pop" a little more. The only limitation to seasoning is your imagination - try out different combinations and see what you like best.

Serve over mashed potatoes (or biscuits, bread - etc.) and enjoy!


Thursday, March 6, 2014

Asian-Styled Beef, Anyone?

Good evening everyone!  Over the last couple of weeks, we went really heavy into Mexican dishes, and by no fault of our own.  Sometimes, we just get in a rut and not really notice it until we've overwhelmed ourselves.  Tonight, I'm going to try a first for the blog, even though it's Asian related, it's definitely something different and out of our cooking realm.

The Recipe:  Korean-Style Beef and Rice Bowl
Original Recipe Found In:  America's Test Kitchen Simple Weeknight Favorites

What You'll Need:
3 Cups Water
1 1/2 Cups short-grain White Rice
3 Tablespoons Soy Sauce
1 Tablespoon packed Brown Sugar
1 Pound Sirloin Steak tips, trimmed and sliced thin
1/4 Cup Vegetable Oil
8 Ounces Shiitake Mushrooms, stemmed and sliced thin*
10 Ounces Baby Spinach*
4 Large Eggs*

To start, fill a large saucepan with the water, rice, and one teaspoon of salt, and heat over medium-high heat.  Bring the ingredients to a boil.  Once at a boil, cook until the water level drops to below the surface of the rice, about five minutes.  After this, reduce the heat to low, cover, and cook the rice until the water has absorbed, about 15 minutes.

Meanwhile, in a large bowl, whisk two tablespoons of soy sauce and the brown sugar together.  Add the slices of steak and toss to coat.  Let the steak pieces marinate while heating a large, nonstick skillet over medium-high heat. Add two tablespoons of oil until it just begins to smoke.  Add the steak pieces and cook each side is well browned, about two minutes per side.  Transfer to a clean plate and loosely tent with aluminum foil.

*This next section is part of the original recipe.  I omitted it, but feel free to let your culinary explorer out.

Next, add one tablespoon of oil, the mushrooms, and one tablespoon of soy sauce to the empty skillet and cook until the mushrooms are soft, about three minutes.  Add the spinach and continue to cook until the spinach has wilted, about two to three minutes.  Once cooked, transfer the spinach and mushroom combination to a clean bowl and loosely tent with aluminum foil.

Wipe out the skillet and heat the remaining tablespoon of oil over medium heat.  Into two bowls, crack two eggs.  Add eggs to the skillet, pouring each bowl on opposite sides of the skillet.  Season the eggs with salt and pepper, then cover to cook until the whites are just set, about two to three minutes.  

Place a ladle full of rice in four bowls and top with the beef and the mushroom/spinach combination. Top with a cooked egg, serve, and enjoy!

The End Result:


The beef was seasoned perfectly.  Who knew the combination of soy sauce and brown sugar would create such a delightful tasting marinate!  If it looks like there isn't enough marinate, trust me, it's just enough to coat and soak in the meat.  My rice came out a little sticky and that helped to stick to the beef.  I was a little bummed, because I should have included the part I omitted.  I needed that extra "sauce" just so the beef and rice didn't become too dry.  If I wanted a sauce, I could have added a cup of beef broth to the skillet once the beef was done cooking and reduced the liquid a bit.  This would have helped the rice be not so dry and add moisture to the beef.  But overall, it was a delicious dish, that's not so ordinary!

Thanks for joining us this week.  We'll continue to highlight dishes and bring you what's cooking in our kitchen next week.  Until then,

~Cheers!

Wednesday, March 5, 2014

Crispy & Crunchy!

Good evening everyone! There's a popular recipe known as 40 garlic chicken (or chicken with 40 garlic cloves) that I'd wager you can find in nearly every mainstream cookbook available. First - yes, there are actually 40 garlic cloves in the recipe and second - no, we're not trying that dish tonight (although it is on my list of "must tries"). Rather, tonight we're borrowing the idea behind 40 garlic chicken (I.E. that chicken and garlic get along wonderfully) and adapting it to another favorite - "you can't go wrong with breading" to create tonight's recipe.

The Recipe: Crispy Garlic Chicken Cutlets
Original Recipe Found In: America's Test Kitchen: Cooks Country

What You'll Need:

6 Chicken Cutlets (Trimmed of excess fat)
1 Cup Plus 3 Tablespoons Vegetable Oil
4 Garlic Cloves (Minced), 6 Garlic Cloves (Smashed)
3 Slices Sandwich Bread (Processed into breadcrumbs)
1 Cup All Purpose Flour
2 Large Egg Whites
1 Tablespoon Garlic Powder
2 Teaspoons Cornstarch

Begin by preheating your oven to 200 degrees.

Use a food processor to pulse your bread into coarse crumbs. Pour the breadcrumbs onto a rimmed baking sheet and set aside.

In a ziplock baggy, combine 3 tablespoons vegetable oil, the four minced garlic cloves and your chicken cutlets. Seal the bag and store it in your refrigerator for 30 minutes (it's good to start here, that way they'll be ready to go once the other steps have been completed).

Place the rimmed baking sheet into the 200 degree oven and allow the breadcrumbs to cook until golden brown and crispy. This takes about 20 minutes.

Next, add the flour to a shallow dish or plate. Whisk the egg whites until they become lightly foamy, then add them onto a second shallow dish. Finally, in a third shallow dish, combine the breadcrumbs you prepared in the first step with the garlic powder and cornstarch. Line these dishes up (assembly line style) flour - egg whites - breadcrumbs.


Remove your cutlets from their baggy and season with salt and pepper (remove any large clumps of garlic hanging on the cutlets - we want the flavor, but not THAT much flavor). Next, carefully dredge a cutlet through the flour, allowing excess flour to fall off (a light shake works well here) before dipping the cutlet into the egg whites. Allow any excess to drip off before rolling the cutlet in the bread crumb mixture. Once the cutlet is evenly coated in a thick layer of breadcrumbs, set it on a wire drying rack and repeat until all cutlets are coated.

Next, heat the remaining vegetable oil and the 6 smashed garlic cloves in a large non stick skillet over medium high heat. Cook the garlic until it turns a light brown color. Discard the garlic and add the cutlets to the skillet. Cook for 2 to 3 minutes per side, or until the breading is crispy and the chicken is cooked through. (You may need to cook the cutlets in two batches, if so, store the cooked cutlets in a 200 degree oven until ready to serve).


Once all of your cutlets are crispy and golden, all that's left is to serve and enjoy!

The Results:


Despite there being over 10 cloves of garlic and a tablespoon of garlic powder - the garlic is rather subtle in this recipe. The breading is delightfully crispy and crunchy and compliments the chicken beautifully. This recipe could be improved with a pan side or even a dipping sauce - perhaps a light mustard or even a garlic infused oil. On it's own, this recipe is perfectly delectable - but with a few more tweaks, I think it could be something spectacular. We'll have to revisit this one in the future and try out these tweaks ourselves.

That's all we have for you this evening. Maggie takes to the kitchen tomorrow night to debut a brand new recipe. Until then,

~Cheers