Sunday, December 21, 2014

World's Greatest Chili

Hello again everyone! For years, I've had a love / hate relationship with chili. When done correctly, traditional chili is a beautiful blend of rich meaty flavors that simply cannot be matched by any other stew. However, it's been difficult for me to find a chili recipe that does "it" correctly. My stomach tends to be overly sensitive to tomato sauce - it's too acidic and sends me on a one way trip to massive heartburn town. The compromise - it seems - is to laden the chili with other additives and when it comes to chili that means beans. Now, I'm not opposed to the occasional beans in my chili, but too many turns the batch into a fibrous chewy...disaster.

So, the trick was finding a recipe that didn't go overboard on the tomato base, that ALSO didn't compromise the structural integrity of the dish (I.E. let's keep the beans to a limited number...or out all together).

As with most kitchen conundrums, Alton Brown came to the rescue. His recipe is based on the traditional old west style of chili - the stuff the cowboys made out on the range. While his original recipe uses a pressure cooker (to replicate the days in a dutch oven in half the time) you can also use a slow cooker to reach the same result (which is what we did). So, how does Alton Brown solve my chili challenge? Let's get cooking and find out!

Original Recipe From: Alton Brown (Good Eats: The Big Chili)
The Recipe: Pressure Cooker Chili

What You'll Need:

2 Pounds Beef Stew Meat
1 Pound Ground Pork
16 Ounces Salsa (Medium or spicy)
1 Tablespoon Tomato Paste
1 Adobo Chile (Diced fine - from the canned variety)
1 Teaspoon Adobo Chile Sauce (From the can)
30 Tortilla Chips (Crushed)
1 Teaspoon Chili Powder
1 Bottle Beer (Preferably an Ale)


First and foremost - yes, this is not your traditional ingredient list for chili - and that's not a bad thing. Secondly, YES, this done turn into amazing chili. Stick with me, it's worth it.

Begin by browning all of the meat in a large dutch oven (work in batches to avoid overcrowding) use peanut oil in the dutch oven to aid in the browning process. Transfer the browned meat into a large slow cooker. If you have any browned on or stuck bits in the bottom of your dutch oven, use a bit of the beer to deglaze the pan (pour a bit of beer into the dutch oven over medium heat and give it a gentle stir - that should work everything right up).

Add this bit of beer (and the rest of the bottle) over the meat in the slow cooker along with the chili powder, salsa adobo chile (and sauce) and finally about half of the crushed tortilla chips. Give the mixture a good stir and then cover the slow cooker and set it on low for 8 hours.

After 8 hours, evaluate your chili. Odds are, it'll need a bit more "thickening" - that's where the rest of the tortilla chips come in. Stir them in and then serve immediately.

The Results:

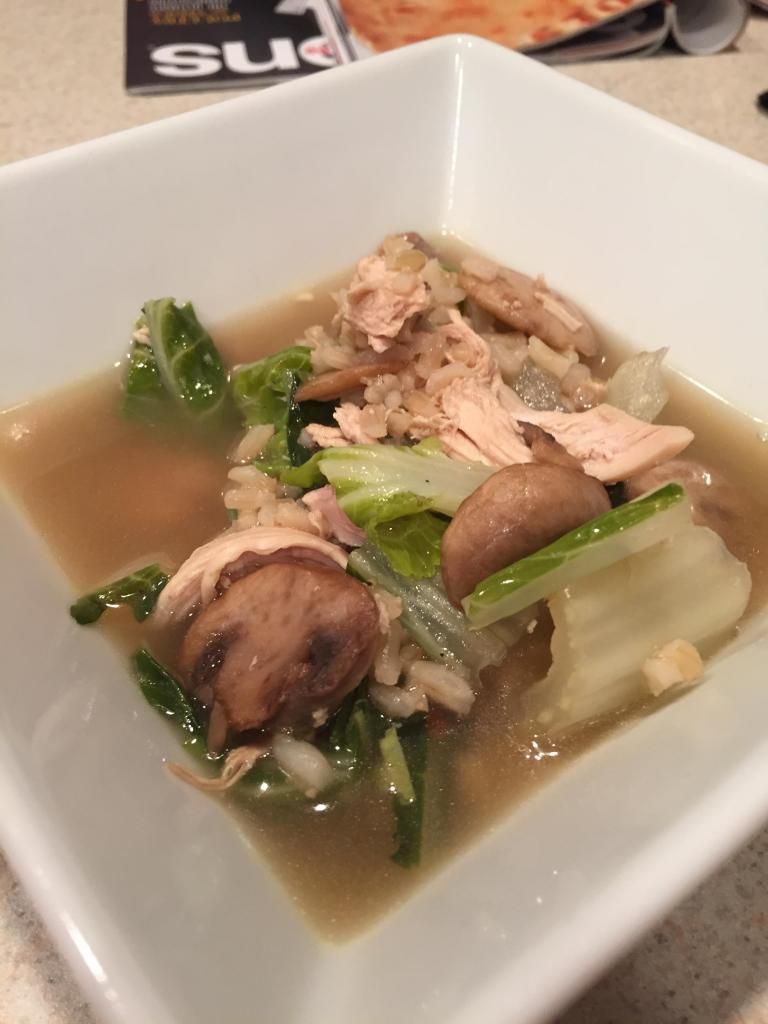
Doesn't matter how you position it - there's no way to make chili photogenic 


This is the most wonderful, flavorful and meaty chili dishes I've ever had. The tomato sauce problem is eased by using a salsa base - it doesn't really change the flavor, but the versatility of salsa means it can take long slow heat without falling apart and since good salsa is typically made with fresh tomatoes - not the canned "metal like" tomatoes that so many tomato sauces or tomato juices are made with the flavor is cleaner and much better overall. The tortilla chips serve a wonderful purpose as well - they act as a thickening agent without overwhelming the dish with other flavors or making it overly chewy (looking at you - beans) and since most of them cook away and break during the 8 hour slow cook - you won't even know they're there.

That's all we have for you this week. We're "closed" for Christmas - but we'll be back next Sunday with a brand new weekend dish. Until then, Happy Holidays and as always,

~Cheers

Wednesday, December 17, 2014

Broccoli Pesto Pasta: Better for your Pallet!

Good evening everyone!  As Tyler mentioned previously, we are transitioning to a new way of posting recipes.  We are still focusing on delicious and healthy recipes, and we also want to showcase weeknight dishes that are a snap to make, without too much hassle.  Tonight's recipe is a great example of that.  While most pasta recipes focus too much on the sauce it's doused in, this dish showcases a brilliant, yet healthy alternative to the norm.  And it's speedy recipe to whip up in a flash.

The Recipe:  Broccoli and Pecorino Pesto Pasta
Original Recipe Found In:  Cooking Light, September 2014 Issue

What You'll Need:
8 Ounces uncooked Whole-Wheat Angel Hair Pasta
1 (12 Ounce) package microwave-in-bag fresh Broccoli Florets
1/4 Cup fresh Basil Leaves
3 Tablespoons Extra-Virgin Olive Oil
1 Tablespoon grated fresh Lemon Rind
3 Tablespoons fresh Lemon Juice
1/4 Teaspoon Kosher Salt
1/4 Teaspoon crushed Red Pepper Flakes
2 Garlic Cloves
1 Ounce Pecorino Romano Cheese, grated (about 1/4 cup)

To start, prepare a medium saucepan, filled with water, over medium-high heat.  Bring the water to a boil and add the pasta.  Cook according to package directions, omitting any salt or oil.  In a sink, place a heatproof bowl over a colander.  Drain the pasta in a colander, reserving one cup of cooking liquid.

While the pasta is cooking, cook the broccoli according to package directions.  Once cooked, allow five minutes to cool the broccoli.  Prepare a food processor and add the broccoli, basil leaves, olive oil, lemon rind, lemon juice, salt, red pepper flakes, garlic cloves, and Pecorino Romano cheese into the processor.  Pulse all the ingredients together until the broccoli and basil leaves are finely chopped.

Keeping the processor on, slowly add the reserved one cup of cooking liquid through the chute, until the sauce has reached desired consistency.  In a large bowl, add the pasta, along with the broccoli mixture and toss to combine.  Place onto a serving dish, serve, and enjoy!

The End Result:


Like it's basic pesto predecessor, it keeps all the same flavors like before.  Adding the broccoli not only thickens the sauce, but makes it boosts its nutritional quantity.  If you didn't know you were eating broccoli, you'd be incredibly surprised to find it in this dish.  I'm all for dressing down overly complicated recipes.  If you are big fan of pesto (like myself,) you will not be disappointed with this dish!

That all we have for you this evening.  Check back frequently for brand new recipes to share with you and yours!  Until then,

~Cheers!

Sunday, December 14, 2014

Smooth and Savory Potato Soup

Good evening everyone! As Christmas approaches, and the cool weather takes hold of the country - we've officially moved into soup season! One of my all time favorite soups is potato soup - a fact that can be easily discerned by looking over the archives of the blog. We've tried just about every variant we could get our hands on, from rustic to bacon infused - it's all been sampled (and savored!) So, it's rare when we find a new potato soup recipe that we HAVEN'T tried before.

Today is one of those rare days.

Today's dish blends yukon gold potatoes with the ever versatile leek to create a smooth and savory dish that's sure to hit the spot as the snow flies and the windows frost over.


The Recipe: Creamy Potato Leek Soup

Original Recipe From: Good Eats: "Sprung a leek"


What You'll Need:

1 Pound Leeks (Roughly 3 large leeks) Cleaned, dark green sections removed, diced
1 Pound yukon gold potatoes (roughy 4 medium), diced
3 Tablespoon Unsalted Butter
1 Cup Heavy Cream
1 Quart Vegetable Broth
Heavy Pinch Kosher Salt
Fresh Chives


Place a large dutch oven over medium high heat and melt the butter. Once melted, add the diced leeks and cook, stirring occasionally, until the leeks are cooked through and softened - this takes about 25 minutes.

Next, add the potatoes and vegetable broth to the dutch oven and bring the mixture to a boil. Once the pot reaches a nice, rolling boil, reduce the heat to medium low and cover the pot. Allow the mixture to cook for 45 minutes (stir once halfway through).

Remove the pot from the heat and use an immersion or stick blender to blend the mixture until smooth. As the last lumps are being blended from the soup, slowly pour the heavy cream into the pot (while continuing to blend).

Finally, taste the soup and adjust with salt and pepper as necessary - serve with the fresh chives and enjoy!

The Results:


This smooth, savory soup is simple yet delicious. It's impressive how deep and flavorful this dish is despite only having two main ingredients. The potatoes act as a nice neutral backdrop for the leeks to shine, blending nicely with the heavy cream and chives to make this soup a personal favorite.

That's all we have for you this evening. We're making a bit of a change to the way we're posting updates to the blog. Maggie and I have each moved into new jobs, and the resulting new employment has changed our posting abilities. So, to amend this, we've picked up a new format. We still plan on posting two new recipes per week - but now Maggie will focus on weeknight cooking, posting her dishes sometime during the workweek. I'll shift to weekends and focus more on weekend cooking - soups, stews, roast - more ambitious projects - my posts will be up on Sunday evenings.

Nothing more than that is changing - we're still cooking - we're still sharing the recipes with you - it's just the timing that'll be different. Get it? Got it? Good!

Stop back in next week for a brand new dish from Maggie. Until then,

~Cheers


Thursday, December 4, 2014

A Curious Case for Citrusy Chicken

Good evening everyone!  On my continuing series of soup/stew recipes, I came across this Asian inspired dish.  While it has more of a broth base, the ingredient in the broth make it delightfully more cozy and delicious.

The Recipe:  Chicken and Rice Soup with Lemon and Ginger
Original Recipe Found In:  Cooking Light, November 2014 Issue

What You'll Need:
1 Tablespoon Olive Oil
1/2 Cup chopped Onion
1 1/2 Tablespoons finely minced fresh Ginger
1 Tablespoon White Miso
1 (8 Ounce package) pre sliced Cremini Mushrooms
4 1/2 Cups unsalted Chicken Stock
1 1/2 Cups shredded skinless rotisserie Chicken Breast
3 Cups chopped Bok Choy
1 (8.5 Ounce) pouch precooked Brown Rice
1 Tablespoon lower-sodium Soy Sauce
1/2 Teaspoon Kosher Salt
1/2 Teaspoon Black Pepper
1 Tablespoon grated Lemon Rind
2 Tablespoons fresh Lemon Juice

To start, heat a large Dutch oven over medium high heat and add the oil.  Once the oil has heated and been swirled around the cooking vessel, add the onion, ginger, and miso.  Saute for four minutes or until the onion has just begun to soften.  Next, add the mushrooms and cook for two minutes, or until they've taken on a bit of color.  Add the chicken stock, rotisserie chicken, and bok choy and stir to incorporate.  Bring the ingredients to a boil and once bubbling, reduce the heat to medium-low and simmer for eight to ten minutes.

While the soup simmers, prepare the pouched rice according to package directions.  After the soup has simmered, add the rice, soy sauce, salt and pepper into the soup and cook for four minutes or until the bok choy has become tender.  Remove the Dutch oven from the heat and stir in the lemon rind and juice.  Ladle into soup bowls, serve, and enjoy!

The End Result:


This recipe has a very distinct hint of citrus flavor, from the ginger and lemon.  While it's not completely overpowering, it's pronounced enough to note it, but it certainly does not take away from the flavor of the dish.  The chicken and the rice make the soup almost a homey feel, which I would have never gotten from putting rice in the soup.  The bok choy definitely makes its presence known.  It's almost a bitter green, without going into the realm of kale.  Adding it to the soup is a welcome addition, but the key is to cooking it until it becomes tender.  It might throw off the whole soup otherwise.  Overall, a great soup to add if you're looking to switch up your tradition Chicken Noodle Soup recipe.