Wednesday, February 25, 2015

Carrots...Who Knew?

Good evening everyone!  Tonight, I introduce a new chef to our kitchen.  No, we're not adding another writer to the blog.  I'm talking about another influence to our cooking abilities.  Chef Geoffrey Zakarian might not be a household name, but if you are a fan of Food Network (especially the show Chopped,) the name you'll immediately recognize.  His old-school, traditional recipes definitely add a bit of style to the modern kitchen, but he has some true talent that cannot be overshadowed.  Tonight, I'll be showcasing one of those dishes and it will not disappoint!

The Recipe:  Roasted Carrots with Provencal Breadcrumb Crust
Original Recipe Found In:  Geoffrey Zakarian's My Perfect Pantry

What You'll Need:

2 Pounds Baby Carrots with tops, trimmed to leave a small tip of green at the top
1/4 Cup Extra-Virgin Olive Oil
2 Cups unseasoned Bread Crumbs
2 small Shallots, finely chopped
1/2 Cup chopped fresh Basil
1/2 Cup chopped Scallions, white and green parts
2 Garlic cloves, finely chopped
1/4 Cup freshly grated Parmigiano-Reggiano cheese

To start, preheat an oven to 375 degrees.  In a large pot, fill with water and bring to a boil over high heat.  Add the carrots to the boiling water and cook until just tender, about four minutes.  Drain the carrots in a colander and place in a ice bath.  Bring the carrots out of the ice bath and onto paper towels to pat dry.  In a large glass or ceramic baking dish, arrange the carrots in a single layer and drizzle with some olive oil.  Season with salt and pepper.

Next, in a large mixing bowl, add the bread crumbs, shallots, basil, parsley, scallions, and garlic and throughly combine.  Season with salt and pepper.  Drizzle the mixture with olive oil and toss well with a fork to combine.

Sprinkle the bread crumb mixture over the carrots, so that that carrots are completely covered.  Sprinkle the cheese and drizzle with a bit more olive oil.  Place the baking dish in the oven and roast until the carrots are browned and the crumbs are crisp and golden, between 20 to 25 minutes.  Serve and enjoy!

The End Result:


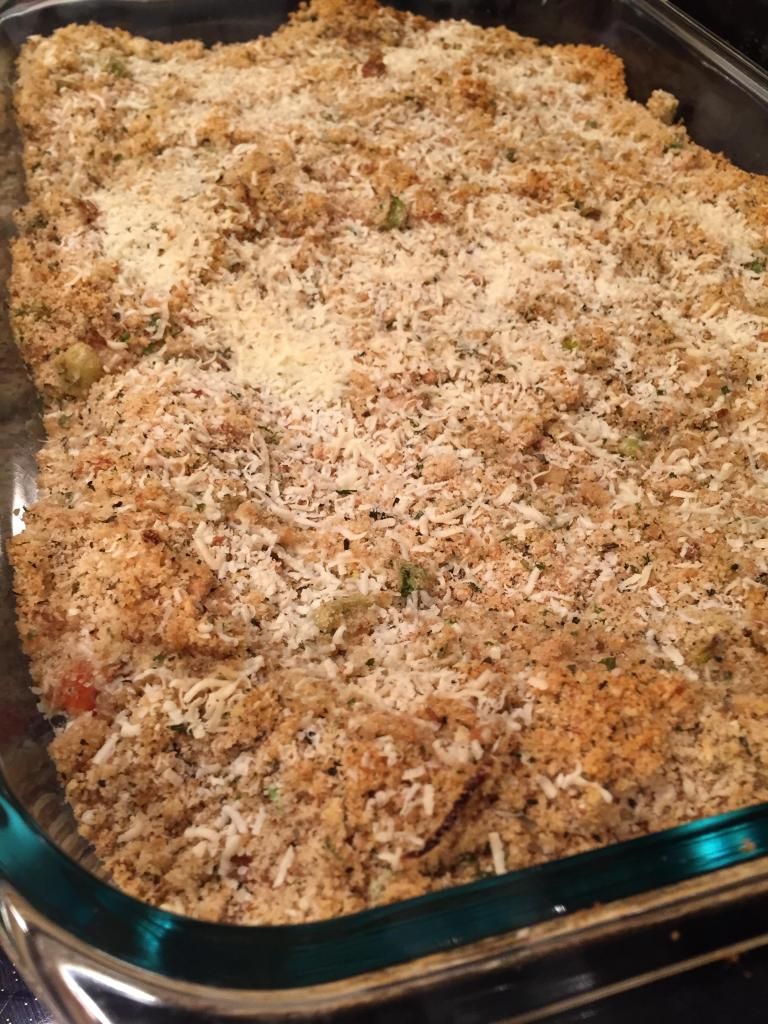
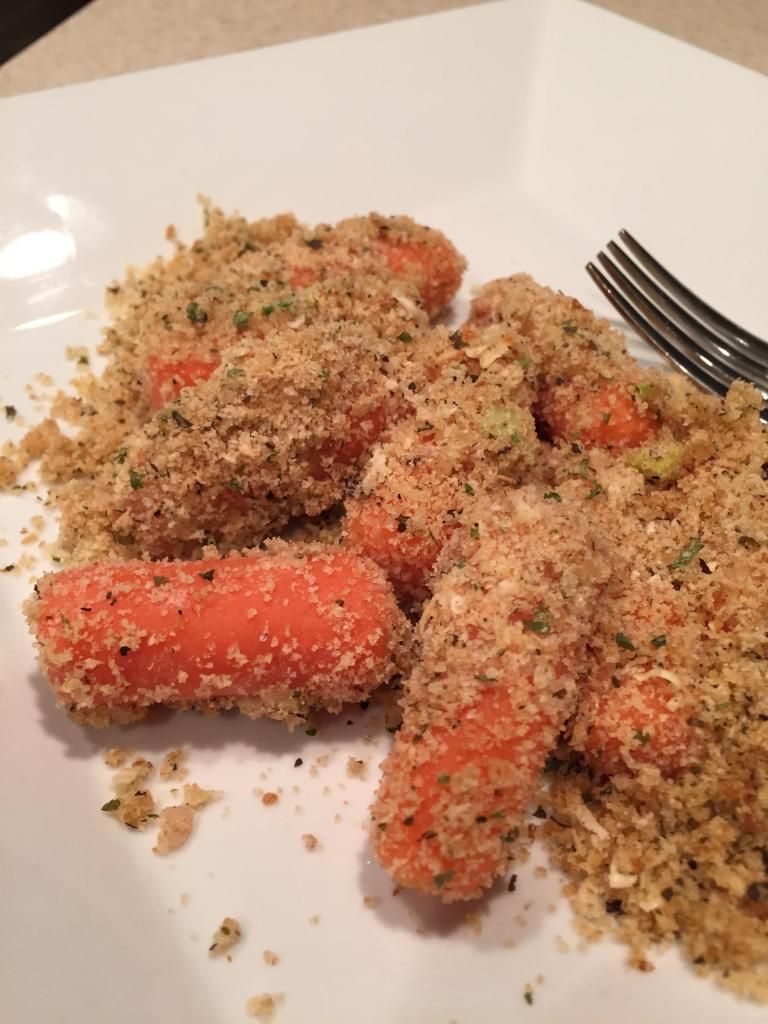
Even though this recipe could call itself a "side dish", there's no dish that could call itself the main course over these carrots!  Once the carrots are nice and tender, the bread crumb topping just melts into the carrots.  There's a host of flavors that have added themselves nicely to this dish and makes it quite delectable.  While this does take a bit more time than my usual week night meals, it well definitely be worth it and you're eating healthy too!

Keep checking back for recipes that are sure to entice and get your mouth watering!  Until then,

~Cheers!

Sunday, February 22, 2015

Chickpea & Spiced Pita Soup

Hello again everyone! While the calendar may be creeping toward spring, the reality is, winter still has a vicious hold upon most of the region. While that is bad news for most things (the air HURTS YOUR FACE! Why do we live in a region where the air hurts you face?!) it does mean that soup season is still very much in place - which is always a welcome thing.

So, let's take full advantage of soup season by cooking up a healthy, filling and most importantly - warm - soup.

The Recipe: Chickpea Soup With Spiced Pita Chips
Original Recipe From: Food Network Magazine - January 2015 Issue

What You'll Need:

1/4 Cup Extra-Virgin Olive Oil
2 Stalks Celery (Chopped)
2 Carrots (Chopped)
1 Large Onion (Chopped)
2 x 15 Ounce Can Chickpeas (Drained, rinsed)
1 x 15 Ounce Can Diced Fire Roasted Tomatoes with Green Chiles
1 Tablespoon Cumin
1 1/2 Teaspoons Ground Coriander
2 Pocketless Pitas (In a pinch, pita pockets work as well)
Juice of 1/2 a lemon

Preheat your oven to 325.

Heat 2 tablespoons of olive oil in a large dutch oven over medium high heat. Once the oil begins to shimmer, add the onion, celery and carrots along with a pinch of salt and pepper. Cook, stirring occasionally, until the veggies have softened.

Next, add 6 cups of water, the chickpeas, tomatoes, 2 teaspoons cumin, 1 teaspoon coriander and 1/2 teaspoon of salt. Cook, stirring occasionally until the mixture has thickened (this takes roughly 20 minutes). After 20 minutes, mash the chickpeas with the back of a large spoon - you don't have to mash them all or evenly completely mash them - just look to "break" them down a bit.

Meanwhile, slice your pita bread into wedges and toss them with the remaining 2 tablespoons of olive oil, 1 teaspoon of cumin, 1/2 teaspoon coriander and 1/2 teaspoon salt. Spread the wedges in a single layer on a rimmed baking sheet. Bake until the wedges are golden brown and crispy (roughly 8 to 10 minutes).

Just before serving, stir in the lemon juice and top with the pita chips. Enjoy!

The Results:


This recipe is a perfect example of a symbiotic culinary relationship. On its own, the soup is a bit bland, with lackluster texture - while on their own, the pita chips are a bit pungent and a little intense - together, however, the two make a beautifully balanced soup that finds great harmony in both flavor and texture. In short, this is a tasty soup that keeps the calorie count low. Just don't skip the pita chips - you'll be sorry!

Wednesday, February 18, 2015

Steak, Onion, and Pepper - A Classy Dinner Move

Good evening everyone!  It's nice to add a bit of decadence to the standard evening meal.  There are numerous options when this is the case.  Nothing says it more than steak.  While the meat itself is pretty bland, the possibilities of how you serve it and what you serve it with is what defines it.  Tonight, I'll be creating a delicious steak, served with some veggie options that are out of the norm.

The Recipe:  Strip Steak with Onions and Poblanos
Original Recipe Found In:  Cooking Light, November 2014 Issue

What You'll Need:
2 (10 Ounce) New York Strip Steaks, trimmed
3/8 Teaspoon Smoked Paprika
1 1/2 Tablespoons Sesame Oil, divided
1 (12 Ounce) Yellow Onion, cut into 12 wedges
2 Poblano Peppers, seeded and cut into 1/2-inch strips
4 Lime Wedges

To start, heat a large, cast-iron skillet over medium-high heat.  On a clean plate, position the steaks.  Sprinkle the steaks evenly with the paprika, salt, and freshly ground black pepper.  Add 1 1/2 teaspoons of oil to the pan and swirl to coat.  Carefully place the steaks to the pan and cook for four minutes on each side, or until desired degree on doneness.  Once cooked, remove the steaks from the pan on a cutting board, cover with aluminum foil, and let stand for ten minutes.

Meanwhile, add the remaining tablespoon of oil to the pan swirl to coat once more.  Add the onion wedges and cook for two minutes on each side.  Make room in the pan and add the poblanos.  Saute the ingredients for four minutes, stirring occasionally.  Remove the skillet from the heat, cover, and let stand for five minutes.  Season with salt and pepper.  


Prepare a clean platter and arrange the onion mixture on top.  Remove the foil from the steak and cut the steak across the grain into thin slices.  Arrange the steak over the onion mixture and sprinkle with salt.  Serve with lime wedges and enjoy!

The End Results:


While the onions look a bit charred, trust me, it only adds more complexity to the dish.  The steak is cooked perfectly, while resting it gives it more juice that would be lost if it was cut into right after cooking.  The poblanos lost most of their heat while deseeding and cooking, which ended up being a a great pepper add in.  The lime juice (we used bottled) spritzed on the meat and veggies added a bright note to the ingredients.  Overall, a great, simple, and a hint of class dinner option that will leave you hungry for more.

That's all we have for you this week.  Continue to check back with great options to try in your kitchen.  Until then,

~Cheers!

Sunday, February 8, 2015

Brilliant Blueberry Cakes

Hello again everyone! We've all been told countless times, "Breakfast is the most important meal of the day" - doctors, dietitians and anyone associated with keeping you healthy and happy have long repeated that mantra. The issue that many folks have is typically twofold - first "lack of time" and secondly "lack of options". In short, we're all in a hurry in the morning and the options set out for express breakfast are either poor in quality or not filling enough to last you all morning.

So, what are we, the at home chef, to do?

In short, address the week ahead on the weekend. Yes, with a bit of time investment on Sunday afternoon, you can prepare a week's worth of delicious breakfast treats that are not only satisfyingly tasty - they're also nutritious and filling. Sounds pretty good right? Then let's get cooking!

The Recipe: Blueberry-Oatmeal Cakes
Original Recipe From: Eatingwell.com

What You'll Need:

2 1/2 Cups Old Fashion Rolled Oats
1 1/2 Cups Low Fat Milk
1 Large Egg (Beaten)
1/3 Cup Pure Maple Syrup
2 Tablespoons Canola Oil
1 Teaspoon Vanilla Extract
1 Teaspoon Ground Cinnamon
1 Teaspoon Baking Powder
1/4 Teaspoon Salt
3/4 Cup Blueberries (Fresh or frozen)

Combine the oats and milk in a large bowl. Cover and place in the refrigerator for 8 to 12 hours.

After the initial soak, set your oven to 375 degrees and coat a 12 cup non-stick muffin tin with non-stick spray (yes, you'll need non-stick spray for non-stick pan - experience has shown that non-stick pans are not exactly non-stick...avoid a mess, use some spray!)

Next, stir in the egg, maple syrup, vanilla, cinnamon, baking powder and salt into the soaked oats. Mix until well combined. Portion the mixture into 1/4 cup increments, into each muffin cup. Top each cup with 1 to 2 tablespoons of blueberries and pop the muffins into the oven for 25 to 30 minutes, or until the muffins are springy to the touch.

Allow the muffins to cool for 10 to 15 minutes before eating. Best of all, these muffins can be stored in the refrigerator (tightly wrapped) for a week or frozen for 3 months.

Yes, these muffins can be frozen, which makes this recipe ideal for "make ahead" planning. You see, you can cook up a big batch of these muffins - pop the extras in the freezer and then simply microwave them for 30 seconds to 1 minute come weekday morning and - ta da! One delicious, filling and healthy breakfast.

The best part is, these little morsels are quite tasty (especially if you're a fan of blueberries!)


Wednesday, February 4, 2015

Stuffed with Spaghetti Squash?

Good evening everyone!  It is no secret that I love Mexican food.  I'm quite keen to the burritos and enchiladas of the world.  But most Mexican dishes are pretty calorie ridden and it's tough to find recipes that keep the flavor and loose the bulk.  Tonight, I'm sharing a pretty tasty Mexican recipe that won't break the calorie bank and will definitely be a fan favorite at your house.

The Recipe:  Chicken Enchilada Stuffed Spaghetti Squash
Original Recipe Adapted From:  www.pinterest.com

What You'll Need:
1 Large Spaghetti Squash, cut in half and seeded
1 Tablespoon Oil
1/2 Pound Boneless, Skinless Chicken Breast, cooked and shredded
2 Cups Enchilada Sauce
1/2 Cup Black Beans
1/2 Cup Corn
1/4 Cup Cilantro, torn (optional)
1/2 Cup shredded Sharp Cheddar Cheese
1/2 Cup shredded Monterey Jack Cheese

To start, prepare the spaghetti squash.  Preheat an oven to 400 degrees.  Brush in the inner flesh of the spaghetti squash with the oil and season with salt and pepper.  Place the squash on a heavy baking sheet, skin side up, and cook until tender, about 30 minutes.

While the squash is cooking, prepare the "inner" ingredients.  In a medium mixing bowl, combine the chicken, enchilada sauce, beans, corn, and cilantro and mix well.  Once the squash has cooled enough to touch, divide the mixture between the two halves.  Top the squash and ingredients with equal amounts of cheese.  

Place the squash back in the oven and cook until the cheese has began to melt and turn a light golden brown, about three to five minutes.  Place the cooked squash on clean plates, serve, and enjoy!

The End Result:


Using a spaghetti squash makes this a much healthier alternative to the traditional Mexican fare.  The portions are smaller, but yet in equal parts, so it's a good way to eat sensibly.  Also, when you mix all the ingredients (the chicken portion with the spaghetti squash flesh,) it tastes incredible!  I'm a big fan of spaghetti squash already and this is a great recipe to incorporate a healthy take into a favorite type food!

That's all we have for you tonight.  Keep checking back for more delicious ideas to bring into your kitchen.  Until then,

~Cheers!