Friday, May 30, 2014

Yet Another Tasty Taco Recipe

Good evening everyone!  After last week's botched dish, it's tough to find a recipe that would yield delicious results.  I must of thrown caution to the wind, because I fell head first into a recipe that 1) has a lot of spice that could have a lot of heat and 2) lots of time to dedicate to it.  I must have been up for the challenge, because this is one taco recipe you'll definitely want to duplicate!

The Recipe:  Tacos Al Pastor with Grilled Pineapple Salsa
Original Recipe Found On:  www.myrecipes.com

What You'll Need:
Pork:
1 Chipotle Chile, canned in Adobo Sauce
1 Tablespoon Olive Oil
1 (1 Pound) Pork Tenderloin, trimmed
1 Tablespoon chopped fresh Oregano
2 Teaspoons Ancho Chile Powder
1/2 Teaspoon ground Cumin
1/2 Teaspoon Kosher Salt
1/4 Teaspoon Black Pepper

Salsa:
4 (1/2-inch thick) slices fresh (or canned) Pineapple
1/4 Cup fresh Cilanto leaves, roughly chopped
3 Tablespoons thinly sliced Red Onion
3 Tablespoons fresh Lime Juice
1/4 Teaspoon Kosher Salt
1/2 Jalapeño, thinly sliced and deseeded

Remaining Ingredients:
8 (6-inch) Corn Tortillas
8 Lime Wedges

To start, mince the chipotle chile and mix the chile and olive oil in a small bowl.  Place the tenderloin on a clean plate and rub the chile/oil mixture over the pork.  In another small bowl, combine the oregano, ancho chile powder, cumin, salt, and pepper.  Sprinkle the spice mixture over the pork and rub in.  Place the tenderloin in the refrigerator and let stand for 30 minutes.  

Prior to taking the pork out of the fridge, preheat a grill to high heat.  Once the grill is heated, place the pork on the grill grates.  Grill for six to ten minutes on each side, or until a cooking thermometer reads 145 degrees.  Remove the pork from the grill, tent with aluminum foil, and let stand for five minutes.

While the pork rests, place the pineapple slices on the grill grates and grill for five minutes on each side.  Once cooked, roughly chop the pineapple and add to a medium mixing bowl.  Add the cilantro, red onion, lime juice, salt, and jalapeño.  Toss the ingredients to combine.

After the pork has rested, roughly chop the pork.  If desired, warm the tortillas.  Serve two tacos evenly with the pork.  Top each taco with three tablespoons of salsa.  Serve with lime wedges and enjoy!

The End Result:


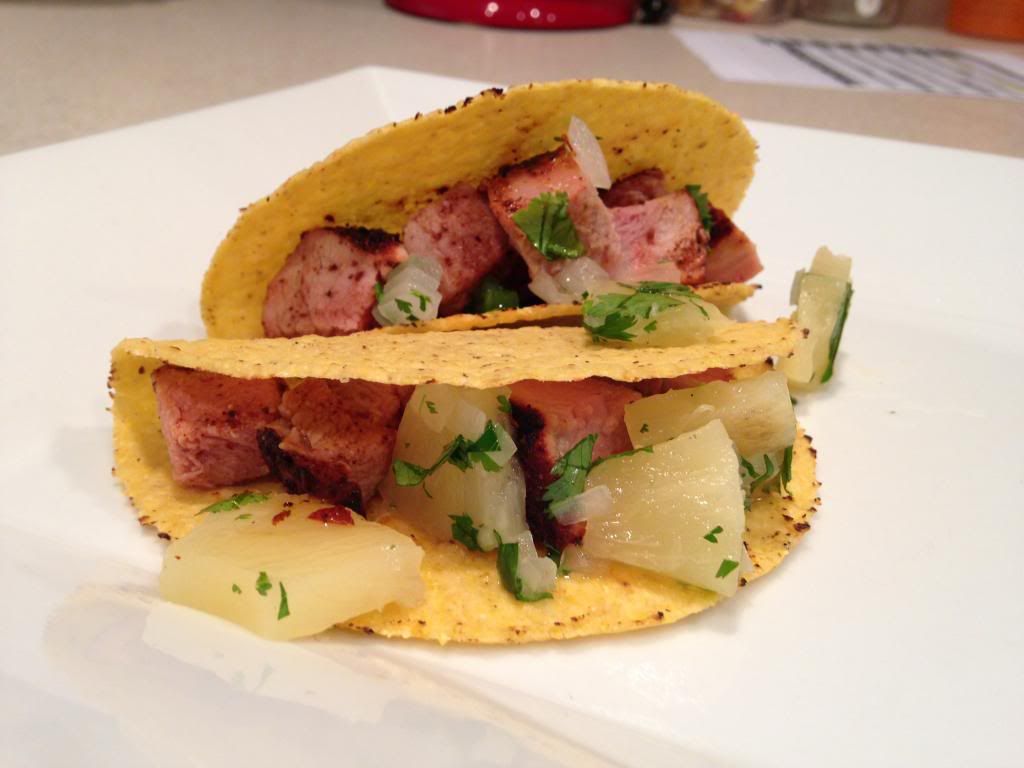
Although, we have created a pork tacos before, this recipe blew that one out of the water.  One difference being that we have a grill to use, that we didn't in the first two years of the blog.  The overwhelming heat, due to the spice content in the recipe, that I thought might occur, didn't happen.  The pork was quite flavorful and juicy, no heat whatsoever.  The spice coating made a nice crust for the pork and was delicious.  The true start of these tacos is the salsa.  The pineapple could have grilled a wee bit longer, but it didn't matter.  Combined with the onion and fresh cilantro, it was a mouthwatering feast.  The lime juice helped to cut out some of the burn from the jalapeño, but I was able to handle it - which surprised even me!  Overall, a recipe definitely worth trying, if you feel adventurous with your taco quests!

Thanks for joining us tonight.  Check back over the weekend for a muffin that will blow your socks off!  Until then,

~Cheers!

Wednesday, May 28, 2014

16 Burgers of Summer: Texas Burger

Good evening everyone! We're continuing on our theme of the summer once again this week with another burger based recipe. With these recipes, I'm looking to try something new - be it new combinations or just interesting toppings, I'm always out looking for something different. Along with that, I'm also actively searching for new ways to cook each dish. For instance, this week's recipe calls for both bacon and sautéed onions. Sure, I COULD complete those items on the stove top - but since we're already using the grill, why not find a way to get everything done with one appliance? The result is a brand new (safe) method for cooking bacon on the grill that I'm eager to share.


The Recipe: Texas Burger (Burger #3 of 16)

What You'll Need:

1 Crackin' Burger Recipe
1 Small white onion (Diced)
2 - 3 Strips Thick Cut Bacon
Pepper Jack Cheese


To begin, place a large sheet of aluminum foil over 1/2 of your grill. Carefully work the foil in between the grates of the grill to accentuate the "gaps" between the grates (you're effectively creating a pooling location between each grate). Make sure you don't puncture a hole into the foil.

Next, take a large sheet of aluminum foil and fold it in half. Then, fold each side in 1 inch and crease, creating a wall (like pictured below).


Once you have four walls, crimp the corners by folding them together (as pictured) to create a short sided box. Place this box on top of the foil covered side of the grill. Preheat your grill to 500 degrees and clean the other grate. Reduce the heat to medium on the foil covered side and medium low on the uncovered side.


Take another sheet of aluminum foil and fold it over itself to form a pouch. Place 1/2 tablespoon of unsalted butter in the pouch, along with the white onion. Crimp to seal the packet shut and place on the uncovered side of the grill (favor the side where the heat is more direct) cook the packet for 10 minutes, making sure to flip halfway through cooking.

Meanwhile, place your bacon strips into the foil box you created earlier. Line them up nicely in a row and allow them to cook for 3 to 5 minutes per side, or until they turn a deep golden brown color. If done correctly, your foil box will hold in all of the grease the bacon leaves behind. If some grease does leak out, the foil on top of the grate should contain it and prevent it from hitting the flame.

I cut our bacon pieces in half so they cooked easier and fit on the burger better

When your onions and bacon are halfway through cooking, place the burgers on the grill and cook to desired doneness. Prior to removing them from the grill, brush them lightly with BBQ sauce and cover with slices of pepperjack cheese. Allow the cheese to melt then serve topped the sautéed onions and with a light spread of mayo on the bun. Enjoy!

The Results:


I'm quite please with my method of cooking bacon on the grill. The bacon turned out crisp and golden brown and there were no flare ups or incidents on the grill. You always avoid any extra cleanup as the foil can be folded up and thrown away.

The burger itself was quite delicious as well. When you find yourself in a "rut" when it comes to traditional burgers, just throw some bacon and BBQ sauce on top and you'll instantly have a brand new (just as delicious) variant to enjoy. That's especially true with this recipe, which is complimented nicely by the onions and the BBQ "glazing" prior to serving. All in all - one tasty burger!

That's all we have for you this evening - Maggie takes to the kitchen tomorrow night with a brand new recipe of her own. Until then,

~Cheers

Thursday, May 22, 2014

A Rare Dud

Good evening everyone!  Over four years of blogging, we've evolved the goal of our blog. We originally set out to show you that healthy cooking was possible for amateur chefs. We then went for a more tutorial approach, providing background on cooking techniques and preparation methods for different dishes. More recently, we've focused on recipe reviews and creation. We cook up our own dishes or try some recipes from well traveled sites and let you know how they stack up. We take them on and make the tweaks so you don't have to. This means we sometimes stumble across great recipes - other times we find recipes with potential that just need a few tweaks. On a rare occasion we find a recipe that is simply...well...bad. Unfortunately, tonight's dish falls into the last category. 

The Recipe:  Spaghetti with Olive Oil, Garlic, and Red Pepper Flakes
Original Recipe Found In:  Michael Symon's Five in Five

What You'll Need:
1 Pound dried Spaghetti
1/4 Cup Olive Oil
5 Garlic cloves, sliced
1 Tablespoon crushed Red Pepper Flakes
1/2 Cup fresh flat-leaf Parsley, chopped
1/2 Cup freshly grated Parmesan Cheese
1 Tablespoon unsalted Butter

To start, mix five quarts of water and three tablespoons of salt in a very large pot.  Bring these ingredients to a boil.  Add the pasta and cook until package directions state al dente.  Once the pasta is done cooking, scoop out a cup of pasta water and drain the remaining water from the pasta.

Next, in a large skillet, add the olive oil and garlic.  Heat this over low heat until the garlic becomes soft and fragrant, about three to five minutes.  Add the red pepper flakes, along with the reserved pasta water, to the garlic and oil mixture.  Bring the heat up on the skillet to a medium heat and heat the ingredients until they are at a simmer, about five minutes.

Meeting of the [flavor] minds...

Add the cooked pasta to the skillet and stir the noodles until they are covered with the sauce.  Remove the skillet from the heat and add the parsley, Parmesan, and butter.  Stir to coat the pasta.  Serve and enjoy!

The End Result:


The final picture looks quite innocent, but prepare yourself.  This is probably one of the hottest dishes we've ever created.  The dish was so hot it was simply inedible. It burned from first bite all the way through the swallow (you could feel it burn going down your throat!) The red pepper flakes were so intense that it overpowered all of the other flavors. This was simply "red pepper flake pasta" and in this case, that isn't a good thing. 

We're not sure if it was simply the quantity of the red pepper flakes or the quality of the flakes we used (we picked up some high quality flakes from Penzey's - it's possible the high quality flakes pack more heat). but the dish was hotter than necessary. 

This recipe deserves a second shot, but the red pepper flakes need to be reduced GREATLY before doing so. (We're talking 1 teaspoon to 1/2 teaspoon - cut it WAY down). As it stands, we simply can't recommend this dish. 

That's all we have for you this week.  Enjoy the long weekend as we salute those who have served our country so we can enjoy the freedoms we have.  Check back next week as we continue our Burger of the Week, serve delicious muffins, and present a brand new recipe.  Until then,

~Cheers!

Wednesday, May 21, 2014

16 Burgers of Summer: Roasted Corn Salsa Burger

Good evening everyone! This week marks entry number 2 in our "16 Burgers of Summer" theme. I'm drawing inspiration for these burgers from everywhere, the largest source being a "50 Burger Idea" insert from Food Network Magazine (a feature run in 2012). The problem with these burger ideas are that they are just that - ideas. In order to cram 50 burgers into a tiny insert, they cut out annoying things like quantity and...instructions. The result is some burger concept with nary a solid guideline to follow. These means flying without a safety net - and being creative. Two things that could throw off some at home chefs. I hope to prove with some of these recipes that even if your execution isn't 100%, you can still turn out a great meal. Tonight's dish is a perfect example of this concept.


The Recipe: Roasted Corn Salsa Burger


What You'll Need:

1 Crackin' Burger Recipe
1 1/2 Cups Frozen Corn
1 Small Red Bell Pepper (Diced)
1 Tablespoon Olive Oil
1 Teaspoon Lemon Juice
2 Tablespoons Mayonnaise
1 Tablespoon Sriracha Sauce


Preheat your grill to 500 degrees, clean the grates then reduce the heat to medium.

Place a small non stick skillet (8 inch) over medium high heat and add the olive oil. Bring the oil to a shimmer before adding the corn. Cook the corn until the kernels begin to soften and become fragrant, roughly 5 minutes. Add in the sliced bell pepper and cook until the peppers have been heated through (3 to 5 minutes). Add a pinch of salt and the lemon juice to the skillet, stir well and remove from heat.

As I noted in the open, the original "recipe" (If you want to be generous and call it that) said little beyond "combine corn and red bell pepper" - so I was left to improvise here. I was originally just going to cook up everything in the skillet, but then I thought, "We're grilling the burgers, why not grill this too?"

Using two sheets of heavy duty aluminum foil, make a pouch to contain the corn mixture. Seal it up well (any gaps or seams and you'll lose all the lemon juice) and place it on the grill directly over the heat. Allow the salsa to cook for the time it takes to cook your burgers (roughly 5 to 7 minutes).

Speaking of the burgers, right before you add them to the grill, give them a light dusting with a pinch of cumin. Then cook them like you would any other burger.

While everything is grilling, combine the mayo and sriracha in a small dish to form chipotle mayo. Spread a thin layer of this mayo on the bottom of a hamburger bun and set aside. You can store the remaining mayo for future recipes.

Once everything is cooked through, assemble the burger and top with a tablespoon of the corn salsa. Serve and enjoy!

The Results:

The chipotle mayo is on the bottom - the pic doesn't show it well but it's there! 


The corn salsa and chipotle mayo compliment well and both are balanced nicely by the juicy burger. That being said, the dish is a bit on the messy side as there's nothing to really "bind" the salsa together. If given the chance to redo this dish, I'd add one more step.

Right after removing the salsa from the grill, stir in 1/2 cup of shredded Mexican or colby jack cheese. Not only will the cheese add another element of flavor to the burger, it will act as a "glue' to keep the salsa together and prevent it from falling all over the plate.

If you attempt this burger at home, I'd highly recommend that little adaptation to this otherwise tasty recipe.

That's all we have for you this evening, We're back Thursday night with another brand new recipe. Until then,

~Cheers


(Oh, by the way, we just recently passed our 4 year anniversary of cooking and blogging at Out of the Culinary...so...Yay!)


Friday, May 16, 2014

16 Burgers of Summer: Chile Verde Burger

Good evening everyone! One of our favorite summertime activities is grilling out. After years of living in an apartment without the luxury of a grill, we've been taking advantage of this handy cooking method for the past year and half, ever since we moved into our house. The realm of grilling, much like standard cooking is only limited to your imagination. There are countless recipes out there that can easily be adapted for the grill and their are variations upon variations of each recipe.

Case in point: the burger. Simple in premise, but the final execution is only limited to your resources on hand. In fact, the world of burgers is so diverse, we're giving it some special attention. Starting this week and running each week through the rest of the summer, we're going to be cooking up a new burger recipe. We may change the meat types, the toppings or twist the concept on its head entirely - but the premise will remain the same. One new burger recipe, each week, until the end of summer. We're calling it "16 Burgers of summer" and it starts right now!


16 Burgers of Summer: Burger #1

Chile Verde Burger:

What You'll Need:

1 Cracking Burger Recipe*
Salsa Verde
Jarred Pimientos
Shredded Mexican Cheese


* Let's get the basics out of the way right off the bat. You can't make a burger without having a standard burger recipe. For us, that is and has always been a variation of Jamie Oliver's Crackin' Burger. Although we've covered it several times on the blog, I'll include the recipe for this framework burger once more - then, in future posts, when I reference "one cracking burger recipe" you'll know that this recipe is what we're referring to. (No, we won't use this base all of the time, but it's probably going to be the most used base for all of these burgers, so it's a good one to familiarize yourself with).

Crackin' Burger:

1 Pound 80/20 or 85/15 Ground Beef
1 Tablespoon Yellow Mustard
1/4 Cup Bread Crumbs
1 Egg (Beaten)

Combine all of the ingredients in a large bowl and separate into four equally sized balls. Work the balls into thin patties. They'll keep for 24 hours in the refrigerator otherwise they can be frozen for future use.

Now that the background information is out of the way - let's get cooking.

Preheat your grill to 500 degrees, then clean the grates. Reduce the heat to medium (300 degrees).

The original version of this recipe called for you to make your own salsa verde and your own sliced, pimientos...yeah, right. Listen, I like cooking as much (maybe even more) than the average individual but I'm not going to toil and make my own salsa verde (with 8 ingredients) and my own pimento mix (with another 5 ingredients) when both of those items are readily available at a super market for a low price. It doesn't make any sense to waste your time for small stuff like that - instead we opted to pick up fresh salsa verde and jarred pimientos (total cost $3 - and there's plenty of leftovers).

Grill your burgers to your desired doneness (I don't think we need to cover how to grill meat, right?) then top with the shredded cheese and allow it to melt. Top with the pimientos and then the salsa verde. Serve and enjoy!

The Results:


This was one tasty burger. I've never had jarred pimientos, but was pleasantly surprised at how well their light heat blended with the salsa verde. It all blended with the mexican cheese and the juicy burger - making up one brilliantly flavorful dish!

That's all we have for you this week. We're back next week with the second edition of our burgers of summer and another brand new recipe. Until then,

~Cheers


Thursday, May 15, 2014

Asian Takeout...In Your Own Home!

Good evening everyone!  Besides Mexican food, one of the my other loves is Chinese/Asian takeout. There are just limitless possibilities that are waiting to be discovered!  Most of the time, there are huge quantities of this food and you are left feeling super stuffed.  Tonight, I present a great tasting Asian-inspired dish that won't make you feel kinda bloated like normal takeout, but will leave you inspired to create your own stir-fry.

The Recipe: Steak and Asparagus Stir-Fry
Original Recipe Found In:   www.myrecipes.com

What You'll Need:
1/4 Cup unsalted Chicken Broth
1 1/2 Tablespoons Oyster Sauce*
1 1/2 Tablespoons lower-sodium Soy Sauce
2 Teaspoons grated peeled fresh Ginger
2 Teaspoons minced Garlic
1 Teaspoons Cornstarch
5 Teaspoons Canola Oil, divided
12 Ounces boneless Sirloin Steak, cut into 1/4-inch strips
12 Ounces medium Asparagus, trimmed and cut into 2-inch pieces
1 medium Red Bell Pepper, cut into strips
1/2 Teaspoon crushed Red Pepper Flakes
3 Green Onions, chopped

*If you don't want to buy an entire bottle of oyster sauce, hoisin sauce is a great substitute in a pinch, without connotations of oysters lingering in your head.

To start, combine the chicken broth, oyster sauce, soy sauce, ginger, garlic, and cornstarch in a small bowl.  Whisk all the ingredients together and set aside.

Next, heat a large skillet over high heat and add one tablespoon of canola oil.  Once the oil has heated, swirl the skillet to coat.  Add the beef and stir fry until browned, but not cooked through, about one and a half to three minutes.  While cooking, just ensure all sides have lost their pink color.  It's okay if some of them are still a touch pink, the slices of beef are thin enough they will cook later.  Once the beef has cooked, place on a clean plate and keep covered.  Discard the beef liquid in the pan.

Return the skillet to high heat and add the remaining two teaspoons of oil, swirl to coat again once the oil has warmed.  Add the asparagus and bell pepper and stir fry the vegetables for two minutes, until the asparagus has become greener and the red bell pepper has hints of browning.  Next, add the crushed red pepper and green onions and stir fry again for 30 seconds to one minute.  Reduce the heat of the pan to a medium-high heat.  Add the stock mixture and cook for three minutes or until the sauce has slightly thickened.  Return the beef and any remaining juices to the pan and cook for one to three minutes, or until all the ingredients have been coated and heated well through.  Serve and enjoy!

The End Result:


This is a great low-calorie (not to mention guilt-free) version of Asian takeout.  Using mostly vegetables, you'll get the flavor from these ingredients, instead of extra additives that might be hidden in normal takeout.  Although, when I added the crushed red pepper to the skillet, there was a waft of strong flavor that took my breath away, so be careful when inhaling at that portion of the recipe!  The steak is super thin definitely adds to an extra protein boost to the dish.  I highly recommend serving this with jasmine rice, because it'll soak that extra sauce and definitely even out any flavors that might be a little too intense.  Overall, a great dish that's suited for anyone willing to take the plunge into cooking Asian at home!

Thanks for joining us tonight.  Tyler joins us tomorrow as he presents a brand new, summer-long special for the blog.  Until then,

~Cheers!

Wednesday, May 14, 2014

Seasoned Steak: Simply Sublime!

Good evening everyone! The butcher at our local grocery store allows the option for certain cuts of meat to be purchased in bulk. Chicken breasts, bratwurst, even steaks can all be bundled into 10 – 12 cuts and sold at a more efficient price. We like to purchase our steak this way for two purposes; first of all it allows us to always have some steak on hand (always a perk, since you never know when you’ll have the urge to grill up a steak after enjoying a weekend outside) and secondly, it cuts down the price per steak significantly.

This reduced price helps when it comes to creativity too. How so? Well, a cheaper steak means you may be willing to take a few more risks than if you had a premium priced steak. Tonight’s recipe, for instance, came into play simply because I had a vast quantity of steak in the freezer – steak that’s cost per unit was no more than ground beef – so I was willing to be a bit bold and try a new seasoning combination. I’m glad I did – and I think you will be too!

The Recipe: Marrakech Grilled Steak & Sweet Potatoes
Original Recipe From: Eatingwell.com

What You’ll Need:
(Serves 2)

8 Ounces Steak (Your choice of cut and quality, although a middle of the road sirloin is probably best)
1 Small Red Onion, Sliced Thin*
1 Medium Sweet Potato, Peeled, Sliced Thin*
½ Teaspoon Ground Allspice
½ Teaspoon Ground Cumin
½ Teaspoon Ground Ginger
½ Teaspoon Kosher Salt
¼ Teaspoon Ground Cinnamon
¼ Teaspoon Ground Coriander
¼ Teaspoon Cayenne Pepper
2 Teaspoons Canola Oil 

* A good rule of thumb I’ve found is when a recipe calls for something to be thinly sliced, move your knife to where you believe “thinly sliced” is, then move the knife over a little more. I found this to be especially true for this dish. We’re cooking the veggies on the grill, and if you want them done in any expeditious manner, you’re best slicing them about as thin as you safely can.
*Preheat your grill to 500 degrees, clean the racks and reduce the temperature to medium high.
Combine all of the spices in a medium bowl, mixing them well. Next, take a pinch of the seasoning and apply it to each side of the steaks evenly. If you’re preparing this dish ahead of time, wrap the steaks in plastic wrap and store in the refrigerator for up to 24 hours. Otherwise, transfer the steaks to a plate and set them aside.

In the same bowl you mixed the spices, add the canola oil (there should still be a good amount of seasoning left). Add in the sweet potatoes and red onion and toss until all of the veggies are coated. (I found using my hand to be the best method).

Next, lay a large sheet of heavy duty aluminum foil on the counter and distribute the veggies evenly in the center. Fold the foil around the veggies to form a pouch, making sure to crease all the seams to prevent leaking. Once sealed, lay another large sheet of aluminum foil on the counter and wrap the veggies a second time. We’re going to be cooking the veggies over high, direct heat. The more layers of foil you add, the less likely you are to burn the veggies during this process. Double layering is your friend!

If your grill has two burners, raise one burner to medium high and place the veggie packet directly over the heat source. (If you only have one burner, place the packet over the hottest part of the grill). Allow the veggies to cook for 5 minutes on each side before adding the steaks to the grill.

Set the second burner to medium and place the steaks on the grill. Cook them for 3 to 5 minutes per side for medium rare, or 5 to 7 minutes per side for medium. As you’re cooking the steaks, be sure to continue flipping the veggie pouch every 3 to 5 minutes as well – that way you’ll prevent burning.

Once the steaks are done, remove them from the grill and allow them to rest for 5 minutes before serving. Use those 5 minutes to finish cooking the vegetables – again, making sure they’re flipped every 2 minutes. Remove the veggies from the grill – CAREFULLY open the packet and serve alongside the steaks. Enjoy!

The Results:


I’m not normally one who likes to heavily season my steak. So, when I initially saw this recipe and it’s multitude of spices, I was a bit cautious. I was worried that the steak would be overpowered by the seasonings and lose out on its great natural flavors. Thankfully, each spice in this recipe is so a reduced quantity that no one spice overpowers the dish. Instead, a beautiful melding of cinnamon, cayenne, ginger and coriander all “pop” at different times, and they all compliment the steak’s flavor nicely. The veggies make a great addition to the dish as well. The sweet potato and red onion contrast nicely, and the seasoning used for the steaks blends the entire dish together . All in all, this is certainly one steak recipe you’ll have to give a try.

That’s all we have for you this evening. Maggie takes to the kitchen tomorrow night with a brand new recipe of her own. We’ll follow that up with another new recipe on Friday – this one will be kicking off a summer long theme for the blog. Until then,

~Cheers

Thursday, May 8, 2014

Fresh Pasta A Go Go

Good evening everyone!  Several months ago, I received a pasta maker attachment for my Kitchenaid for Christmas and I've been anxious to use it.  I have never made fresh pasta in my life - always using the boxed kind as my fall back.  Last week, one of my coworkers taught me how to use my pasta attachment.  The end result is whatever your pasta imagination can come up with.

The Recipe:  Leek and Lemon Fettuccine
Original Recipe Found From: www.relish.com

What You'll Need:
2 Tablespoons Olive Oil
3 cloves of Garlic, crushed
1 Teaspoon dried Oregano
3 large leeks, white part only, thinly sliced
9 Ounces fresh Fettuccine
1 1/2 Teaspoons fresh Lemon Juice
1 Tablespoon Capers, drained
3/4 Cup finely grated Parmigiano Reggiano cheese
1 Tablespoon dried Parsley

To start, fill a large saucepan with water and heat the water over medium-high heat.  Bring the water to a boil and cook the fresh fettuccine until al dente.  Depending on the thickness of the fettuccine, will depend on the cooking time.  The pasta I made was a little thicker than normal and it had been in the refrigerator for several days.  I cooked mine between five and eight minutes, checking for doneness after five minutes.  

Before the pasta is done cooking, reserve 1/4 cup of the cooking water and set aside.  Drain the pasta in a colander, shake to remove the excess water, and quickly spray with cool water, so it won't stick together.  Return the pasta back to the saucepan and cover until the leek mixture has done cooking.

Meanwhile, in a large nonstick skillet, heat the olive oil over medium heat.  Once heated, add the garlic, oregano, and leeks and sauté until the leeks have become soft and transparent, about eight to ten minutes.  Add salt and pepper to taste.  Once the leeks have cooked, add the cooked pasta, lemon juice, capers, cheese, and parsley.  Stir well to combine or until the cheese has melted.  Add the reserved pasta water, if the pasta seems dry.  Serve with addition cheese and enjoy!

The End Result:


This is an incredibly fresh pasta that only takes a few ingredients and a few minutes to create.  The lemon and leek really brighten the recipe and the capers add a hint of bitterness, in a good way!  When the cheese melts, it almost becomes a sauce-like consistency, so the need for any type of sauce is not needed.  I will say making my own pasta and using it in a dish like this makes the effort worth it.  I hope to create more dishes in the future using homemade pasta and all different kinds of creations with it!

That's all we have for you this evening.  Check back soon as Tyler creates a brand new version of steak and potatoes.  Until then,

~Cheers!

Thursday, May 1, 2014

Sweet Potato Hash - There's Nothing Wrong About That!

Good evening everyone!  I've mentioned numerous times that I like breakfast for supper as a recipe idea.  While there are plenty of options out there, including those of the waffle, pancake, and eggs variety, tonight I wanted to switch it up and create a hash.  Normally, white potatoes take the spotlight in hashes, but this one includes sweet potatoes, and I'm definitely excited to see what becomes of it.

The Recipe:  Sweet Potato Steak Hash
Adapted from an Original Recipe Found In:  Self Magazine, May 2014

What You'll Need:
(Serves 2)
2 Tablespoons Olive Oil, divided
6 Ounces Top Sirloin Beef, diced
1 medium Sweet Potato, diced
1 White Onion, chopped
1 Red Bell Pepper, chopped
3 Tablespoons Water
1 Teaspoon minced Garlic
1 Teaspoon ground Cumin

To start, heat a medium, nonstick skillet over medium-high heat and drizzle one tablespoon of olive oil into the skillet.  Once the skillet has heated, add the diced beef and sauté until the outside of the meat has browned, about five minutes.  After the steak has cooked, season with salt and pepper, stir once more, and transfer the steak to a clean plate and cover to keep warm.

Without wiping out the skillet, heat the remaining olive oil and add the sweet potato, white onion, and red bell pepper to the skillet and stir to combine.  Cook the vegetables until they have begin to soften, about five minutes.  The vegetables will start to show a little browned color, but don't go overboard at this stage.


Next, add the beef, water, garlic, and cumin and stir to combine once more.  Cover the skillet and cook until the sweet potato is fork tender, about five to eight minutes.  When appropriate, add water if the skillet seems a bit dry.  Spoon the hash into a bowl, serve, and enjoy!

The End Result:


For this being a "quick hit", this recipe packs quite the punch!  There's just enough steak to make the rest of the vegetables have a beefy flavor, but it's not too overwhelming.  The onion and red bell pepper definitely add by giving good flavor enhancers.  They are cooked down enough, so their presence too strong.  The sweet potatoes are actually a nice surprise.  Most hashes we create use regular potatoes, so the fact that there's a hint of sweet definitely adds to the overall tastiness of this dish.  If you're looking to cook something sweet and savory, regardless of the time of the day, this dish is for you!

Thanks for joining us this evening.  Check back next week as we continue our culinary adventures.  Until then,

~Cheers!