Thursday, July 28, 2011

Iowan Luau

Good evening everyone! Last weekend, Maggie and I embarked on a large project. We decided to inventory our freezer and refrigerator. Everyone has had this problem at some point in time - you're cleaning out your fridge one day and you happen up some ingredient you didn't know you had or you find some green blob of 'food' that you're pretty sure just moved across the counter. We had both of these instances occur last week and we decided it was time to fix the situation.

So, we made an inventory of every single thing in our refrigerator along with a note of expiration date and date purchased. Next, it was on to the freezer. While expiration date is not as important here - it is nice to know what you have in inventory. I think we've purchased 4 bags of vegetable medley over the past 6 months - each time forgetting that we already had 1/2 a bag in the freezer!

This new inventory systems seems to be working well (so far) and it also led to us discovering a few 'treasures' (not the gross kind). I for one, found two pork chops in the freezer, which made my recipe for this week pretty easy. A quick search of Eatingwell.com (our favorite recipe website) and I had found a perfect, adventurous recipe for this evening that would also help clean out the freezer. That, is a win-win situation. Let's get cooking!


The Recipe: Pineapple Pork Chops
Original Recipe From: Eatingwell.com

What You'll Need:
*Serves 4

3 Tablespoons Pineapple or Apricot Preserves (Orange marmalade also is a substitute)*
3 Tablespoon Orange Juice
2 Teaspoons Stone-Ground or Dijon Mustard
1/2 Teaspoon Fresh Grated Ginger
1/2 Teaspoon Curry Powder
4 Fresh (or canned) Pineapple Rings (Cut 1/2 inch thick, juice reserved, cut in 1/2)
2 Teaspoons Butter
4 (4-5 ounce) Boneless Pork Loin Chops (Trimmed)
2 Tablespoons Fresh Chopped Thyme
1/2 Teaspoon Salt (Divided)
1/4 Teaspoon Fresh Ground Pepper (Divided)


* It isn't as hard to find pineapple preserves as you might think. Maggie and I were sure that we would have to find orange marmalade for this recipe, as we could never recall seeing pineapple jam, jelly or preserves anywhere. It turns, we just weren't looking very hard! Pineapple preserves are readily available at any grocery store - we found ours at our local Target! Crisis averted!


** Since this dish serves four, and at last count there were only two of us here... we chopped our measurements in half. The original recipes measurements are above, but seeing as we usually adjust the dishes to 'two person' measurements, I just wanted to give you a heads up that tonight's recipe amounts are in their original form. Don't automatically double the sizes!


In a small bowl, combine the preservers, orange juice, mustard, ginger and curry powder. Mix well and set aside. Pour the juice from the pineapple slices into a measuring cup to ensure that you have at least 1/3 cup of juice. If you are a little short, feel free to add some orange juice to bring the level up to 1/3 of a cup. Set the juice aside.

In a medium non stick skillet, heat the butter over medium high heat. Add the pork chops and season with 1/2 of the allotted thyme, pepper and salt, immediately turn the chops and season with the remaining thyme, salt and pepper. Allow the chops to cook until golden brown, roughly 5 to 6 minutes. Be sure to turn the chops fairly regularly - roughly every two minutes.


Next, add the reserved pineapple juice to the pan. Cook for an additional 2 to 4 minutes, until the pork chops have completed cooking. (The chops should be at 145 degrees in the center). Move the chops to a platter (lightly tented with aluminum foil) and set aside.

Add the pineapple slices and reserved sauce (AKA the preserve mixture) to the skillet and cook until the mixture is bubbling. This should take about 2 to 4 more minutes. Serve this sauce over the pork chops and enjoy! (You may return the chops to this mixture for 1 minute to 30 seconds to bring the temperature back up if you so wish - just be careful to not overcook the chops!)


The Results:


This turned out to be a very tropical tasting dish. I've never had the fortune of eating authentic Hawaiian cuisine (if anyone one of our readers would like to donate to us to make a Hawaiian getaway possible, our PayPal link is on the right hand side of the blog...) but if I could 'guess' the flavor, I would think this dish arrives pretty close to the real deal. The pork is succulent and juicy and combined with a very citrusy and yet not too tart sauce - it is an ideal summertime dish. At only 30 minutes start to finish, this makes a great 'quick fix' for the family on the go this summer. Give it a shot yourself and see!

That's all we have for you this week. We're back on Monday night with another edition of Around The Culinary World - I'm playing around with an idea for this week's feature, so it could look a little bit different come Monday night. Wait and see what we've got planned for that! As always, thank you for sharing our recipes this week. Have a great weekend everyone! Until next time,

~Cheers

Tuesday, July 26, 2011

ZITI ZITI ZITI!!

Good evening everyone! I'm so glad to be back in the Tuesday night slot, although Thursday's was nice because I had all week to 'study' my recipes. Hmm...decisions, decisions!


Tonight, I'm trying an old favorite of those who are devout followers of the blog or fans of the Italian community. Ziti is probably one of those most commonly known pasta dishes, outside of spaghetti, lasagna, and fettucini. It's great because the little tubes of pasta soak up whatever sauce it's in and there's always a good amount of sauce without feeling like you're having sauce ladeled into your mouth. I'm trying a twist on the classic - instead of tossing the noodles with a traditional sauce, I'm baking it with lots of cheese in the dish and on top. We've tried variants of this in the past, and it's proven to be a very nice twist on a classic dish. To me, pasta is one of those great comfort foods and I hope to perfect upon it tonight.

The Recipe: Three Cheese Baked Ziti with Spinach
Original Recipe Found In: www.kitchendaily.com

What You'll Need:
1 Package (16 ounces) Uncooked Medium Tube-Shaped Pasta (ziti)
1 bag (6 ounces) Baby Spinach , washed (about 4 cups, optiona)
1 Jar (1 pound 9 ounces) Marinara Italian Sauce
1 Cup Ricotta Cheese
4 Ounces Shredded Mozzarella Cheese (about 1 cup)
3/4 cup Grated Parmesan Cheese
1/2 Teaspoon Garlic Powder
1/4 Teaspoon Ground Black Pepper

To start, prepare the pasta according to package directions, between 10 to 12 minutes, depending on your preference of pasta firmness.  If you are adding the spinach to this dish, add it during the last minute of cooking.  Drain the pasta (and spinach) into a colander and shake well.  Return to the original saucepot.  


Since Tyler and I are all about the Fooducate app (and I'm completely being serious here: if you haven't gotten it yet...DO IT!!  You will be amazed at the nutritional value of certain items.  We never leave home without one of our phones to scan items.)  As always, we check our ingredients before we purchase them to see if they are "good enough" to put in our bellies.  This ingredient list was no exception.  Granted, I couldn't find ziti that was healthy enough, so I substituted for penne rigate.  The difference being that penne rigate has thicker ridges to hold sauce in better, which I'm all for more sauce in a dish.  Our penne rigate of choice this evening is from Ronzoni, which received an A- grade on Fooducate and was the top it its category.

The highest rated penne product on Fooducate
Nice deep ridges
The second ingredient going under the Fooducate gun was our tomato sauce.  Kitchen Daily.com gave a suggestion for our sauce, but once I scanned the item, it was rather clear to see that we would not be using said sauce.  We scanned our way through the pasta sauce aisle until we found a winner.  The Muir Glen, Italian Herb sauce received a B grade, a high grade for an organic sauce and was the best out of all the sauces we scanned.

Organic pasta sauce...yum!

Moving along with our recipe, stir the sauce, ricotta, 1/2 cup of the mozzarella cheese, 1/2 cup of parmesan cheese, garlic powder, and black pepper into the pasta mixture.  Slowly, spoon the pasta, sauce, and cheese mixture into a 13x9 baking dish.  Sprinkle the dish with the remaining mozzarella and parmesan cheeses.  Bake and 350 degrees for 30 minutes, serve, and enjoy!

The End Result:


With pasta and sauce, you really can't go wrong.  There was a perfect amount of cheese (even for me, the cheese lover, who would have gladly smothered the entire dish in cheese.)  All of the different flavors from the three cheeses worked superbly to make an incredibly smooth finish.  The pasta was cooked to a T and the only crunchy bits were from the cooked pasta from being in the oven for thirty minutes.  The sauce was incredibly good as well, and good for you.  Albeit a smudge too sweet for my liking, everything worked great together and I am happy to report this will a Return Recipe.


That's all we have for you this evening, join us on Thursday when Tyler takes to the kitchen with a dish that channels visions of a tropical place.  Until then,

~Cheers!

Sunday, July 24, 2011

Around The Culinary World

Good evening everyone! Welcome back to another edition of Around The Culinary World. We were off last week due to a little bit of traveling - that just means that this week we have a whole lot more stories to blog about. The culinary world didn't disappoint this week - we've got stories about food trucks, a big name restaurant chain in financial trouble and so much more. Let's dive in!


We've said it time and time again on the blog - we're not just about healthy cooking & eating but we're also about sustainability and maintaining a healthy, working world. Overfishing, pollution as a by-product of certain crops, chemical contamination of our food system; these are all key points in the culinary world, whether some will admit it or not. It's not just about what type of foods we eat and how we prepare them, but also about where the come from and the impact their production has on the world around us. Eatingwell.com puts this issue in a new light this week with their article regarding the best proteins for your health and the environment - and they throw in the worst as well. It's a very interesting read and maybe it will help you make smarter decisions the next time you head out to the grocery store. Check it out HERE.


The food truck phenomena hasn't hit the greater midwest in force as of yet (outside of Minneapolis, Detroit, St. Louis and the other major cities). For those who are unaware, food trucks are essentially restaurants on wheels - while these creations have been around for many years, they are just now becoming a culinary delight. (I suppose that's a nice way to say that their food is now becoming edible!) Just because you don't have a food truck in your neighborhood doesn't mean that you can't laugh at some of the more...poorly named ones. Check out the slideshow of bad food truck names HERE


Our "So...do I still have a job?" story of the day goes to this unfortunate soul. Oops. 


As a business major, I tend to pay close attention to the daily runnings of some of the corporations and businesses that I use or support. I like to see their day to day actions and how they are using a financial strategy to plan for the future. For the most part you can see the financial struggles of a company coming. Cutbacks, conservative strategy (I.E. financially bailing water). I'll have to admit, I didn't see the troubles that Quiznos is facing coming. It turns out that one of my and Maggie's favorite eateries is in a little financial hot water. Check out how bad things really are HERE


It turns out, consumers actually enjoy foods that are better for them (who knew!?) A recent study found that most consumers if given a choice between an organic or non-organic food item will opt for the organic.  (The downside, as we pointed out in an Around The Culinary World story from 2 weeks ago - is that organic almost always costs more, which instantly forces the consumer away). It's not a groundbreaking finding by any means but it does show some support for healthier eating in this country. As soon as production costs can be lowered into a competitive range with non organic items, we could have a real competition on our hands. Check out the details of the study HERE


It's summer cooking time (hooray!) which means grilling, outdoors and enjoyment. Outdoor cooking and grilling means outdoor cooking and grilling gadgets. (again, hooray!) Check out the five best summertime cooking gadgets HERE. How many do you have in your kitchen? (We have 4/5! Lactose intolerance kinda makes an ice cream maker unnecessary...) 


That's all the news that's fit to blog about this week. We've got another full week of recipes line up for you - starting with Maggie's dish on Tuesday night (does she get bold again or is she going to try something more traditional after last weeks' 'flop'?) And I will be taking to the kitchen Thursday night with a very unique recipe - one that should channel visions of a faraway land... Be sure to stop in then to see what we've got cooking. Until Tuesday, 

~Cheers


Thursday, July 21, 2011

Grownup Ramen

Good evening everyone. To our fellow midwesterners, we are somewhat out of the heat! Today was in the low 90's with next week being in the mid 80's. Finally a break from the soul-sucking heat (I may be a little dramatic there...) Nevertheless, I'm glad that the humidity finally broke and we can get some 'normal' July temperatures.


Anyhow, back to cooking! Like any normal college student, part of the college experience and a quick and easy meal anytime of the day was ramen noodles. So popular, in fact, that grocery stores in college towns sell them by the 10-12 pack for next to nothing. Granted, they aren't the best for you - don't even peek at the sodium levels, you'll die of a heartattack right in the store! Being a former student and alumni (Go Iowa State!) I used to gobble up ramen like my fellow cohorts. I could only boil water at that point and the fact that I didn't have to when cooking ramen was great! Now that I've been out of college for almost 2 years, I still get cravings for ramen, but I've always wanted to try a variant on the old standby. Tonight, I'm going to attempt it, without resorting to the classic noodles, water, and spice packet.


The Recipe: Homemade Ramen Noodles
Original Recipe Found In: www.kitchendaily.com


What You'll Need:


7 Ounces Shiitake Mushrooms, stems removed, thinly sliced
4 Garlic Cloves, minced
1 Inch Piece Ginger, peeled, minced (or 1 teaspoon pre-minced ginger)
1 Finely Minced Hot Chile Pepper (with or without seeds, depending in how spicy you like it - we choose a non-spicy version of this recipe, so no peppers will be our version)
1/4 teaspoon Chinese Five Spice
1 X 5-ounce Package Japanese Curly Noodles or Chuka Soba
1 cup Reduced-Sodium Beef Broth
4 cups Baby Spinach
1 tablespoon Butter
2 Scallions
1/4 cup Cilantro Leaves


We are adding a new ingredient to our repertoire: Chuka soba, otherwise known as Japanese curly noodles.  I was kind of worried that we wouldn't find these noodles at our local grocery store.  But one quick browse down the Asian food aisle and they were quite easy to find.  They came in one standard size - more than likely can be used for recipes like this or if you wanted, using it for a base of a wok recipe.


Chuka Soba - fun new food of the day!


To begin, heat a large skillet over high heat and coat with a layer of cooking spray.  Add the mushrooms and cook for one to two minutes, stirring once or twice until the mushrooms start to soften.  Obviously don't cook the mushrooms for too long - the mushrooms might become rubbery.  Add the garlic, ginger (and chili pepper if your stomach won't engulf in flames) and stir to coat.  Next, add the noodles and broth, cover, and reduce heat.  Simmer for four to five minutes until the noodles are tender.  


Noodles in pre-simmer mode


After the noodles are softened, add the spinach and butter and cook for one to two more minutes until the spinach is wilted.  Add the scallions and cilantro until throughly heated.  Toss the noodles, mushrooms, spinach, and scallions and enjoy!


The End Result:


This dish has a lot of flavor and you can pick out the Chinese five spice and ginger.  And that's about all that's good about it.  I kept looking at the recipe, seeing if there was another liquid ingredient that I was missing.  Nope, one cup of beef broth is all it needed.  In the end, we added a half cup of water and it needed more.  The noodles didn't soften, like they were supposed to and the entire dish got really dry.  It had the potential for something really delicious.  Unfortunately, more liquid should have been added when the dish was simmering and it would have made the dish a heck of a lot more delicious.


Thanks Maggie. This was certainly another live and learn recipe. Maggie likes to take chances and try dishes that are really out there. Sometimes, it's a hit and she creates a great flavor combination. Others, it's a disaster or it falls flat. While tonight was no disaster, it certainly doesn't warrant a return attempt. Even had the liquids been higher, the flavor was still just 'off'. Maybe because the original recipe is trying to 'renovate' ramen instead of simply making a better dish? After all, ramen isn't exactly known for its culinary prowess. If you are craving ramen - buy the .50 package in the grocery store. Save your cooking time for something more worth while.


That's all we have for you this week. As always, thanks for sharing another week of recipes with us. Stop in on Monday evening for another entry of 'Around The Culinary World'. We'll also have two new recipes to share. Will Maggie learn from so many 'failed' dishes and stop trying the recipes that are really out there - or does she get even bolder and try something more extraordinary? We'll find out next week! Until then,


~Cheers!

Tuesday, July 19, 2011

'Cheaters' Cordon Bleu

Good evening everyone! Welcome back to a new week of recipes here at Out Of The Culinary! We've always been fans of French cuisine on the blog. We've tried multiple French recipes and have had great success in almost every French dish we've tried. The downside to French cooking is twofold. First, it is not at all good for you. 90% (unofficial guess) is packed with butter and could clog your arteries in one or two bites (unofficial medical diagnosis). Secondly, French cooking is a very time consuming and tedious process. Therefore, whenever I find a recipe like the one we're trying tonight - where a usually complex French dish is broken down into a much more simple and healthy alternative, I'm always eager to give it a shot. Let's get cooking!


The Recipe: Chicken Cordon Bleu For Two
Original Recipe Found On: Eatingwell.com

What You'll Need:

2 Boneless, Skinless Chicken Breasts
1/4 Teaspoon Black Pepper (Divided)
1/8 Teaspoon Salt
3 Tablespoons Shredded Swiss Cheese
1 Tablespoon Reduced Fat Cream Cheese
2 Tablespoons Coarse, Dry Whole Wheat Breadcrumbs
1 1/2 Teaspoons Chopped Fresh Parsley or Thyme
2 Teaspoons Extra Virgin Olive Oil (Divided)
2 Tablespoons Chopped Ham


Begin by preheating your oven to 400 degrees.

Season your chicken with 1/8 teaspoon of pepper and the salt. In a small bowl combine the cheese and cream cheese (mix until well combined).

In another small bowl, combine the bread crumbs, 1 teaspoon of oil, remaining pepper and parsley. Mix until well combined.

For this recipe we're trying a new product. We found this:


Next to the herb section of our local Hy-Vee. This little tube is supposed to be made for chefs like us - who don't use fresh parsley, thyme and basil fast enough to justify buying the gigantic bags it comes in. It is supposed to work on a 1 to 1 ratio with fresh parsley. (1 tablespoon fresh equals 1 tablespoon from the tube.) The advantage is that this product is supposed to be good for 3 months rather than about 1 week. We'll have to test it out in a lot of recipes before we can give you a final verdict - so be sure to stay tuned for that!

In a medium oven safe skillet, heat the remaining teaspoon of oil until it begins to shimmer. Place your chicken breasts in the skillet and cook, 2 minutes per side until lightly browned.


Next, remove the skillet from the heat but leave the chicken breasts in the skillet. Evenly spread the cheese mixture on the chicken breasts.


Sprinkle the chopped ham over the chicken breasts and finally cover both breasts with the bread crumb mixture.


Place the skillet in the oven for about 7 to 10 minutes or until the chicken reaches 160-165 degrees. Serve and enjoy!

The Results:


You have to love a dish that gives you comparable flavor for a lot less work. Normal Cordon Bleu features a careful layering of proscuitto and cheese - usually a cheese with butter infused mix, in between layers of chicken. This time consuming process produces a great tasting dish - but as we pointed out in the opening, it's not exactly healthy or practical if you're on a time restricted dinner plan.

Tonight's dish is packed with a great flavor and is simple and very easy to make. The cheese is a nice addition to the bread crumb topping and the ham adds a little layer of complexity to the final taste. At about 30 to 35 minutes start to finish this great tasting dish is certainly one worth trying yourself at home.

That's all we have for you this evening. Maggie is taking to the kitchen on Thursday so be sure to stop in then to see what she has cooking. Until then, (Stay cool fellow midwestern residents) and

~Cheers

Friday, July 15, 2011

Product Review: Annie's Bunnies

Hello again everyone! Welcome to a bonus Friday edition of Out Of The Culinary. With as busy as we have been lately, we haven’t been able to post as much content as we’d like – today, we’re making up for some of that with a product review! One of the things we like to do on the blog is feature a product, device or gadget that we feel is worth a look. We are not a paid-per-post blogging site, we don’t have any advertisements and in no way do any of the companies ever reimburse us for the free publicity. We attempt to sustain the blog simply via our cookbook sales and free will donations. (Links for both of those are on the right hand side of the blog – we’d greatly appreciate your support!) We are simply doing these features for you, dear reader, as a way to share cool (or not so cool) products with our fellow culinary fans.


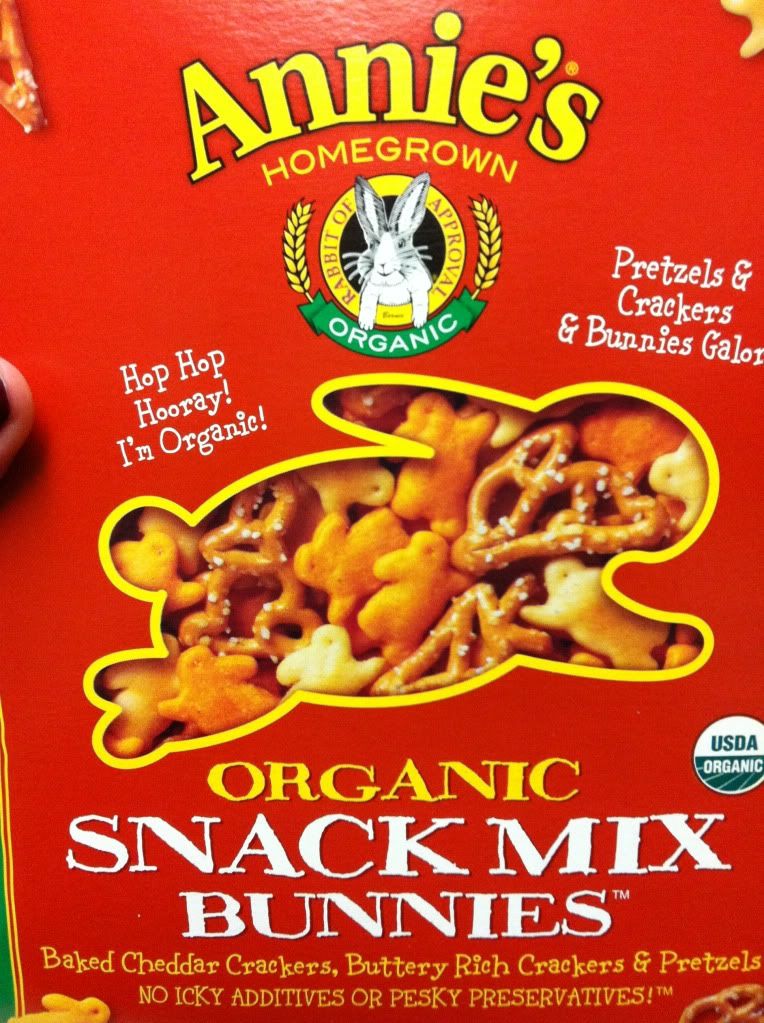
Today, we’re featuring a food product (a first for the blog) that Maggie and I stumbled upon about a month or two ago. The product, Annie’s Bunnies snack crackers are a line of organic snack crackers comparable to the Goldfish brand and Ritz / Cheez-It brands you find in the snack isle of your grocery store. The difference is that Annie’s Bunnies are supposed to be organic and much better for you. While nutrition can be decided fairly easily – the one thing a box will not tell you about is flavor. Luckily for you, we put our taste buds on the line so you wouldn’t have to. So, do Annie’s Bunnies stack up with the competition? Or is it better to eat a cardboard box?

Product Review: Annie’s Bunnies: Organic Bunnies (cheddar) snackmix


This review will focus on the Annie’s Bunnies: Organic Bunnies (cheddar) snackmix. Not all of the Organic Bunnies line fall under the below review. More details on that later on.

We compared the products versus their largest ‘big name’ competitor in each category. We are not negatively reflecting on the products chosen as ‘competition’. Rather, we are simply giving you a basis of comparison.

About our process:

Annie’s Bunnies can be found in the nutritional or health section of your local grocery store. (They also may be found in the organic section). Immediately, this indicates to the consumer that this product is inherently ‘better’ than something that doesn’t reside in these isles. The savvy consumer, of course, knows that this isn’t always true. There are countless products in the organic / health section of our local Hy-Vee that are not 100% good for you. Simply put – it might be organic, but that doesn’t mean it needs to go into your diet.

The obvious way to compare the nutritional value of two products is to flip the boxes and compare the labels side to side. While this does give you a decent idea of what the differences may be between two products, it doesn’t always tell the full story. Sure, the calories and fat content may be lower in product A, but product A also packs a high amount of sodium or contains some form of artificial coloring or sweetener that may throw off even the most health conscious consumer.

So the question became, how can we compare the products in a fair way? We needed a third party grading system that would evaluate all of the data about a certain product (consistently) and give us an across the board score that we could use. The answer? Fooducate.

Fooducate was created by dieticians to be a quick and easy reference for consumer to use to make smarter choices in their diets. They have an iPhone app (also available on the Android Marketplace) that uses your mobile phone’s built in camera as a barcode scanner. Simply point the camera at the barcode and Fooducate does the rest.

Fooducate gives any product a letter grade (standard letter grades: A+ trough F, just like in grade school) based on a multitude of factors. Yes, grams of fat, calories, sodium and all of the standards are included in the grade – but other factors such as ingredients and additives are also factored in. After a few short minutes with the app, you’ll be amazed at just how much variation there is in your local grocery store.

Some products will shock you (Wheat Thins Whole Wheat Crackers – dubbed ‘100% whole wheat’ on the box, earned a dismal D+ due to their high sodium content and the fact that they were not ‘actually 100% whole wheat’) Fooducate will also recommend products in the same category. For example if you’re trying to find healthy microwave popcorn, Fooducate can tell you which products scored the highest in this category. Fooducate will also show you where the product you scanned is on the grading scale, relative to other products in the same category. Simply put, it’s an amazing tool that you need to be using while you’re shopping.

With over 200,000 products (and growing) there is very little that Fooducate cannot find. Even Hy-Vee store brands can be found in the database. If there’s anything you can’t find, you simply have to scan the front of the box and the ingredients & nutritional label and Fooducate will research and grade the product within a few days. Did we mention the app was free? If you own an iPhone or Android – you owe it to yourself to download this app.

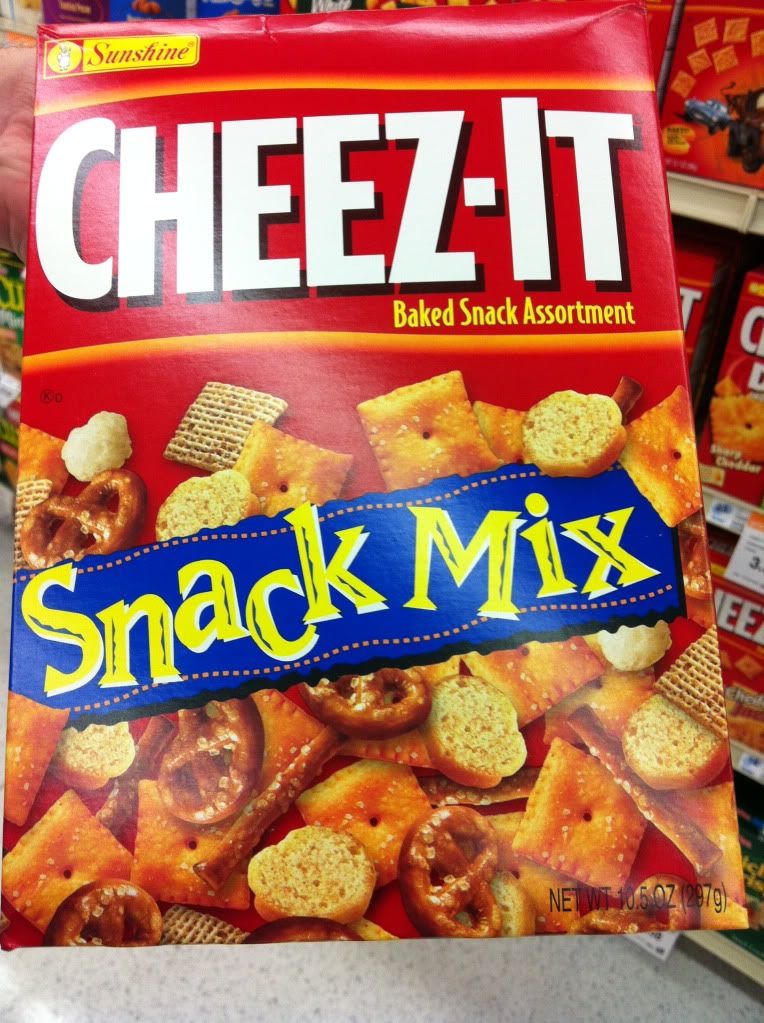
Armed with our jury, we were not set to begin comparing Annie’s Bunnies vs the competition. First up, Organic Bunnies Snackmix vs Cheez It Party Snack Mix.


Nutritional Values:

Annie’s Bunnies:


Serving Size: 40 Pieces
Calories: 140
Fat Grams: 5 g
Carbs: 20 g
Protein: 3 g
Sodium: 300 mg
Cholesterol: 0 mg

Fooducate Grade: B-


Cheez It: Snackmix


Serving Size: ½ Cup
Calories: 130
Fat Grams: 4.5 g
Carbs: 20 g
Protein: 3 g
Sodium: 370 mg
Cholesterol: 0 mg

Fooducate Grade: C

Now, you may be looking at the above data and asking yourself: why did the big name score lower? The two products are almost identical nutritionally! (as an side, the ½ cup serving size of Cheez it is significantly lower than the 40 pieces from Annie’s Bunnies). The answer lies in the ingredients. (Remember Fooducate scores on nutritional value and ingredients). A simple glance at the ingredients of each product paints the full picture:

Annie’s Bunnies Ingredients:


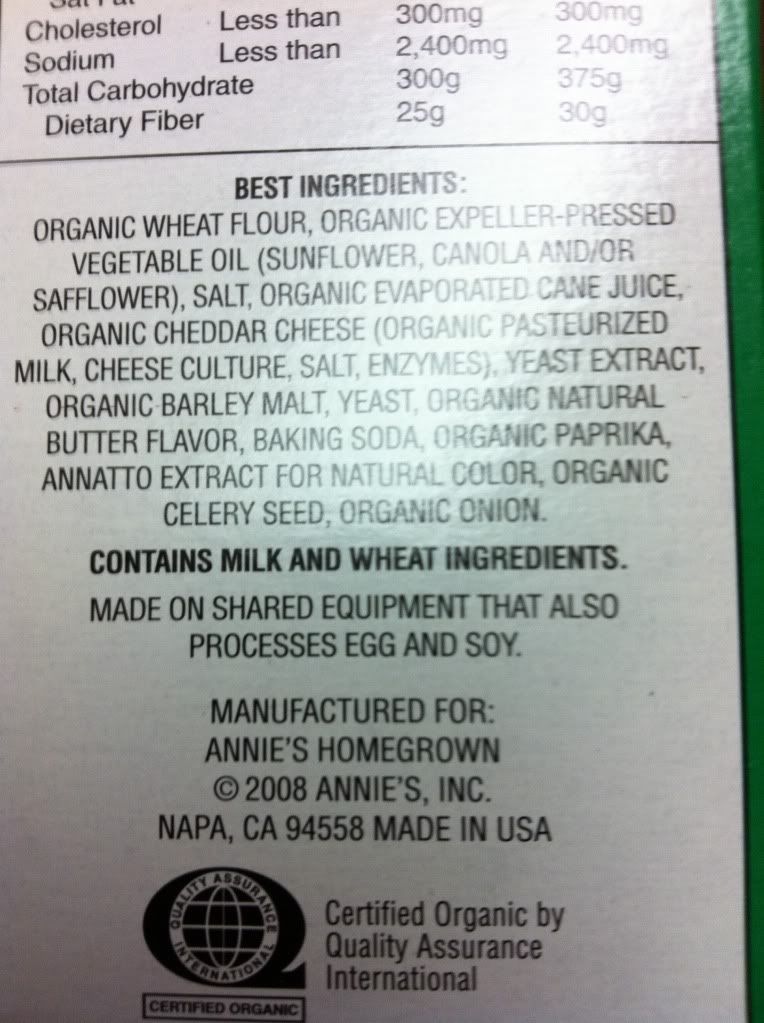
Organic wheat flour, organic pressed vegetable oil (sunflower oil, canola and/or safflower) salt, organic evaporated cane juice, organic cheddar cheese, organic pasteurized milk, cheese culture, yeast extract, organic barley malt, organic natural butter flavor, baking soda, organic paprika, annatto extract for natural color, organic celery seed, organic onion.

Not one thing on that list is an unpronounceable chemical. Everything on the list is natural or organic. So, how does Cheez-it stack up in the ingredient department?


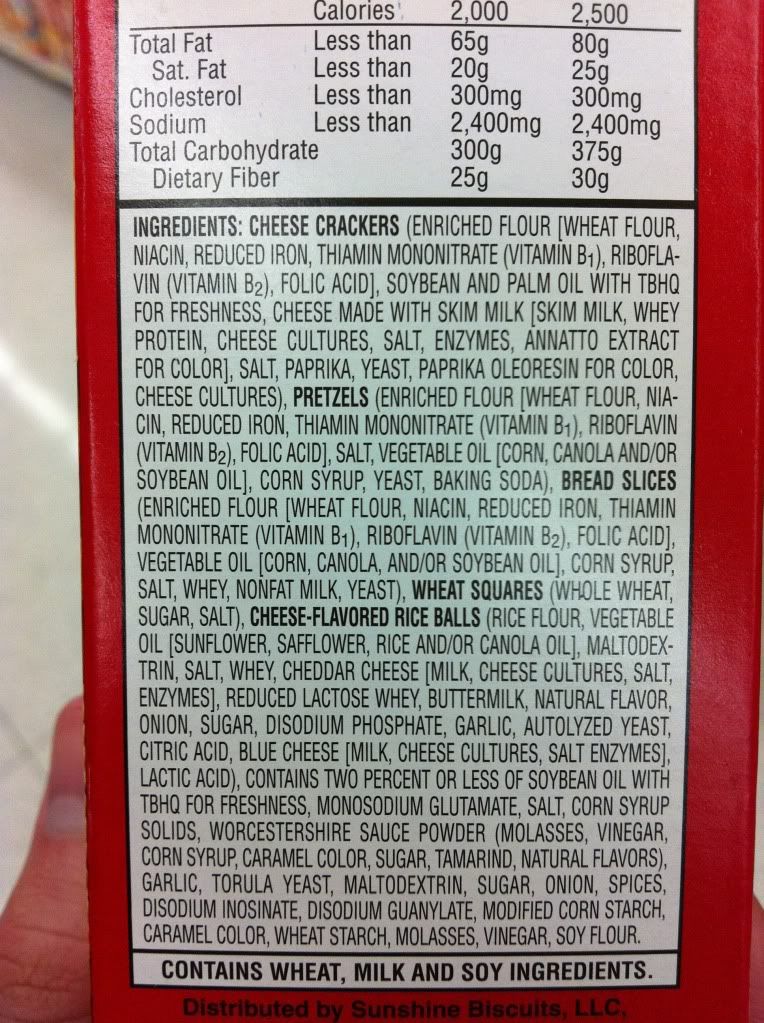
Cheez-it: Snackmix Ingredients:


Enriched flour (wheat flour), niacin, reduced iron, thiamin mononitrate, (Vitamin b1), riboflavin (vitamin b2), folic acid, soybean and palm oil (with TBHQ for freshness), cheese made with skim milk, salt, cheese cultures, enzymes, annatto extract for color, paprika, yeast, paprika oleoresin for color.


That’s just for the Cheez-It pieces. The pretzels, rice balls and wheat squares all have their own list – just as long. Now, it should be noted that Annie’s Bunnies do not have rice balls, but do contain every other product listed on the Cheez-It box. For those keeping score at home, it took the Cheez-It product three whole ingredients before it hit its first chemical. (thiamin mononitrate) – While Annie’s Bunnies didn’t list a single thing you couldn’t pronounce.

There you have it, when you compare what each product is composed of right in front of you, the healthy option is obvious.


The verdict:

I don’t know about you, but I’d rather be eating something with ingredients I can pronounce (and that don’t stretch on for ½ the box) rather than chemicals and additives that I don’t know their origins. As far as nutrition is concerned, Annie’s Bunnies win in a landslide.

Flavor:

Nutritional value is all well and good – but you know as well as I do that many nutritional ‘winners’ come out as duds when it comes down to flavor. Every single one of us out there has tried some form of health product and winced in disgust as the flavor we were greeted with was more reminiscent of cardboard than food.

Luckily, that isn’t the case for Annie’s Bunnies. In fact, I’m happy to report that in a head to head contest with Cheez-It snackmix, they are almost indistinguishable. Both products are delicious. A great blending of cheddar infused salty goodness that makes for a perfect snack. As far as flavor is concerned, you cannot go wrong with either product – but when you factor in nutritional value and ingredients, Annie’s Bunnies become the clear winner.

We could spend all day reviewing each individual product line of Annie’s Bunnies – but that would be worthy of a college thesis and well, I get the feeling that you wouldn’t find it too interesting after awhile. So instead we will give you a few bullet points on some of the other offerings.


Annie’s Bunnies: Cinnamon 


Fooducate Grade: B-

Flavor: Outstanding


Compared to:


Cinnamon Graham Goldfish


Fooducate Grade: C-

Flavor: Good, a little too much ‘cinnamon’ in some bites


Winner: Annie’s Bunnies


Annie’s Bunnies: Chocolate Bunnies


Fooducate Grade: B-

Flavor: Great


Compared to:

Teddy Grahams (Chocolate)


Fooducate Grade: C-

Flavor: Great

Winner: Annie’s Bunnies


Annie’s Bunnies: Chocolate & Vanilla Bunnies


Fooducate Grade: B-

Flavor: Good, both flavors need to be combined or the overall flavor seems ‘bland’


Compared to: No available market comparison


Annie’s Bunnies: Chocolate Chip


Fooducate Grade: B-

Flavor: Good, not overly sweet – somewhat ‘lacking’ compared to competition


Compared to:

Teddy Grahams (Chocolate Chip)


Fooducate Grade: C-
Flavor: Great


Winner: Again, Annie’s Bunnies are not as sweet, but the flavor difference is more than offset by the nutritional difference. Bunnies win again.


Annie’s Bunnies: Bunnies & Friends


Fooducate Grade: C-

Flavor: Great

No market comparison available


This one is a mix of chocolate, honey, chocolate chip and vanilla and well…it’s not good for you. Loaded with sodium and sugars, this one goes to show that all of the Annie’s Bunnies product line isn’t ‘instantly healthy’. While it certainly is better than other options on the market – you can do better by grabbing a box right next to this one. (I.E. another Annie’s Bunnies product).


There are many, many more Annie’s Bunnies products on the market (we are currently trying the cereal). A vast majority of the time, the Annie’s Bunnies line seems to be a great alternative to the big name, more conventional competition. The flavor is nearly identical or very close and the ingredients are almost always better than the competition. The tradeoff, of course, is cost. Annie’s Bunnies tend to run anywhere form $1 to $2.50 higher than their competition. Based on nutritional bonuses and knowing that what I’m eating isn’t pumped full of chemicals – that is a price I’m willing to pay. Obviously most consumers shop based on bottom dollar only – thus the reason why we’re trying to show that there are other (just as tasty) options out there.

We hope you enjoyed our (very limited) product review. We spent two solid weeks of research and work on this post – scanning products, researching competitors – it was daunting. Not to mention all of the taste testing we had to do. (It’s a tough job, but somebody has to do it!)

That's all we have for you this week. We're back with new recipe on Tuesday (No 'Around The Culinary World' for Monday). Be sure to stop in then to see what we've got cooking. Until then,

~Cheers

Thursday, July 14, 2011

Perfected Paninis

Good evening everyone!  As Tyler mentioned yesterday, I am stepping into new territory tonight...by cooking on a Thursday!  I will admit, I'm not quite used to it, as I'm sure you aren't as well.  But alas, I am ready to conquer this new and daunting task ahead of me!


All kidding aside, I want to reiterate that we had a great birthday weekend for Tyler.  We had some culinary adventures and non-culinary adventures.  We discovered a great breakfast burrito at the local farmer's market that will soon become tradition when we go to the farmer's market.  We had a surprisingly good Chinese dinner at one of the local restaurants here in the metro.  But most of all, we got to spend some time together, which is one of our favorite hobbies, and that was the best part.


But enough blabbering...onto the recipe!  I found this recipe a couple of months ago - I decided to unbury it and use it tonight.  When making panini's, I always find it important to not over power the dish with too many ingredients that might get trapped underneath one another.  With simple ingredients, a plain panini should shoot itself into the stratosphere of flavor.  Question is: can it be done?

The Recipe:  Prosciutto and Fontina Panini with Arugula Pesto
Original Recipe Found In:  www.food52.com

What You'll Need:
(serves four sandwiches)

For the Sandwich:
1/4 Cup Cider Vinegar
2 Tablespoons Sugar
1/2 Teaspoon Salt
1 Large Shallot, thinly sliced
1 Loaf Ciabatta, sliced lengthwise
1/3 Pound Prosciutto, about 10 slices
1/3 Pound Fontina, thinly sliced

For the Pesto:
1/4 Cup Toasted Pine Nuts
2 Garlic Cloves
2 Cups Baby Arugula
1/2 Lemon, juiced
1/2 Teaspoon Salt
1/4 Cup Olive Oil

First off, I want to mention that we didn't find a full loaf of ciabatta bread in our local grocery store.  Instead, we found a smaller, "slider" version of ciabatta bread.  So this recipe isn't really much of a panini; it's more of a slider panini.  Unfortunately, our local grocery store has issues with keeping freshly baked bread...well, fresh.  When I went to make tonight's recipe, I found all of my ciabatta sliders had little splotches of mold on them.  It's rather irritating, because this is the third time we've tried using fresh bread for a recipe, but it ended being thrown out due to mold.  So, an emergency trip to our grocery store and we made due with wheat buns.  Also, we've run into the problem of pine nuts costing way to much for our budget - 6.99 a serving is asinine (all the good foods have to ridiculously priced, right?)  So, I did some research and almonds actually work quite well in place of the pine nuts.  So, we substituted almonds as well. Adjustments aside, a great recipe has yet to be made!


To begin, make the pickled shallots:  bring the cider, sugar, and salt to a boil over medium heat in a small saucepan.  Simmer the liquid for a minute until the sugar is dissolved and pour the liquid over the shallots in a small bowl until fully submerged.  Sit for 20 minutes and place in an airtight container until you are ready for use.  Now, I love pickles (the original pickled food) and shallots (adds great flavor to any dish,) but I've had one too many recipes gone wrong with shallots (Mascarpone- It's Just Fun to Say) and I'm not brave enough to combine the two, so I decided not to use the pickled shallots this evening.  If there is someone out there who is daring enough to try it, let me know how it tastes!


Next, make the pesto:  pulse the pine nuts (or almonds in our case) and garlic coarsely in a food processor.  Add the arugula, lemon juice, salt and pulse until combined.  This should start to look like a thick blend of spinach puree (not the best thing to picture, but when making pesto, it's all about judging the looks.)  In small pours, pour in the olive oil and continue the blend until the pesto is thick and creamy and the ingredients are finely chopped.  If need be, add more salt to taste.

Tasty, tasty pesto!

After the pesto is made, preheat an oven to 270 degrees (or, if you have a broiler, you can turn it on.)  Place the slices of bread crust side down on a baking sheet and toast in the oven for 3-5 minutes, lightly browned and not charcoal black.  Take the bottom half of the ciabatta and spread the pesto evenly and add an even layer of cheese.  Return the bottom half to the oven and toast until the cheese is melted, another 3-5 minutes.  Get the other half of the ciabatta and spread more pesto on that half, adding the prosciutto as well.  Sandwich those halves together.

Warming up the sliders

Finally, heat a large skillet (or grill pan) over medium high heat.  Set the sandwich top side down and weigh it down with a heavier pan or bowl.  Once this is flattened and browned, flip it to the other side.  After the sandwich is crisped and cheese is oozing out the sides, it's ready to serve and enjoy!

The End Result:


Oh...my...goodness...The sharp kick from the pesto plus the saltiness from the proscuitto plus the creaminess from the fontina equals an incredibly great little sandwich.  The bread was toasted to perfection and gave a good enough crunch without it being too hard to chew.  The meat was heated to a good enough temperature and the cheese melted nicely.  Top that with a flavorful pesto which, by the way, there wasn't much of a difference using almonds instead of pine nuts, made a really quick and easy recipe that is simple enough to make for any family!

That's all we have for you this evening.  Stop in tomorrow for a weekend bonus that will make you think twice when shopping for snack food.  Until then,

~Cheers!

Wednesday, July 13, 2011

Terrific Tacos

Good evening everyone! It's a beautiful day here in the greater Des Moines metro - but it sounds like that will not last for much longer. A hot, balmy and all around unbearable weekend is supposedly on its way (I.E. Iowa in July) so get out and enjoy this nice weather while you can. One way to enjoy the nice weather is to have a great summertime meal on your deck or patio. Nothing says 'summertime meal' like chicken tacos (in our opinion anyway). Tonight, we'll show you how to cook up your own poultry based taco dish!


The Recipe: Chicken Soft Tacos
Original Recipe Found In: Cooking for Two 2011

What You'll Need:
*Serves 2

1/2 Teaspoon Vegetable Oil
3 Garlic Cloves (Minced)
1 1/2 Teaspoons Minced Chiles (Chipotle preferred - green as a substitute)
1/2 Cup Minced Fresh Cilantro
1/2 Cup Orange Juice
1 Tablespoon Worcestershire Sauce
2 (6 ounce) Boneless, Skinless Chicken Breasts (Trimmed)
1 Teaspoon Yellow Mustard
1/2 Cup Low Fat Sour Cream
6 (6 inch) Corn Tortillas (Warmed)

Begin by adding the oil to a 10 or 12 inch non stick skillet and heat until shimmering. Stir in your garlic cloves and 1 teaspoon of the chiles until fragrant (roughly 30 seconds). Stir in 5 tablespoons of the chopped cilantro as well as the orange juice and Worcestershire sauce.

Nestle your chicken breasts in the skillet and bring the mixture to a simmer. Once simmering, cover the skillet and reduce the heat to medium low. Allow the chicken to cook for 12 to 18 minutes or until it reaches 160-165 degrees. Be sure to flip the breasts halfway through cooking to ensure a nice, even heat distribution throughout.


A quick and easy way to warm the tortillas while cooking! 


Once at the optimal temperature, transfer your chicken breasts to a plate and allow to cool for a few minutes before shredding. Using two forks, pull the chicken breasts into smaller pieces. You can do this by inserting both forks into the chicken (about 1/4 inch to 1/2 inch apart) and pulling the forks away from each other. This should result in small, bite sized pieces of chicken. Don't worry if you shred the pieces extra small - it's better to error on smaller size than to try to choke down 1/2 a chicken breast in one bite!


Meanwhile, continue to simmer the sauce over medium heat until it begins to thicken and reduces to 1/2. This should take about 2 to 5  minutes (roughly the same time it takes to shred the chicken).

Off the heat, stir in the mustard, 2 more tablespoons of cilantro and the shredded chicken. Season lightly with salt and pepper.

In a small bowl, combine the sour cream with the remaining chiles and the remaining cilantro. Mix well and season lightly with salt and pepper. Spoon the chicken on to your warmed tortillas and serve with the sour cream. Enjoy!

The Results:


Sometimes beauty lies in simplicity. This recipe is fairly straightforward and on the surface seems like it could be bland. However, due to the sauce's amazing flavor - you don't need to spice up the chicken with any toppings at all. The dish carries enough natural flavor that cheese or hot sauce would simply ruin the amazing (delicious) simplicity of this dish. It takes about 25 minutes to prepare - so there is no excuse for not trying this delicious dish yourself today!

That's all we have for you this evening. Maggie takes to the kitchen tomorrow night with another unique recipe. (She's continuing her track record of taking risks - she likes to gamble with her cooking nights). Sometimes she hits one out of the park, sometimes the recipe falls flat. Which will it be tomorrow? Stop back in and see. Until then,

~Cheers

Monday, July 11, 2011

Around The Culinary World

Hello again everyone! It’s good to be back blogging again after a few weeks of hectic (yet enjoyable) summertime plans. With Maggie’s birthday weekend, the 4th of July and then my birthday weekend, we’ve been running around a lot lately – which cuts into the quality / quantity we can put into new and interesting blog posts. We’re making all of our time away up this week – we’ve got two new recipes and a product review all scheduled to go live this week. It should be fun, so be sure to stop back Wednesday, Thursday and Friday for all of those features to go up. First, however, we have to start the week off with a trip ‘Around The Culinary World’ Here’s what’s newsworthy in the world of food:


It has long been known that cow’s milk is tainted with some chemicals and hormones. It makes sense, after all, that all of the drugs that are being pumped into cattle would eventually find their way into their byproducts. Growth hormones and antibiotics were the usual suspects – but up until recently, it wasn’t known just what else was showing up in the milk supply. Now, a new study has found that there are 20 different chemicals that are present in milk. Most are at low enough levels that they do not affect the consumer (that we know of…) but it’s still a little disconcerting to see what exactly is in the supposedly ‘pure’ milk you’re drinking. Check out the list of chemicals and the full story HERE.


File this one under the sub-category ‘huh…that’s neat’. Food scientists have developed a new line of sandwiches that can last weeks – while maintaining their freshness. The secret? The packaging of course! By flushing the sandwiches with a nitrogen and carbon dioxide mixture (yum…) rather than oxygen, scientist have found that sandwiches will stay fresh up to two weeks. That’s not all they do to maintain freshness, however. Check out the full story HERE.


Our ‘what will they think of next?’ product of the week is easily awarded to this new line of ice cream. Many companies are rolling out a new set of flavors (not unheard of for the summertime) but they are drawing from an unusual source of inspiration – wine. That’s right, some companies are debuting a series of wine flavored ice creams and sorbets. I asked Maggie (our resident wine connoisseur) if she would eat wine flavored ice cream and she gave a sort of ‘eww’ mixed with a wince. I’m taking that to mean no… How about you? Would you try wine flavored ice cream? Check out all of the flavor options HERE.


Speaking of wine, the nation’s most renowned wine growing region – Napa Valley, may be looking at a grim future. New studies have found that the premium wine growing land is losing its nutritional value due to climate change in the area. In fact, as much as 50% of the premium wine growing land may be unfit to grow grapes in the future if adjustments are not made now. Read the full story – including some of the options for ‘fixing’ the situation HERE.


One of our favorite topics is food marketing. Mainly, how companies will stick to one or two words and imply that their products are better than they really are. The industry ‘buzz words’ seem to change from year to year, but there are always one or two that companies like to latch on to. Chow.com has compiled a list of some of those buzzwords and attached specific product examples of the biggest violators. It’s a little bit ‘tongue in cheek’ article and fairly satirical, but worth a read for a good laugh. Check it out HERE.


That’s all the news that’s fit to blog about this week. Like I mentioned in the open, we’ve got a full week lined up for you. Tuesday will be an off day due to our schedule – but on Wednesday I’ll be debuting a new recipe, followed by a unique dish from Maggie and Friday we’ll launch a product review that’s been a long (and fairly complicated) process – but hopefully will be worth it in the end. Be sure to stop in Wednesday for my recipe. Until then,

~Cheers