Thursday, September 30, 2010

Instant Classic: Hamburger Noodle Bake

Good evening everyone! It's Thursday once again, and tonight Maggie took over the kitchen for her second recipe of the week. Like my recipe last night, Maggie's recipe comes from Taste Of Home magazine, and if my recipe last night set any precedent - Taste Of Home knows a thing a two about delicious recipes. After tasting Maggie's dinner tonight it's clear that precedent is deserved.

The Recipe: Hamburger Noodle Bake
Original Recipe From: Taste Of Home magazine, August & September 2010

What You'll Need:

2 Cups Uncooked Egg Noodles
1/2 Lb. Lean Ground Beef (90%)
2 Tablespoons Finely Chopped Onion
1 Can Tomato Sauce (8 Ounces)
1/4 Teaspoon Sugar
1/8 Teaspoon Salt
1/8 Teaspoon Garlic Salt
2 Ounces Cream Cheese
1 Tablespoon Thinly Sliced Green Onion
1 Tablespoon Chopped Green Pepper
1 Tablespoon Sour Cream, softened
2 Tablespoons Grated Parmesan Cheese

The Recipe:  Cheesy Garlic Bread
Original Recipe From: Food Network Magazine, October 2010

What You'll Need:

1 Loaf Italian Bread
3 Tablespoons Olive Oil
1 Clove Minced Garlic
1/4 Teaspoon Oregano
2 Tablespoons Grated Parmesan Cheese
1 Cup Shredded Asiago Cheese
1 Cup Shredded Mozzarella Cheese

Hi everyone!!  When I took a gander through the Taste of Home magazine, I came across this recipe, which was under this headline "A pound of ground beef equals a satisfying casserole sized just right for a couple."  Bingo... Normally when we make recipes, the serving size is usually anywhere in between 4-8 people.  Tonight, it was really nice to cook just for two and have very little leftover.


Start by boiling a pot of water for the egg noodles and cook according to package directions.  Meanwhile, brown the ground beef until no longer pink in the middle.  Remove from heat and drain.  Stir in the tomato sauce, sugar, salt, garlic salt, and pepper.  In another small bowl, combine the cream cheese, green onion, green pepper, and sour cream.  In the original recipe, it called for 1/4 cup of cottage cheese, but since neither one of us likes cottage cheese, we omitted it from our version.


By this time, the noodles should be done and drained.  Place half of the noodles in a greased 1 quart baking dish.  Spoon half of the beef mixture over the noodles.  Layer with the cream cheese mixture and the rest of the noodles.  Top with remaining beef mixture and sprinkle with parmesan cheese.


Cover the foil and bake at 350 degree for 25 minutes.


While that is baking, slice off four pieces of Italian bread.  Mix the olive oil, minced garlic, and oregano and spread over the cut sides of the bread - toast for 10 minutes for 400 degrees.  Mix the cheeses together in a small bowl.  Take the bread out and top with cheeses.  Bake the bread until melted - 10 to 15 minutes.


The End Result:


These recipes were quite simple, yet very delicious.  All the ingredients in the bake and the bread worked so perfectly together.  I loved the idea of the cream cheese and the sour cream together - it made for a nice middle layer of flavor.  Tonight served a purpose I've been wanting to do for a while.  I've heard from several fans that they've wanted something cheap, yet with the serving size of one or two.  I believe I've found that recipe in the Hamburger Noodle Bake - not only is it saving on the grocery bill, but it's so simple and there's not much leftover, it's a simple way to bring homemade to the dinner table.


Thanks Maggie, and way to go on a nicely summed up blog post - I don't feel like I need to add anything! So I wont!

The one point I would make would be regarding the 'saving on the grocery bill' notion of this recipe and the fact that it is an advantage. Yes, I will admit that once in awhile it is nice to not have a lot of leftovers - and to just have the meal and be done. But, I would counter that this isn't really saving money. You have to buy the hamburger in 1 pound increments, the noodles come in bags of 4 to 6 cups - you see what I'm getting at here? You're already buying enough ingredients to make twice the amount for the recipe. With a double batch, you have leftovers and get more meals out of the same ingredients thereby getting more for your money - and truly saving on the grocery bill. (You could argue that you would be able to use those ingredients later on, which is true, but you are shoehorned into smaller portion sizes, presenting the same problem - in addition, a second recipe would likely require additional ingredients.) I'm not saying either of us is right, it's just interesting to get a little point - counterpoint going every once in a while.

Things like this are big topics you have to think about when cooking full time like we do. Groceries certainly are not cheap, so stretching your dollar to get the most (quality) food for you buck is a very big key. We'll be playing with this concept in two weeks - so be sure to stay tuned for that. (We're excited to try our idea, but we need the time to do it)

Subtle hints and teasing aside, that's all we have for you this week. A bit of a different schedule is due up next week. Sunday will be our ingredient list day, and the first day of recipes will be Monday - my day in the kitchen. Maggie will take Tuesday, and we will share a Wednesday recipe. My work schedule (once again) is changing a lot - so we're adapting. Until next time,

~Cheers


Wednesday, September 29, 2010

Flavors Of Fall: Spiced Cran-Apple Brisket

Good afternoon everyone! For today's blog - we're doing something we've never done before. I made supper ahead of time, and Maggie and I will not be sharing it together. Not exactly good firsts, but firsts non the less. The reason for this change is simple. Although today was my day off, I have to go into work at 6:00 tonight for a institution wide meeting. What a way to ruin a day off, eh?

This schedule change provided an tricky evening for us as well. How was I going to have supper done early enough for me, yet have it still be warm and edible by the time Maggie arrived home? After perusing through a few recipe ideas, I settled on one kitchen device that was meant for exactly this problem. The crock pot. Now, I'm not too fond of using only the crock pot - especially on blog recipes - mainly because I like to cook - and the crock pot reduces the amount of cooking by 70%. However, for tonight's purpose, the crock pot was exactly what we needed. It would allow me to cook the meal ahead of time and still have it warm by the time Maggie arrived home. That's what we call a 'win win'.

So, without further ado, let's get cooking!

The Recipe: Spiced Cran-Apple Brisket
Original Recipe Found In: Taste Of Home Magazine, August & September 2010 Issue

What You'll Need:

Fresh Beef Brisket (2-4 Pounds)
1/2 Cup Apple Butter
1/4 Cup Ruby Port Wine
2 Tablespoons Cider Vinegar
1 Teaspoon Black Pepper
1/2 Teaspoon Salt
1 Medium Tart Apple (Cored, Peeled and Cubed)
1 Celery Rib (Chopped)
1 Small Red Onion (Chopped)
1/3 Cup Dried Apples
1/3 Cup Dried Cranberries
2 Garlic Cloves (Minced)
1 Tablespoon Cornstarch
3 Tablespoons Cold Water

Begin by slicing your brisket in half and placing it in the crock pot.

In a large bowl, combine the cider vinegar (commonly known as apple cider vinegar) apple butter, ruby wine as well as the salt and pepper.

Baby poo soup 


As an aside, apple butter sort of looks like a hybrid between chocolate pudding and baby poo. Who was the brave soul that took a look at that sticky concoction and decided - yes, that looks delicious? It sort of makes you wonder who the brave souls were that tried all sorts of foods for the first time.

Grog: Hey, ogg - this fell out of the chicken's hindquarters - I dare you to eat it!
Ogg: *Crunches*
Grog: Wow you didn't die!
Ogg: And it tastes good too!

I'm pretty sure that's exactly how the consumption of the first chicken egg went.

Anyway, my point is - apple butter looks kinda of nasty, but tastes good.

Mix the wine, vinegar and baby poo apple butter until it becomes a thick, soupy mixture. Next, add in the dried apples, dried cranberries, onion, garlic, celery and cubed apple. The recipe calls for a tart apple, which really can be any green apple. There are some varieties of red/green apple hybrids that are perfectly suited for this job, such as gravenstein and winesap, but they seem to be regional and seasonal (unlike the more common granny smith, braeburn, fuji, etc.) In that case, any green apple is a suitable substitute.


I always like the look of a cored apple.  It sort of has a face! 


Once everything is mixed well. Simply spread the entire concoction over the top of the brisket (making sure the sides are covered as well). Cover the crock pot and set the heat to low. Allow the brisket to cook all day, 8 to 10 hours.

+

=


The long cooking time works in a lot of ways. We've established in previous recipes that the key to really tender roasts is to cook the meat 'low and slow'. Low heat for 8 hours is about as 'low and slow' as it gets. Secondly, the low heat keeps the enzymes in the brisket at their optimum 'open' stage for longer. That means that not only are they breaking down the muscle cells of the meat (allowing for more moisture to be stored in the meat) but they are also opening the cells of the brisket more, meaning more juices can flow in. In short, it's like you are marinading and cooking the meat at the same time.

Once you are ready to serve up the brisket, simply remove the meat from the crock pot and set aside. Skim the juices and apples/onions etc. from the pot and pour through a strainer into a saucepan. Be sure to squish out all of the liquids from the pulp with a spoon. Turn the juices heat to high and bring to a boil. Once boiling, mix with the water and cornstarch on medium heat, stirring constantly until the mixture begins to thicken. This will create a great, flavorful gravy that you can pour on top of the meat just before serving.

After 8 hours - you cook the color right out of the apples! 


I accompanied tonight's brisket with a mashed potato recipe that I made up on the fly. I simply combined a half dozen russet potatoes with 1 cup of mozzarella cheese, half and half (to make desired consistency) and 3 roasted garlic cloves (15 minutes in a 350 degree oven, skins on, drizzled with olive oil and cooked until lightly browned) and served. Add the garlic, half and half and the cheese as you are mashing the cooked potatoes. You don't have to roast the garlic. You can also mince the garlic and put those pieces into the hot potatoes with the cheese. Either way works, I chose to try something new and roast the little buggers.

Roast with the skin on, when finished, the skin should pop right off


I wanted a nice side dish to accompany the brisket, but I didn't want to go out and buy anything special. I came up with this little recipe simply by searching through our cupboards. It's fun to get a little creative from time to time - you never know what you'll come up with!

Serve the potatoes up with this delicious dish and enjoy! 


The Results:


Sometimes, I even surprise myself. We've already established that any time you roast meat, it's pretty much one of the best meals around. However, I wasn't expecting just how amazingly delicious the end result turned out to be.

The brisket was amazingly juicy and absolutely tender. Any time you lift the brisket out of the crock pot and it falls apart, with no 'egging on' you know that the meat is going to be tender. You could have eaten this brisket with a spoon!

The real surprise, for me, was in the incredible fruity flavor that accompanied the dish. The gravy simply burst with the flavors of apples and cranberries, giving the dish a very distinctive fall flavor. The brisket itself absorbed all of those flavors and held a light hint of apple and red wine with every bite.

The potatoes turned out fantastically as well. (Especially since it was a recipe I made up with kitchen leftovers!) The garlic added a nice subtle flavor to the thick, creamy (and slightly cheesy) potatoes. Topped with the apple gravy, the potatoes were down right heavenly!


That's all we have for you this evening. Here's hoping you'll give the brisket and mashed potato a recipe a try for yourself. Maggie takes back the kitchen tomorrow night with a whole new recipe, so be sure to stop by tomorrow evening to see what she's got cooking. Until then,

~Cheers

Tuesday, September 28, 2010

South(west) Of The Border

Good evening everyone! It's starting to feel at lot like fall (in the evenings anyway). Fall happens to be my favorite season. Cool-ish weather. Beautiful leaves and great culinary traditions. Pumpkin bread, squash and other gourds are in season, pumpkin spice, pumpkin lattes, pumpkin pie. Although there are no pumpkin related dishes on the menu tonight, you can rest assured that there will be in the near future. Pumpkin pie is a certainty, pumpkin bread is a possibility and a saw a recipe for a pumpkin spice soup that has my interest. When it comes to fall culinary treats, it's all good.

Speaking of all good, tonight was Maggie's night to take the kitchen and she debuted a delicious little treat that could have come off a menu at Perkins or Ihop (or other breakfast serving establishment) I'll turn the keyboard over to her now and let her share her unique and tasty dish for this evening.


The Recipe: Western Skillets Eggs
Original Recipe Found In: Food Network Magazine October 2010 Issue

What You'll Need:

1/2 Cup Half-And-Half
Pinch Of Cayenne Pepper
2 Tablespoons Olive Oil
2 Shallots (Sliced)
2 Large Green Bell Peppers
1 1/2 Cups Cherry Tomatoes
1/4 Pound Thinly Sliced Ham
4 Slices Sourdough Bread
2 Tablespoons Chopped Parsley
8 Large Eggs

Good evening everyone!  I, as well, love fall - it's the perfect time of the year (that's why we got married in the fall.)  For tonight's recipe, I went on a limb.  "A limb" usually refers to a non-pasta, non-cheese, non-chicken dish that incorporates one or more flavors/ingredients I don't usually use.  This recipe was definitely out there for me.


I started by chopping the green peppers, tomatoes, shallots, and breaking up the slices of bread into one inch sections.  Also, I whisked the half-and-half, cayenne pepper, salt, and pepper together.  I began to preheat my oven to 350 degrees and heat a large ovenproof skillet (or in my case ovenproof dutch oven) over medium high heat.  


Add the olive oil to the skillet and warm for a minute or so.  Add the shallots and cook until softened - two minutes.  Add the chopped green peppers and cook until the peppers are soft and the shallots are golden - six minutes.  Add the tomato, ham, bread, parsley, and a fourth of a cup of water and cook until most of the water is absorbed - three minutes.  Season with salt and pepper and remove from heat.


With the bottom of a ladle, make eight well-defined indentations into the bread mixture.  


The bread might still be a little sticky at this point, but make sure the indentations are there.  Crack each egg over a single indentation.  Slowly pour the half and half mixture over the eggs.  


Put the combination into the oven and bake for 15 minutes, rotation the dish every five minutes, until the whites are set.  Top with parsley.


The End Result:


It was a pleasant surprise, to say the least.  I was a little worried about this recipe (but, at this point, I worry about all my recipes.)  I had never really made a breakfast-esqe recipe for dinner and all the flavorings made me a little weary.  


But, the flavors from the cayenne, green pepper, parsley, and tomato gave this dish a real warmth, yet not too spicy.  The eggs were perfectly cooked - everything was real harmonious.  Although I didn't add the ham, it could have used a meat to round out the flavor.  All in all, I'm happy with this dish and it makes me not so nervous to try out "limb" recipes.


Thank you Maggie. Tonight's recipe certainly defines the cooking style that has become Maggie's. Nothing too complicated, nothing too labor intensive, but always something new. The flavors blended together nicely, making this simple dish a nice way to top off a day - or to get one started. My only change to this dish would be to add some sausage or other breakfast meat (bacon?). The recipe calls for ham, but ham and I don't get along. So, Maggie omitted it. However, some form of meat would really make the dish. Other than that, a tasty little treat that is worth a shot.

That's all we have for you tonight. I'm taking over the kitchen tomorrow night with a recipe that is perfect for those of you who work all day. With only a little bit of prep and a long cooking time - my recipe is perfect for the family on the go. More on that tomorrow, until then.

~Cheers


Monday, September 27, 2010

This Week's Ingredients

Good evening everyone! It's Monday once again, which means a fresh week of recipes and opportunities here on the blog. This week is a bit of a 'twilight zone' week. Maggie will be taking Tuesday & Thursday (my typical cooking days) while I tackle Wednesday (her usual day). Once again, a completely horrid schedule at work has forced our hand into a less than desirable schedule for the coming week, but we'll make due. Hopefully, when the calendar changes to October, some part of normalcy will return to my schedule that will allow the blog to return to normal.

Anywho... here's what we're cooking with this week:

4 Pounds Beef Brisket
Apple Butter
Ruby Port Wine
Loaf Of Italian Bread
Shredded Asiago Cheese
Shredded Mozzarella Cheese
Medium Green Apple
Small Red Onion
Dried Apples
Large Eggs
Sourdough Bread
2 Green Peppers
Half & Half
Sour Cream
Dried Cranberries
Russet Potatoes (3 Pounds)
90% Lean Ground Beef
18 Ounces Tomato Sauce
Cream Cheese


And there you have it! I'm eager to try out my recipe for the week, and Maggie is excited to have her shot at two recipes in one week - a first for her on the blog. As we said, Tuesday and Thursday will be Maggie's nights - so expect the blog up at around the same time. Wednesday, I have the day off - but have to go into work after hours - don't get me started.... - so the blog will be up early Wednesday afternoon (hooray?)

It should be a fun week, although I certainly can't wait for it to be over. (I have a recipe or two that I'm really eager to share...but I need the opportunity to actually cook them. Something I haven't had lately. I'm hoping that comes next week. It'd better...)

Stop by tomorrow evening to see what Maggie is cooking! Until then,

~Cheers

Thursday, September 23, 2010

Recipes Of The World: Italy

Good evening everyone! Tonight marks the third (and final) stop on our 'recipes of the world' tour here on the blog. On yet another rainy, cool day here in the greater Des Moines metro, it was nice to make another culinary escape. Tonight, we traveled to the beautiful country of Italy. As I mentioned yesterday, both of tonight's recipes were on my list of 'to do's', however, we decided that in order to prevent dinner being finished at 8:00 PM and the blog going up at 10:30, we were going to have to share these recipes. That means a return to 'kitchen collaboration'. Tonight, Maggie tackled the main dish, lighter chicken parmesan. While I took on the side dish, butternut squash risotto. I'll turn the keyboard over to Maggie and let her start the evening off with her chicken parmesan recipe.

The Recipe: Lighter Chicken Parmesan
Original Recipe Found In: The Complete America's Test Kitchen TV Show Cookbook 2nd Edition: Every Recipe from the Hit TV Show With Product Ratings and a Look Behind the Scenes

What You'll Need:

1 1/2 Cups Panko Bread Crumbs
1 Tablespoon Olive Oil
1 Ounce Parmesan Cheese
1/2 Cup Unbleached All Purpose Flour
1 1/2 Teaspoons Garlic Powder
3 Large Egg Whites
1 Tablespoon Water
3 (7 to 8 Ounce) Boneless, Skinless Chicken Breasts
Simple Tomato Sauce (Barilla Italian Marinara)
3 Ounces Mozzarella Cheese (Shredded)
1 Tablespoon Minced Basil


The Recipe: Butternut Squash Risotto
Original Recipe Found In:The Complete America's Test Kitchen TV Show Cookbook 2nd Edition: Every Recipe from the Hit TV Show With Product Ratings and a Look Behind the Scenes

What You'll Need:

2 Tablespoons Olive Oil
1 Medium Butternut Squash (Peeled, seeded - seeds reserved, cubed into 1/4 inch cubes)
3/4 Teaspoon Salt
3/4 Teaspoon Black Pepper
4 Cups Low Sodium Chicken Broth
1 Cup Water
4 Tablespoons Unsalted Butter
2 Small Onions
2 Medium Garlic Cloves
2 Cups Arborio Rice
1 1/2 Cups Dry White Wine
1 1/2 Ounces Parmesan Cheese
2 Tablespoons Minced Sage Leaves
1/4 Teaspoon Grated Nutmeg


For The Chicken Parmesan

Hi everybody!  As I am writing this, I'm still wiping the sweat off my brow.  After I settled in to make tonight's recipe, I realized I told Tyler I would pick up some of the ingredients that we forgot to pick up on our grocery night.  After I got back to the apartment, I realized that I was past the time that I was going to start my portion of the meal tonight.  So, needless to say, I was scrambling to get my part done. But here's how it went:


Preheat an oven to 475 degrees.  Line a baking sheet with aluminum foil and place a wire rack over the sheet.  Meanwhile, combine the bread crumbs and oil in a skillet and lightly toast over medium heat until golden brown, about 10 minutes.  Spread the bread crumbs on a plate to cool.  Once the crumbs cool, add the parmesan cheese.


While the crumbs cool, cover the chicken with plastic wrap and pound the chicken into quarter of an inch thickness.  Pat the chicken dry with a paper towel.  


In another plate, combined the flour, garlic powder, salt, and pepper.  In a bowl, whisk together the water and the egg whites.  Lightly dip the chicken in the flour mixture until completely coated - shake to remove the excess flour.  With a pair of tongs, dip the chicken in the egg mixture until completely coated as well.  Place the chicken in the bread crumbs mixture and coat.  Press to adhere the bread crumbs to the chicken.  Place the chicken on the wire rack.


Spray the chicken with cooking spray and place in the oven.  Cook until the chicken is firm when pressed, about 15 minutes.  Remove the chicken from the oven and top the chicken with the simple tomato sauce and the mozzarella cheese.  Place back in the oven for five more minutes until the cheese is melted.  Take the chicken back out of the oven and top with basil and serve!! 

For The Risotto:


To begin preparing the risotto, you will first have to peel and slice the squash. Don't have the first clue about how to do this? Never fear (I didn't either!) after a little research on my end, I am now a self proclaimed 'expert' on butternut squash carving. So sit back for 'Introdtuction to butternut squash 101 - carving'

First, you'll need the right tools to carve the little bugger up. For this task you're going to need two knives, a strong serrated knife and a VERY sharp chef's knife (8 inches or larger - the bigger it is, the better leverage you can get while slicing). In addition, you'll need a melon baller or a large scooping spoon (a melon baller works the best). Finally, you'll need a 'Y' hanled vegetable peeler (better leverage than the standard straight peeler)

Begin by slicing the first 1/4 inch off of the top of the squash (essentially, the top and everything that touches the stem). Now, most of the websites and books I read on slicing a butternut squash said that this task could be done with only a strong chef's knife. I don't know what world these people were giving gourd cutting advice from - but it wasn't the real world. These suckers are so tough that you end up putting a dangerous amount of weight on the chef's knife. Keeping yourself off balance with a round object and sharp knife are not ideas that I would recommend you try. As such, I found a strong serrated knife works best in this situation. That allows you to 'saw' the top portion away - greatly reducing the risk of injury.


Next, slice the bottom 1/4 inch off of the squash as well. Try to get the cut as flat as possible, as this surface is going to be your leverage point in the next few steps. Once again, I recommend that you use the serrated blade and simply saw off the bottom portion. Test your squash for stability after cutting. Place the squash on its newly sliced base and press down. If it wobbles, use your chef's knife to trim at the bottom until you have a level surface. Use the 'Y' peeler and work away at the skin until the squash is totally 'naked'. It is a slow process - but keep at it and you should be done in a few minutes.


Once everything is squared away, take your chef's knife and slice down the center of the squash, breaking it into two halves. This should reveal the (gooey) center of the squash. Since we are using the seeds and strings of the squash, you'll want to take extra care and scoop out the innards into a small bowl. This is where the melon baller comes into play. Using the baller, you should be able to make quick work of the guts of the gourd.


Once sufficiently gutted, turn your attention to slicing the squash even further down. I saw multiple techniques for making even, accurate cuts of the squash - all of which I attmepted to duplicate - and had great difficulty duplicating. As such, I'll simply say that your end goal is to have 1/4 inch cubes of squash. However you decide to go about carving from here is up to you.

Now that your squash is peeled, sliced, gutted and cubed, you're ready to get cooking!

Begin by heating 2 tablespoons of oil in a large 12 inch non-stick skillet until slightly smoking. Pour in the cubes of squash and allow to cook undisturbed for 3 to 5 minutes or until slightly golden brown.

Next add your salt and pepper and stir the cubes. Allow them to cook for another 5 to 7 minutes, or until completely golden brown, stirring occasionally.


Once the cubes are golden brown and slightly tender, transfer them to a large bowl and set aside. In the same skillet, add the seeds and strings that you reserved from earlier. Cook the seeds on medium high heat (stirring constantly) until them are golden brown. Once browned, transfer the seeds and other various pieces of gourd guts into a sauce pan with the chicken broth and water. Heat the mixture on high heat (covered) until it reaches a simmer. Once simmering, lower the heat to medium and allow to lightly simmer.


Next, melt your butter in the newly emptied skillet. Add in your onions, garlic and a pinch of salt and pepper. Cook until the onions are softened and slightly golden, roughly 3 to 5 minutes. Add your rices to the skillet and cook, stirring constantly for about 3 minutes, or until the sides of the rice begin to become translucent. Be wary of stirring in circles here, that will cause the rice to spill over the pan. Instead, stir from the outside in, making sure to keep all rice inside the skillet.

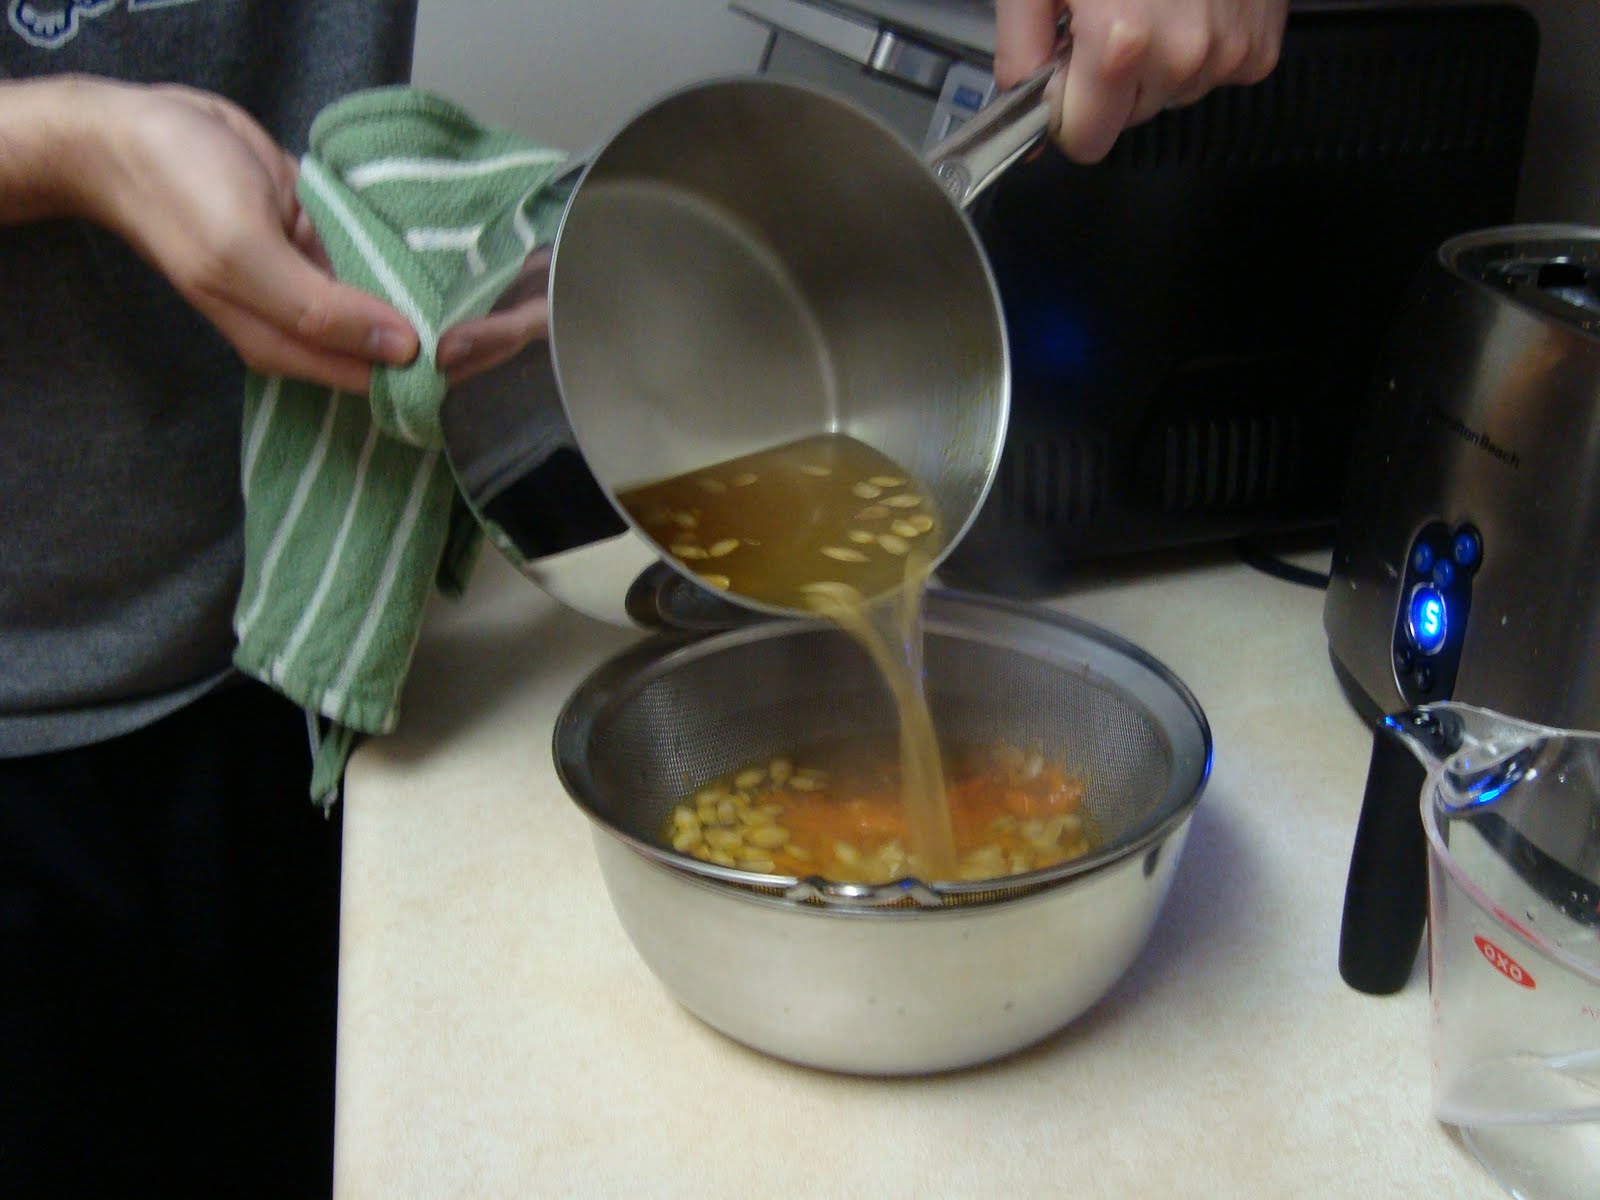
Add your wine to skillet and stir, allow to cook for 4 to 6 minutes, or until the wine has been completely absorbed. While this is cooking, you can turn your attention to the broth. Using a strainer, strain all of the seeds and strands from the broth. Return the strained broth to low heat to keep warm. You can now discard the seeds.


The idea behind cooking the seeds was to enhance the squash flavor of the dish. As the seeds cooked, the fantastic aroma of fresh squash filled the kitchen. By cooking the seeds and then adding them to the broth, you are essentially 'boosting' the flavor of the final dish.


Once the wine is fully absorbed, add 3 cups of the hot broth to the skillet. In addition, add 1/2 of the cubed squash. Simmer the mixture, stirring every 3 to 4 minutes. Cook for 12 minutes or until all of the broth has been absorbed.


Once absorbed, continue to add the broth in 1/2 cup intervals, stirring after each addition. Continue this process until the rice is completely cooked and tender (the only sure way to do this is to taste check the rice - constantly).

Remove the skillet from the heat and add the parmesan cheese, sage and nutmeg. Fold in the remaining squash as well. Fold everything together well and serve immediately!


The Results:


While it was a hectic night in the kitchen, especially for Maggie - who was master of the measuring cup, it was well worth it in the end.

The chicken was full of flavor and packed a great outer crunch. You simply cannot complain with the marinara, mozzarella and chicken flavor pairing. Delicious. The chicken was slightly dry - but that was due to the long time it had to be 'in holding' while we waited for my dish to finish. No fault of the chef, only the others that also needed the kitchen.

The risotto had many, many layers of complex flavors. The squash was not nearly as abundant in this dish as I would have liked, mainly because the sage overpowered it slightly. A future attempt at this dish would see me reducing the sage to 1 teaspoon and allowing the squash to run the show. All in all, great flavor combinations and amazing textures made this a delicious side dish.

That's all we have for you this evening! We hope you enjoyed our 'recipes around the world' week, we had a lot of fun doing something a little bit different than the norm. Unfortunately, we have another weeked that is being sabotaged with my work schedule, so no farmer's market or Saturday morning recipe. We have an exciting development in our waffle making abilities, but I don't think I've used this particular product enough to warrant a full review yet - so I'm holding off on a Sunday 'product review' post as well. That means we're done for the week! We'll see you back here on Monday evening with a new grocery list and a new week of possibilities. Until then,

~Cheers

Wednesday, September 22, 2010

Recipes Of The World: Mexico

Good evening everyone! It's day two on our trip around the (culinary) world. Tonight, I take our taste buds on a trip south of the border - to the land of tacos! (And much more, but for tonight's blog - it's the land of tacos) Mexico!

Now, anyone can make up ground beef tacos in the skillet - there are multiple taco seasonings out there on the market and tortilla shells are in no short supply. Rather than recreating something your average Taco Bell could serve you in 30 seconds, I wanted to try something a little less 'standard taco' and a little more 'gourmet taco'. Here's how I went about making the taco from fast food to evening feast.

The Recipe: Steak Tacos
Original Recipe Found In: Cook's Illustrated iPhone App

What You'll Need:

1/2 Cup Fresh Cilantro Leaves
3 Medium Garlic Cloves
3 Medium Scallions, Roughly Chopped
1 Medium Jalapeno Chile (Optional)
1/2 Teaspoon Ground Cumin
1/4 Cup Vegetable Oil Plus 2 Tablespoons
1 Tablespoon Fresh Lime Juice
1 Flank Steak (1.5 to 1.75 Pounds)
1 Tablespoon Kosher Salt
1/2 Teaspoon Sugar
1/2 Teaspoon Black Pepper
Corn Tortilla Tacos (Found in the refrigerator section as they have less preservatives)

Begin by placing the garlic, scallions, jalapeno (which is optional, if you don't like things too spicy, leave the jalapeno out - I chose to leave the little flame thrower out of this dish) and cumin in a food processor and pulsing in one second intervals until everything is finely chopped. Once everything is sufficiently shredded, add in 1/4 of the vegetable oil and pulse until your mixture resemble pesto.

Before...

After! 


Reserve 2 tablespoons of this paste and whisk in the tablespoon of lime juice. Set this mixture aside for later.

Trim the excess fat from your flank steak and slice it into four equally wide strips. (This size will vary depending on the width of your steak) Poke each piece of steak 10 to 12 times with a dinner fork (on each side) and cover with salt. Poking holes in the steak allows the salt to quickly access the interior of the steak, speeding up the tenderizing process. Place the steak in a large dish and with the remaining herb paste, coat the steak pieces evenly. Cover the dish with plastic wrap and allow to refrigerate for 30 minutes to 1 hour.
Marinading...with pizaz! 


After 30 minutes to an hour, scrape the herb paste off of the steak (this prevents it from burning in the skillet) and sprinkle with sugar (which causes caramelization) and black pepper.

Set a 12 inch, nonstick skillet on medium high heat and warm the remaining oil until slightly smoking. Place the steak in the skillet and cook each side until well browned, roughly 3 to 5 minutes per side. Be sure to stand the strips on their cut edge as well, to ensure all four sides are nicely browned. (You should also see some nice caramelization taking place on the surface of the steak. That's the sugar at work.) Check the temperature of the steak with an instant read thermometer, once you've reached 125 to 130 degrees, your steak is cooked to perfection.


Set the finished strips aside on a cutting board and allow them to rest for 2 to 5 minutes. Just like my roast recipe last week, you don't want to cut the steak immediately or you will lose all of the juices on the cutting board. (And make a big mess!)

Makes your mouth water doesn't it? 


Slice the steak strips (across the grain) into 1/8 thick pieces and toss them in the bowl with the reserved herb paste and lime juice mixture. Once all of the pieces are evenly coated, simply serve the steak on your warmed corn tortillas and enjoy! (Feel free to add onions or other veggies to top of the steak, customize as you see fit!)


The End Result:


Muy Beuno!

Half-hearted attempt at Spanish aside, tonight's dish was delicioso! (OK, I'm done now)

The steak was tender and juicy (and had a nice, sweet undertone due to the light sugar on top). The cilantro provided the classic 'taco flavoring' that is so well known (and so mass produced via 'flavor pouches' today). The scallions and garlic gave that ending kick that really made the whole dish.

I've never journeyed too far 'out there' in the culinary world to try other forms of tacos. In fact, most of my taco making has been limited to flavor pouches and ground beef. That made tonight's contest a easy one. These were simply the best tacos I've ever tried. Here's hoping you give them a shot yourself!

That's all we have for you this evening. Tomorrow, we conclude our 'recipes of the world' week with a collaborative effort between Maggie and I. It's actually a set of recipes that I wanted to cook myself, however, with this new (awful) schedule at work, I simply would not have time to do it alone. As such, Maggie is jumping in and taking care of 1/2 of the work. It should be a fun evening tomorrow with a delicious end result. Be sure to stop back tomorrow evening to see what exactly we're up to. Until then,

~Cheers