Hello everyone! It's been... a while. See, we hit a spell this spring where things just got too hectic and something had to give - and that something was the day in and day out of managing the blog. We were still cooking, just not posting things here.
Our hiatus will end soon, however. We're planning on coming back in the New Year with a different format and more new recipes. Keep your eyes on our page as the calendar turns to 2016 - we'll be back at it!

Friday, December 11, 2015
Wednesday, March 25, 2015
Perfect Pilaf
Good evening everyone! The premise behind Chef Zakarian's latest book is that to create a delicious meal is lurking just inside your pantry. He lists 50 readily available ingredients and creates a multitude of recipes from these. One of these ingredients is long-grain brown rice. While most of us serve it as an afterthought, Chef Zakarian uses it to create a filling, yet delicious meal, with some vegetable goodness.
The Recipe: Brown Rice Pilaf
Original Recipe Found In: Geoffrey Zakarian's My Perfect Pantry
What You'll Need:
1/4 Cup Extra-Virgin Olive Oil
1 Cup finely chopped Bell Pepper (green or red will do just fine)
1 Cup finely chopped Carrot
1 Cup finely chopped Onion
2 Garlic cloves, finely chopped
2 Teaspoons chopped fresh Oregano
2 Teaspoons chopped fresh Thyme
1 Cup long-grain Brown Rice
2 1/2 Cups Chicken Stock
2 dried Bay Leaves
1 Cup chopped Scallions (white and green parts)
2 Tablespoons unsalted Butter, cut into pieces
To start, place the oil in a medium-sized Dutch oven and heat over medium heat. When the oil is hot, add the bell pepper, carrot and onion. Cook these vegetables until they begin to soften, about seven to eight minutes. Add the garlic, oregano, and thyme and cook until the fragrances release themselves, about one minute.
Next, add the rice and stir to coat with the ingredients in the Dutch oven, insuring the rice begins to toast in the oil, about two minutes. Add the chicken stock and bay leaves and bring to a boil. Once at a boil, bring the heat to a bare simmer, cover the Dutch oven, and cook until the rice is just tender, and still a little chewy, about 45 minutes. Remove the pot from the heat and let sit, covered, for about ten minutes.
Uncover the pot and fluff the rice with a fork. Add the scallions and the butter, stir to combine to melt the butter. Once the butter is melted, remove the bay leaves and season with salt and pepper. Serve and enjoy!
The End Result:
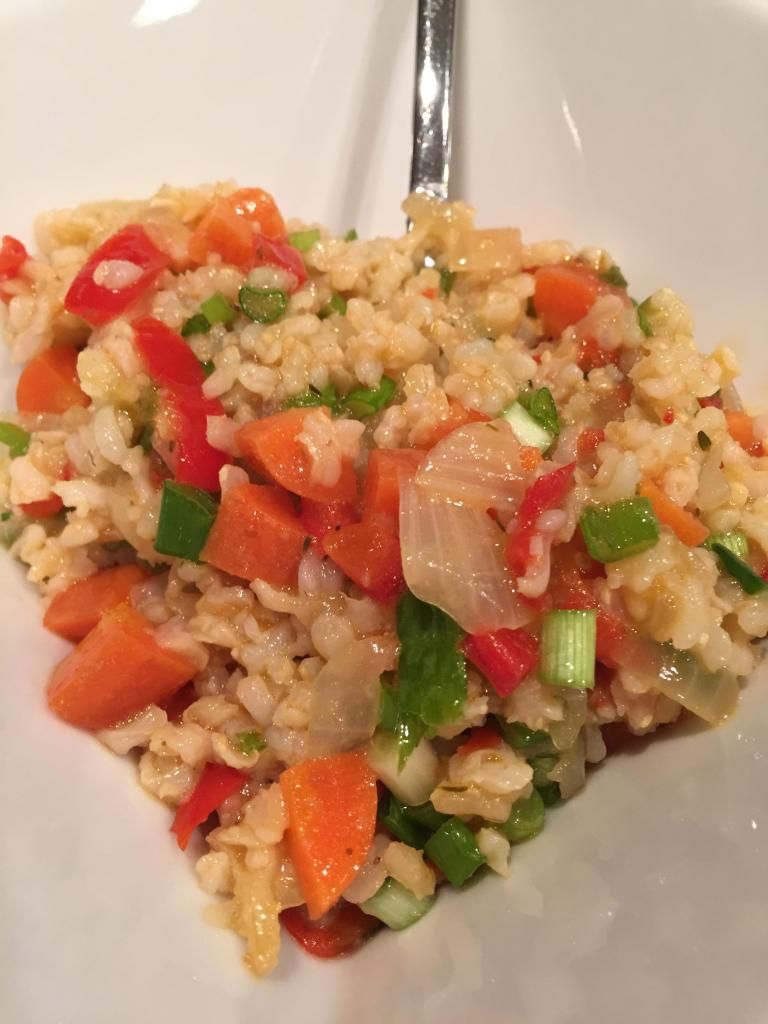
While it's hard to ignore all the beautiful colors in this dish, the rice remains the star. Perfectly seasoned in chicken stock, it almost melts on your tongue with each bite. But all the ingredients have taken on that stock flavor and have harmonized together. While this dish might not be a week-night favorite (since it does take over an hour to cook,) it's something delicious to try using the resources that might be in your pantry!
The Recipe: Brown Rice Pilaf
Original Recipe Found In: Geoffrey Zakarian's My Perfect Pantry
What You'll Need:
1/4 Cup Extra-Virgin Olive Oil
1 Cup finely chopped Bell Pepper (green or red will do just fine)
1 Cup finely chopped Carrot
1 Cup finely chopped Onion
2 Garlic cloves, finely chopped
2 Teaspoons chopped fresh Oregano
2 Teaspoons chopped fresh Thyme
1 Cup long-grain Brown Rice
2 1/2 Cups Chicken Stock
2 dried Bay Leaves
1 Cup chopped Scallions (white and green parts)
2 Tablespoons unsalted Butter, cut into pieces
To start, place the oil in a medium-sized Dutch oven and heat over medium heat. When the oil is hot, add the bell pepper, carrot and onion. Cook these vegetables until they begin to soften, about seven to eight minutes. Add the garlic, oregano, and thyme and cook until the fragrances release themselves, about one minute.
Next, add the rice and stir to coat with the ingredients in the Dutch oven, insuring the rice begins to toast in the oil, about two minutes. Add the chicken stock and bay leaves and bring to a boil. Once at a boil, bring the heat to a bare simmer, cover the Dutch oven, and cook until the rice is just tender, and still a little chewy, about 45 minutes. Remove the pot from the heat and let sit, covered, for about ten minutes.
Uncover the pot and fluff the rice with a fork. Add the scallions and the butter, stir to combine to melt the butter. Once the butter is melted, remove the bay leaves and season with salt and pepper. Serve and enjoy!
The End Result:
While it's hard to ignore all the beautiful colors in this dish, the rice remains the star. Perfectly seasoned in chicken stock, it almost melts on your tongue with each bite. But all the ingredients have taken on that stock flavor and have harmonized together. While this dish might not be a week-night favorite (since it does take over an hour to cook,) it's something delicious to try using the resources that might be in your pantry!
Wednesday, March 18, 2015
Bountiful (Meat-Free) Burritos
In the endless pursuit that is my obsession with Mexican food, I found this little gem. While it may not be an overly complicated recipe and packed to the gills with meat, its simplicity won me over and what a delicious delight this dish turned out to be!
The Recipe: Cheesy Baked Bean and Rice Burritos
Original Recipe Adapted from a Recipe Found On: www.pinterest.com
What You'll Need:
1 (16 Ounce) can of Refried Beans
2 Tablespoons of jarred Salsa (your favorite will suffice)
1 Teaspoon packaged Taco Seasoning Mix
1 (10 count) package medium soft, taco-sized flour Tortillas
1 Cup prepared Mexican Rice
1 Cup shredded Sharp Cheddar Cheese
1 Cup shredded Monterey Jack Cheese
To start, preheat an oven to 400 degrees and prepare a baking sheet by covering it with foil and top with non-stick cooking spray. In a small mixing bowl, add the refried beans, taco seasoning, and salsa and thoroughly mix. Set the bowl aside.
Warm the entire stack of tortillas in the microwave for 20 seconds, just to slightly warm them. Place a tortilla on a cutting board and place a couple of tablespoons of the refried bean mixture in the center of the tortilla. Next, layer a couple of tablespoons of the rice and finally top with some cheddar and Monterey Jack cheeses. Fold in both sides and then roll the tortilla up. Place seam side down on the prepared baking sheet. Continue the process with the remaining tortillas. Coat the tops of the burrito with additional cooking spray.
Once all the burritos have been prepared, bake at 400 degrees for ten minutes. Remove the baking sheet from the oven and using tongs, very carefully flip each burrito over to brown the other side. Return the baking sheet to the oven for an additional five to ten minutes or until each sides has browned slightly. Serve and enjoy!
The End Result:
If you are looking for a quick, simple, meatless Mexican dish to whip up, this recipe is for you! Sometimes, it's nice to go au natural when creating a timeless dish. This dish, packed with cheesy, protein-rich goodness is delightful, and never heavy. If you want to serve with addition salsa or sour cream, be my guest. But this one is best left alone and you will be rewarded!
The Recipe: Cheesy Baked Bean and Rice Burritos
Original Recipe Adapted from a Recipe Found On: www.pinterest.com
What You'll Need:
1 (16 Ounce) can of Refried Beans
2 Tablespoons of jarred Salsa (your favorite will suffice)
1 Teaspoon packaged Taco Seasoning Mix
1 (10 count) package medium soft, taco-sized flour Tortillas
1 Cup prepared Mexican Rice
1 Cup shredded Sharp Cheddar Cheese
1 Cup shredded Monterey Jack Cheese
To start, preheat an oven to 400 degrees and prepare a baking sheet by covering it with foil and top with non-stick cooking spray. In a small mixing bowl, add the refried beans, taco seasoning, and salsa and thoroughly mix. Set the bowl aside.
Warm the entire stack of tortillas in the microwave for 20 seconds, just to slightly warm them. Place a tortilla on a cutting board and place a couple of tablespoons of the refried bean mixture in the center of the tortilla. Next, layer a couple of tablespoons of the rice and finally top with some cheddar and Monterey Jack cheeses. Fold in both sides and then roll the tortilla up. Place seam side down on the prepared baking sheet. Continue the process with the remaining tortillas. Coat the tops of the burrito with additional cooking spray.
Once all the burritos have been prepared, bake at 400 degrees for ten minutes. Remove the baking sheet from the oven and using tongs, very carefully flip each burrito over to brown the other side. Return the baking sheet to the oven for an additional five to ten minutes or until each sides has browned slightly. Serve and enjoy!
The End Result:
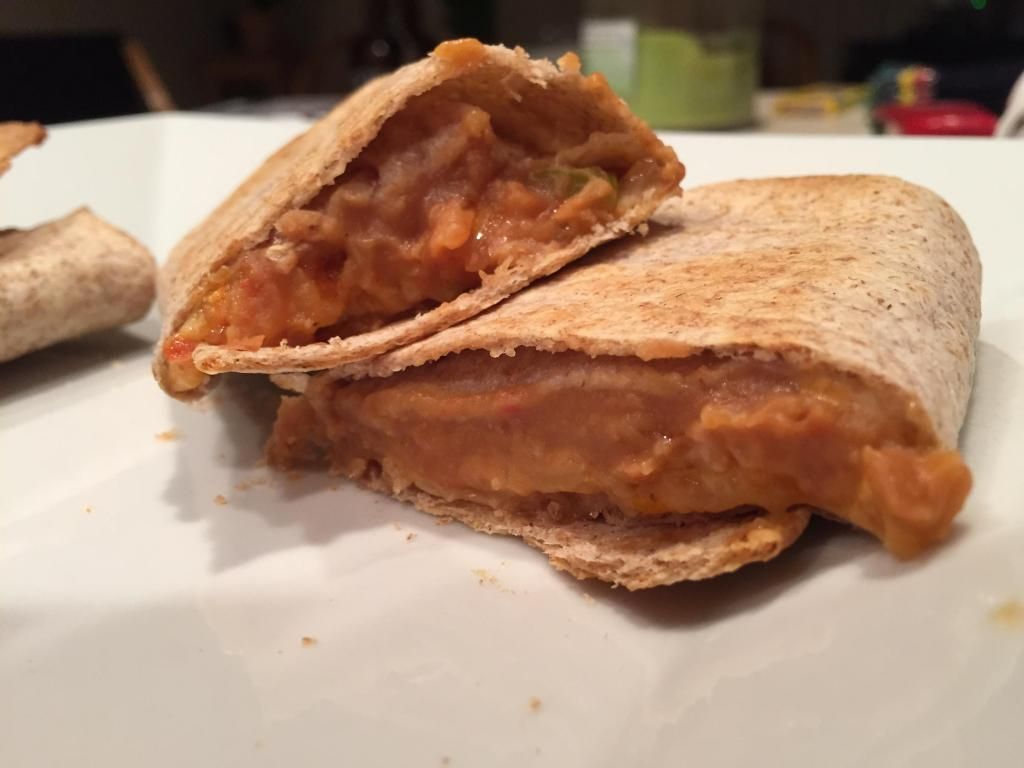 |
| I realize refried beans aren't the best to photograph after I took this picture! |
Sunday, March 15, 2015
Perfect Pulled Pork
Hello again everyone! Spring appears to have finally arrived in the midwest, as the past week has seen temperatures in the 50's, 60's and even 70's. As to be expected, the warm weather has brought the grills from the garage back to the patio - we've already fired ours up as well!
Yes, warm weather means grilling and BBQ, but the downside with these early spring days is that the temperature isn't consistently warm. So, what are you to do when you want great BBQ flavor but the outdoor temps aren't cooperating? Turn to the slow cooker, of course!
The Recipe: Barbecue Pulled Pork
Original Recipe Found in: Food Network Magazine (January / February 2015 Issue)
What You'll Need:
1/4 Cup Dark Brown Sugar
1 Tablespoon Chili Powder
2 Teaspoons Ground Cumin
1 Teaspoon Ground Mustard
1/2 Teaspoon Ground Allspice
1/2 Teaspoon Cayenne Pepper
4 Pounds Boneless Pork Shoulder (Excess fat trimmed)
1 Tablespoon Vegetable Oil
1 Onion (Chopped)
4 Cloves Garlic (Chopped)
1 Tablespoon Tomato Paste
2 Cups Low Sodium Chicken Broth
1/2 Cup Ketchup
1/4 Apple Cider Vinegar
In a medium bowl, combine the brown sugar, chili powder, cumin, ground mustard, allspice, cayenne pepper, and a pinch of salt and pepper. Once combined, rub this spice mixture all over the pork shoulder, making sure to get the spices into every crevice of the meat. Once completely covered, tightly wrap the shoulder in plastic wrap and store it in the refrigerator for 1 to 4 hours (the longer the better - feel free to leave it for up to 8 hours, if you can).
Next, set a large skillet over medium high heat and add the vegetable oil. Once the oil is shimmering, add the onion and garlic and cook until softened. Add a pinch of black pepper along with the tomato paste, chicken broth, ketchup and cider vinegar and a cup of water. Bring the mixture to a simmer and allow to thicken slightly.
Transfer the pork shoulder to a slow cooker, and cover with the BBQ sauce. Set the slow cooker to low and allow it slow roast for 5 to 7 hours. After the initial roast, use a part of tongs or forks (whatever you feel most comfortable with) to tear apart the pork. Serve on fresh buns with a pickle and enjoy!
Wednesday, March 11, 2015
Dessert for Breakfast? Yes, Please!
Need a brunch idea fast, but in not a lot of time? These pancakes will be sure to delight and will make you crave for some more!
The Recipe: Carrot Cake Pancakes
Original Recipe Found In: Cooking Light 350 Calorie Dishes
What You'll Need:
5.6 Ounces All-Purpose Flour (about 1 1/4 cups)
1/4 Cup chopped Walnuts
2 Teaspoons Baking Powder
1 Teaspoon ground Cinnamon
1/4 Teaspoon Salt
1/8 Teaspoon freshly ground Nutmeg
Dash of ground cloves
Dash of ground ginger
1/4 Cup Brown Sugar
3/4 Cup Low-Fat Buttermilk
1 Tablespoon Canola Oil
1 1/2 Teaspoons Vanilla Extract
2 Large Eggs, lightly beaten
2 Cups finely grated Carrot (about 1 pound)
To start, weigh or lightly spoon 5.6 ounces of flour into dry measuring cups and level with a knife. Combine the flour, walnuts, baking powder, cinnamon, salt, nutmeg, cloves, and ginger in a large mixing bowl. Stir these ingredients with a whisk until well combined. In a medium mixing bowl, add the brown sugar, buttermilk, oil, vanilla extract, and eggs. Thoroughly mix until all the ingredients have incorporated themselves. Slowly pour the sugar mixture into the flour mixture and stir until just moist. Fold in the carrot until it has incorporated itself into the batter.
Next, heat a large, nonstick skillet over medium heat. Coat the pan with cooking spray. Once the pan has heated, spoon a 1/4 cup portion of the batter into the skillet, leaving room for three more pancakes. Gently spread the batter, but don't overcrowd the pan. Cook each pancake for two minutes or until the tops have begun to bubble and the edges look colored. Very carefully turn the pancakes over and cook for another minute, or until lightly browned. Repeat this procedure with the remaining batter. Serve with butter and/or syrup or nothing at all and enjoy!
The End Result:
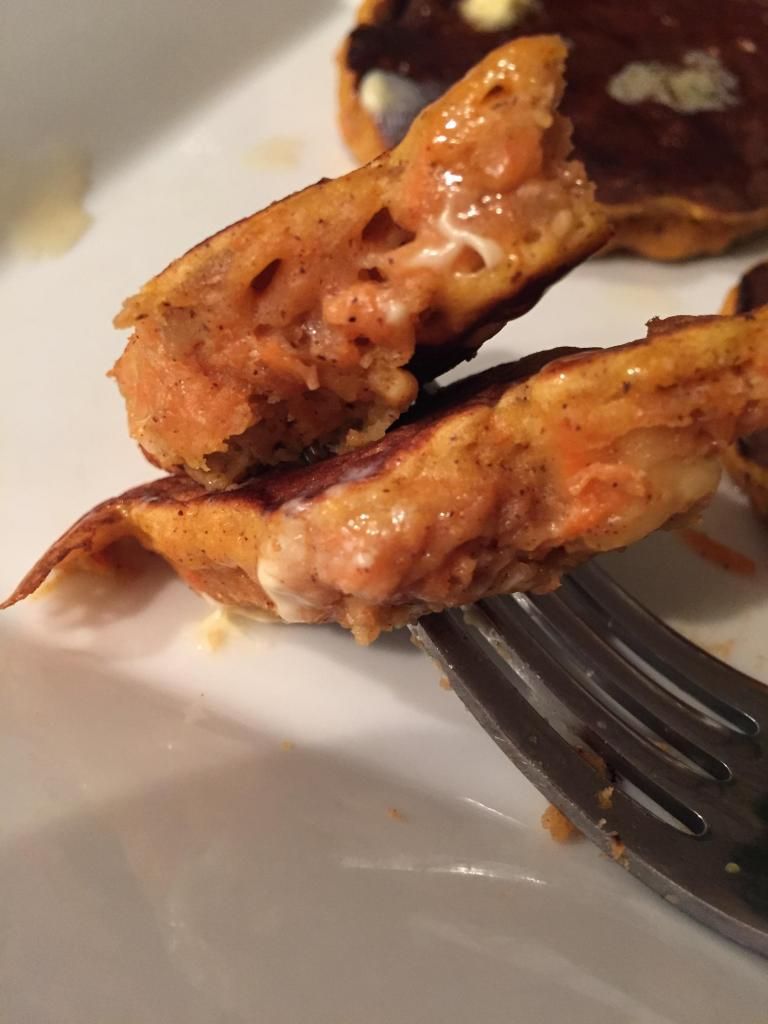
These little pancakes are the most decadent, moist pancakes you will ever meet! The carrots will make it taste like carrot cake, and if you are a fan of it (but not the amount of time it takes to make it,) you will love these pancakes! You will have to be very careful on latter batches of the pancakes, because they will cook very quickly, if you aren't watching. The original recipe called to serve with the honey and butter, but I stuck with good ol' maple syrup and it tasted delicious. You could serve it with a multitude of sweet toppings, or, like Tyler did, ate them by themselves and the delicious factor was still in place. Give these pancakes a try, you will NOT be disappointed!
The Recipe: Carrot Cake Pancakes
Original Recipe Found In: Cooking Light 350 Calorie Dishes
What You'll Need:
5.6 Ounces All-Purpose Flour (about 1 1/4 cups)
1/4 Cup chopped Walnuts
2 Teaspoons Baking Powder
1 Teaspoon ground Cinnamon
1/4 Teaspoon Salt
1/8 Teaspoon freshly ground Nutmeg
Dash of ground cloves
Dash of ground ginger
1/4 Cup Brown Sugar
3/4 Cup Low-Fat Buttermilk
1 Tablespoon Canola Oil
1 1/2 Teaspoons Vanilla Extract
2 Large Eggs, lightly beaten
2 Cups finely grated Carrot (about 1 pound)
To start, weigh or lightly spoon 5.6 ounces of flour into dry measuring cups and level with a knife. Combine the flour, walnuts, baking powder, cinnamon, salt, nutmeg, cloves, and ginger in a large mixing bowl. Stir these ingredients with a whisk until well combined. In a medium mixing bowl, add the brown sugar, buttermilk, oil, vanilla extract, and eggs. Thoroughly mix until all the ingredients have incorporated themselves. Slowly pour the sugar mixture into the flour mixture and stir until just moist. Fold in the carrot until it has incorporated itself into the batter.
Next, heat a large, nonstick skillet over medium heat. Coat the pan with cooking spray. Once the pan has heated, spoon a 1/4 cup portion of the batter into the skillet, leaving room for three more pancakes. Gently spread the batter, but don't overcrowd the pan. Cook each pancake for two minutes or until the tops have begun to bubble and the edges look colored. Very carefully turn the pancakes over and cook for another minute, or until lightly browned. Repeat this procedure with the remaining batter. Serve with butter and/or syrup or nothing at all and enjoy!
The End Result:
These little pancakes are the most decadent, moist pancakes you will ever meet! The carrots will make it taste like carrot cake, and if you are a fan of it (but not the amount of time it takes to make it,) you will love these pancakes! You will have to be very careful on latter batches of the pancakes, because they will cook very quickly, if you aren't watching. The original recipe called to serve with the honey and butter, but I stuck with good ol' maple syrup and it tasted delicious. You could serve it with a multitude of sweet toppings, or, like Tyler did, ate them by themselves and the delicious factor was still in place. Give these pancakes a try, you will NOT be disappointed!
Wednesday, February 25, 2015
Carrots...Who Knew?
Good evening everyone! Tonight, I introduce a new chef to our kitchen. No, we're not adding another writer to the blog. I'm talking about another influence to our cooking abilities. Chef Geoffrey Zakarian might not be a household name, but if you are a fan of Food Network (especially the show Chopped,) the name you'll immediately recognize. His old-school, traditional recipes definitely add a bit of style to the modern kitchen, but he has some true talent that cannot be overshadowed. Tonight, I'll be showcasing one of those dishes and it will not disappoint!
The Recipe: Roasted Carrots with Provencal Breadcrumb Crust
Original Recipe Found In: Geoffrey Zakarian's My Perfect Pantry
What You'll Need:
2 Pounds Baby Carrots with tops, trimmed to leave a small tip of green at the top
1/4 Cup Extra-Virgin Olive Oil
2 Cups unseasoned Bread Crumbs
2 small Shallots, finely chopped
1/2 Cup chopped fresh Basil
1/2 Cup chopped Scallions, white and green parts
2 Garlic cloves, finely chopped
1/4 Cup freshly grated Parmigiano-Reggiano cheese
To start, preheat an oven to 375 degrees. In a large pot, fill with water and bring to a boil over high heat. Add the carrots to the boiling water and cook until just tender, about four minutes. Drain the carrots in a colander and place in a ice bath. Bring the carrots out of the ice bath and onto paper towels to pat dry. In a large glass or ceramic baking dish, arrange the carrots in a single layer and drizzle with some olive oil. Season with salt and pepper.
Next, in a large mixing bowl, add the bread crumbs, shallots, basil, parsley, scallions, and garlic and throughly combine. Season with salt and pepper. Drizzle the mixture with olive oil and toss well with a fork to combine.
Sprinkle the bread crumb mixture over the carrots, so that that carrots are completely covered. Sprinkle the cheese and drizzle with a bit more olive oil. Place the baking dish in the oven and roast until the carrots are browned and the crumbs are crisp and golden, between 20 to 25 minutes. Serve and enjoy!
The End Result:
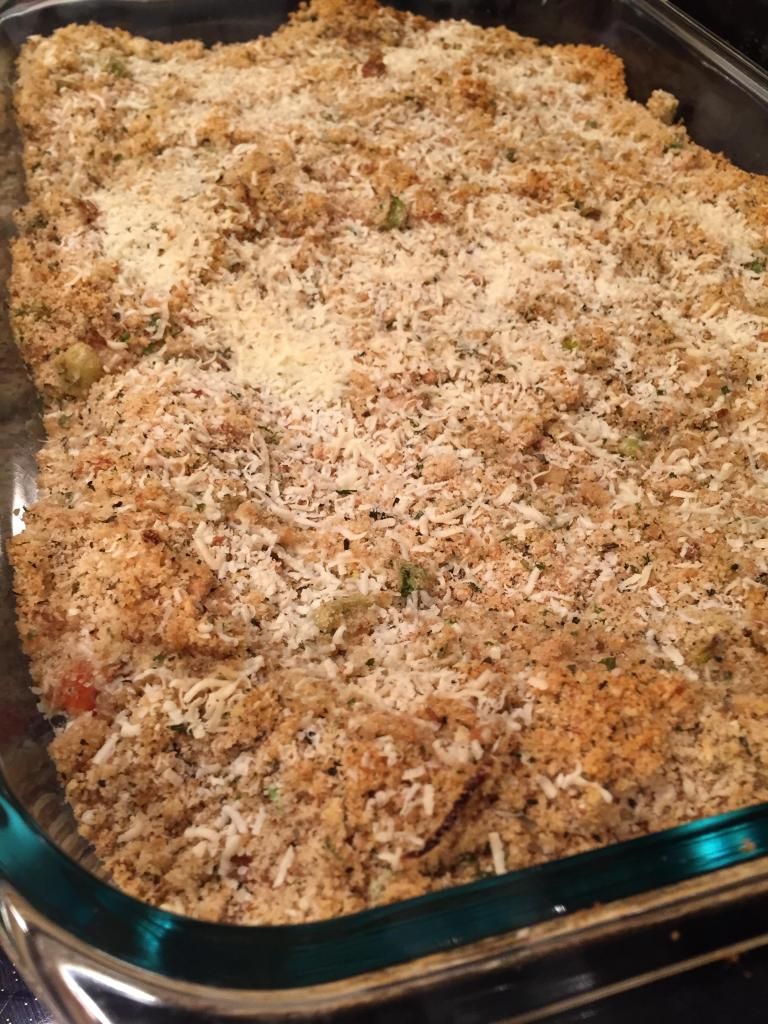
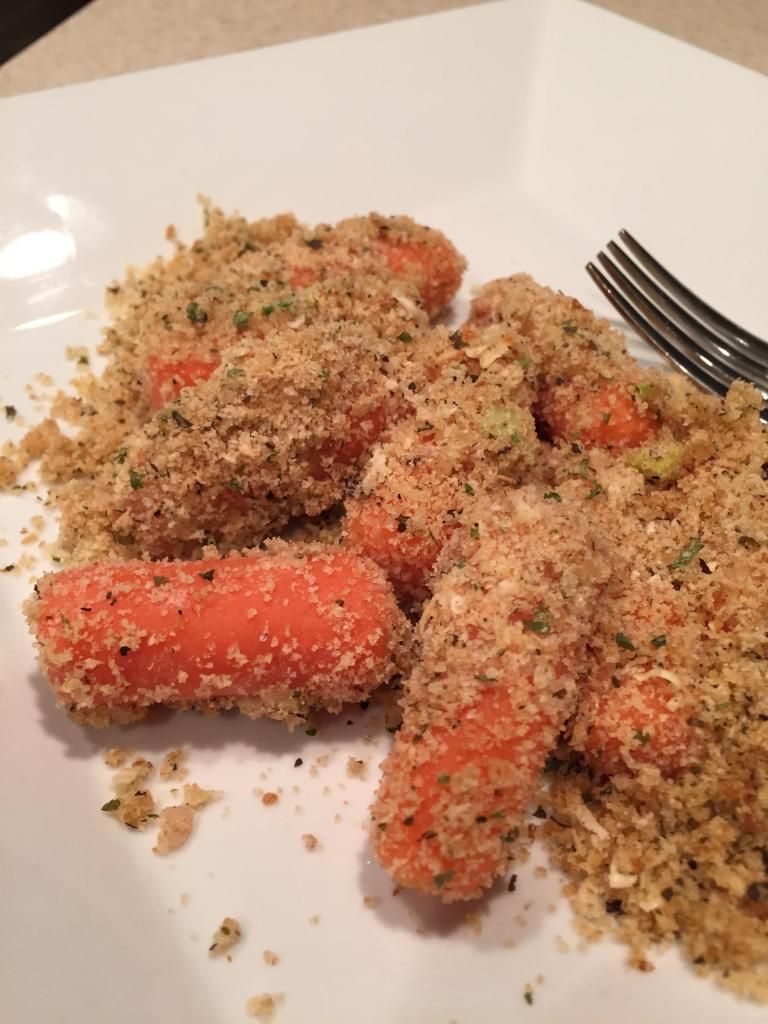
Even though this recipe could call itself a "side dish", there's no dish that could call itself the main course over these carrots! Once the carrots are nice and tender, the bread crumb topping just melts into the carrots. There's a host of flavors that have added themselves nicely to this dish and makes it quite delectable. While this does take a bit more time than my usual week night meals, it well definitely be worth it and you're eating healthy too!
Keep checking back for recipes that are sure to entice and get your mouth watering! Until then,
~Cheers!
The Recipe: Roasted Carrots with Provencal Breadcrumb Crust
Original Recipe Found In: Geoffrey Zakarian's My Perfect Pantry
What You'll Need:
2 Pounds Baby Carrots with tops, trimmed to leave a small tip of green at the top
1/4 Cup Extra-Virgin Olive Oil
2 Cups unseasoned Bread Crumbs
2 small Shallots, finely chopped
1/2 Cup chopped fresh Basil
1/2 Cup chopped Scallions, white and green parts
2 Garlic cloves, finely chopped
1/4 Cup freshly grated Parmigiano-Reggiano cheese
To start, preheat an oven to 375 degrees. In a large pot, fill with water and bring to a boil over high heat. Add the carrots to the boiling water and cook until just tender, about four minutes. Drain the carrots in a colander and place in a ice bath. Bring the carrots out of the ice bath and onto paper towels to pat dry. In a large glass or ceramic baking dish, arrange the carrots in a single layer and drizzle with some olive oil. Season with salt and pepper.
Next, in a large mixing bowl, add the bread crumbs, shallots, basil, parsley, scallions, and garlic and throughly combine. Season with salt and pepper. Drizzle the mixture with olive oil and toss well with a fork to combine.
Sprinkle the bread crumb mixture over the carrots, so that that carrots are completely covered. Sprinkle the cheese and drizzle with a bit more olive oil. Place the baking dish in the oven and roast until the carrots are browned and the crumbs are crisp and golden, between 20 to 25 minutes. Serve and enjoy!
The End Result:
Even though this recipe could call itself a "side dish", there's no dish that could call itself the main course over these carrots! Once the carrots are nice and tender, the bread crumb topping just melts into the carrots. There's a host of flavors that have added themselves nicely to this dish and makes it quite delectable. While this does take a bit more time than my usual week night meals, it well definitely be worth it and you're eating healthy too!
Keep checking back for recipes that are sure to entice and get your mouth watering! Until then,
~Cheers!
Sunday, February 22, 2015
Chickpea & Spiced Pita Soup
Hello again everyone! While the calendar may be creeping toward spring, the reality is, winter still has a vicious hold upon most of the region. While that is bad news for most things (the air HURTS YOUR FACE! Why do we live in a region where the air hurts you face?!) it does mean that soup season is still very much in place - which is always a welcome thing.
So, let's take full advantage of soup season by cooking up a healthy, filling and most importantly - warm - soup.
The Recipe: Chickpea Soup With Spiced Pita Chips
Original Recipe From: Food Network Magazine - January 2015 Issue
What You'll Need:
1/4 Cup Extra-Virgin Olive Oil
2 Stalks Celery (Chopped)
2 Carrots (Chopped)
1 Large Onion (Chopped)
2 x 15 Ounce Can Chickpeas (Drained, rinsed)
1 x 15 Ounce Can Diced Fire Roasted Tomatoes with Green Chiles
1 Tablespoon Cumin
1 1/2 Teaspoons Ground Coriander
2 Pocketless Pitas (In a pinch, pita pockets work as well)
Juice of 1/2 a lemon
Preheat your oven to 325.
Heat 2 tablespoons of olive oil in a large dutch oven over medium high heat. Once the oil begins to shimmer, add the onion, celery and carrots along with a pinch of salt and pepper. Cook, stirring occasionally, until the veggies have softened.
Next, add 6 cups of water, the chickpeas, tomatoes, 2 teaspoons cumin, 1 teaspoon coriander and 1/2 teaspoon of salt. Cook, stirring occasionally until the mixture has thickened (this takes roughly 20 minutes). After 20 minutes, mash the chickpeas with the back of a large spoon - you don't have to mash them all or evenly completely mash them - just look to "break" them down a bit.
Meanwhile, slice your pita bread into wedges and toss them with the remaining 2 tablespoons of olive oil, 1 teaspoon of cumin, 1/2 teaspoon coriander and 1/2 teaspoon salt. Spread the wedges in a single layer on a rimmed baking sheet. Bake until the wedges are golden brown and crispy (roughly 8 to 10 minutes).
Just before serving, stir in the lemon juice and top with the pita chips. Enjoy!
The Results:

This recipe is a perfect example of a symbiotic culinary relationship. On its own, the soup is a bit bland, with lackluster texture - while on their own, the pita chips are a bit pungent and a little intense - together, however, the two make a beautifully balanced soup that finds great harmony in both flavor and texture. In short, this is a tasty soup that keeps the calorie count low. Just don't skip the pita chips - you'll be sorry!
So, let's take full advantage of soup season by cooking up a healthy, filling and most importantly - warm - soup.
The Recipe: Chickpea Soup With Spiced Pita Chips
Original Recipe From: Food Network Magazine - January 2015 Issue
What You'll Need:
1/4 Cup Extra-Virgin Olive Oil
2 Stalks Celery (Chopped)
2 Carrots (Chopped)
1 Large Onion (Chopped)
2 x 15 Ounce Can Chickpeas (Drained, rinsed)
1 x 15 Ounce Can Diced Fire Roasted Tomatoes with Green Chiles
1 Tablespoon Cumin
1 1/2 Teaspoons Ground Coriander
2 Pocketless Pitas (In a pinch, pita pockets work as well)
Juice of 1/2 a lemon
Preheat your oven to 325.
Heat 2 tablespoons of olive oil in a large dutch oven over medium high heat. Once the oil begins to shimmer, add the onion, celery and carrots along with a pinch of salt and pepper. Cook, stirring occasionally, until the veggies have softened.
Next, add 6 cups of water, the chickpeas, tomatoes, 2 teaspoons cumin, 1 teaspoon coriander and 1/2 teaspoon of salt. Cook, stirring occasionally until the mixture has thickened (this takes roughly 20 minutes). After 20 minutes, mash the chickpeas with the back of a large spoon - you don't have to mash them all or evenly completely mash them - just look to "break" them down a bit.
Meanwhile, slice your pita bread into wedges and toss them with the remaining 2 tablespoons of olive oil, 1 teaspoon of cumin, 1/2 teaspoon coriander and 1/2 teaspoon salt. Spread the wedges in a single layer on a rimmed baking sheet. Bake until the wedges are golden brown and crispy (roughly 8 to 10 minutes).
Just before serving, stir in the lemon juice and top with the pita chips. Enjoy!
The Results:
This recipe is a perfect example of a symbiotic culinary relationship. On its own, the soup is a bit bland, with lackluster texture - while on their own, the pita chips are a bit pungent and a little intense - together, however, the two make a beautifully balanced soup that finds great harmony in both flavor and texture. In short, this is a tasty soup that keeps the calorie count low. Just don't skip the pita chips - you'll be sorry!
Wednesday, February 18, 2015
Steak, Onion, and Pepper - A Classy Dinner Move
Good evening everyone! It's nice to add a bit of decadence to the standard evening meal. There are numerous options when this is the case. Nothing says it more than steak. While the meat itself is pretty bland, the possibilities of how you serve it and what you serve it with is what defines it. Tonight, I'll be creating a delicious steak, served with some veggie options that are out of the norm.
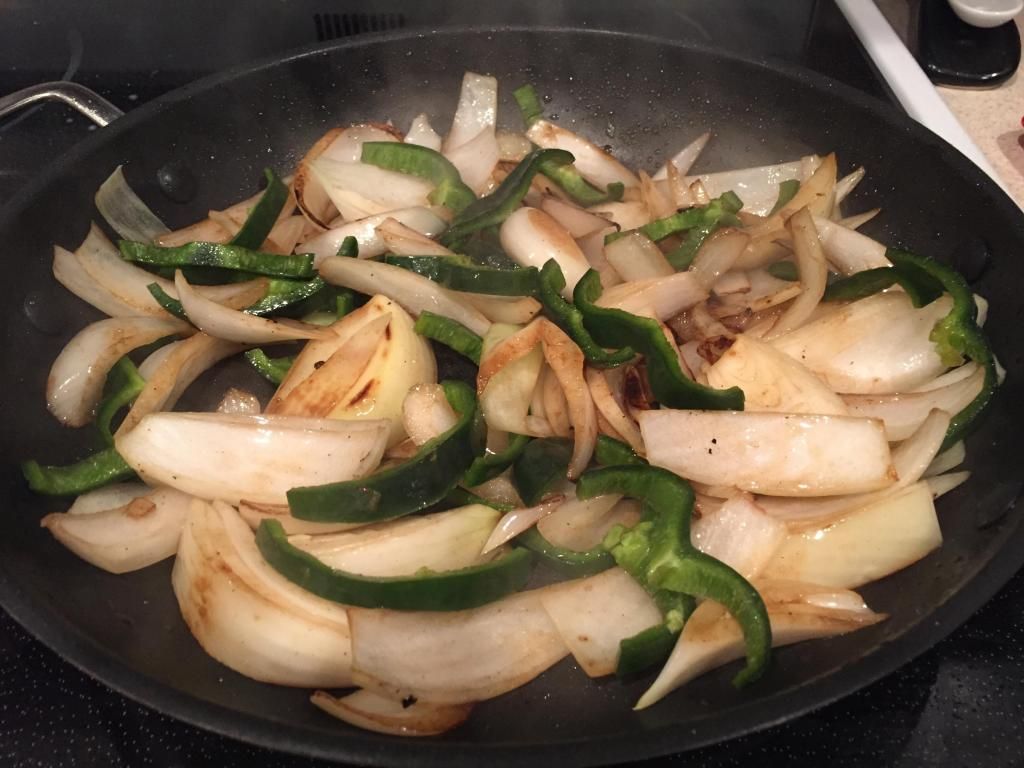
The Recipe: Strip Steak with Onions and Poblanos
Original Recipe Found In: Cooking Light, November 2014 Issue
What You'll Need:
2 (10 Ounce) New York Strip Steaks, trimmed
3/8 Teaspoon Smoked Paprika
1 1/2 Tablespoons Sesame Oil, divided
1 (12 Ounce) Yellow Onion, cut into 12 wedges
2 Poblano Peppers, seeded and cut into 1/2-inch strips
4 Lime Wedges
To start, heat a large, cast-iron skillet over medium-high heat. On a clean plate, position the steaks. Sprinkle the steaks evenly with the paprika, salt, and freshly ground black pepper. Add 1 1/2 teaspoons of oil to the pan and swirl to coat. Carefully place the steaks to the pan and cook for four minutes on each side, or until desired degree on doneness. Once cooked, remove the steaks from the pan on a cutting board, cover with aluminum foil, and let stand for ten minutes.
Meanwhile, add the remaining tablespoon of oil to the pan swirl to coat once more. Add the onion wedges and cook for two minutes on each side. Make room in the pan and add the poblanos. Saute the ingredients for four minutes, stirring occasionally. Remove the skillet from the heat, cover, and let stand for five minutes. Season with salt and pepper.
Prepare a clean platter and arrange the onion mixture on top. Remove the foil from the steak and cut the steak across the grain into thin slices. Arrange the steak over the onion mixture and sprinkle with salt. Serve with lime wedges and enjoy!
The End Results:
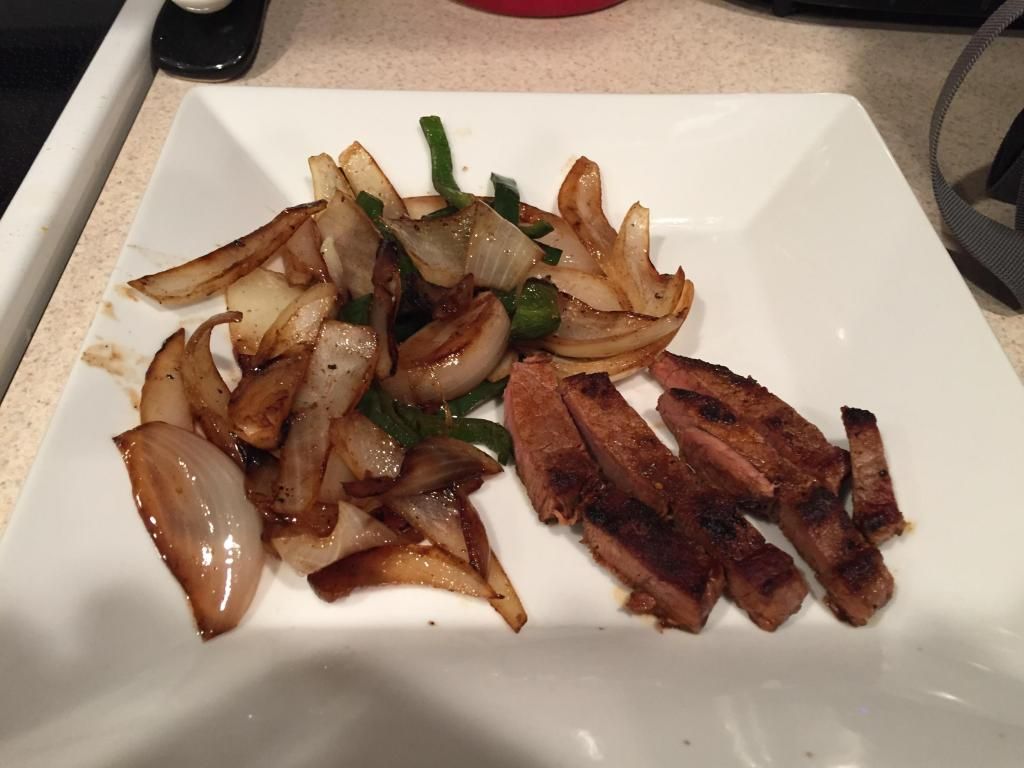
While the onions look a bit charred, trust me, it only adds more complexity to the dish. The steak is cooked perfectly, while resting it gives it more juice that would be lost if it was cut into right after cooking. The poblanos lost most of their heat while deseeding and cooking, which ended up being a a great pepper add in. The lime juice (we used bottled) spritzed on the meat and veggies added a bright note to the ingredients. Overall, a great, simple, and a hint of class dinner option that will leave you hungry for more.
That's all we have for you this week. Continue to check back with great options to try in your kitchen. Until then,
~Cheers!
The Recipe: Strip Steak with Onions and Poblanos
Original Recipe Found In: Cooking Light, November 2014 Issue
What You'll Need:
2 (10 Ounce) New York Strip Steaks, trimmed
3/8 Teaspoon Smoked Paprika
1 1/2 Tablespoons Sesame Oil, divided
1 (12 Ounce) Yellow Onion, cut into 12 wedges
2 Poblano Peppers, seeded and cut into 1/2-inch strips
4 Lime Wedges
To start, heat a large, cast-iron skillet over medium-high heat. On a clean plate, position the steaks. Sprinkle the steaks evenly with the paprika, salt, and freshly ground black pepper. Add 1 1/2 teaspoons of oil to the pan and swirl to coat. Carefully place the steaks to the pan and cook for four minutes on each side, or until desired degree on doneness. Once cooked, remove the steaks from the pan on a cutting board, cover with aluminum foil, and let stand for ten minutes.
Meanwhile, add the remaining tablespoon of oil to the pan swirl to coat once more. Add the onion wedges and cook for two minutes on each side. Make room in the pan and add the poblanos. Saute the ingredients for four minutes, stirring occasionally. Remove the skillet from the heat, cover, and let stand for five minutes. Season with salt and pepper.
Prepare a clean platter and arrange the onion mixture on top. Remove the foil from the steak and cut the steak across the grain into thin slices. Arrange the steak over the onion mixture and sprinkle with salt. Serve with lime wedges and enjoy!
The End Results:
While the onions look a bit charred, trust me, it only adds more complexity to the dish. The steak is cooked perfectly, while resting it gives it more juice that would be lost if it was cut into right after cooking. The poblanos lost most of their heat while deseeding and cooking, which ended up being a a great pepper add in. The lime juice (we used bottled) spritzed on the meat and veggies added a bright note to the ingredients. Overall, a great, simple, and a hint of class dinner option that will leave you hungry for more.
That's all we have for you this week. Continue to check back with great options to try in your kitchen. Until then,
~Cheers!
Sunday, February 8, 2015
Brilliant Blueberry Cakes
Hello again everyone! We've all been told countless times, "Breakfast is the most important meal of the day" - doctors, dietitians and anyone associated with keeping you healthy and happy have long repeated that mantra. The issue that many folks have is typically twofold - first "lack of time" and secondly "lack of options". In short, we're all in a hurry in the morning and the options set out for express breakfast are either poor in quality or not filling enough to last you all morning.
So, what are we, the at home chef, to do?
In short, address the week ahead on the weekend. Yes, with a bit of time investment on Sunday afternoon, you can prepare a week's worth of delicious breakfast treats that are not only satisfyingly tasty - they're also nutritious and filling. Sounds pretty good right? Then let's get cooking!
The Recipe: Blueberry-Oatmeal Cakes
Original Recipe From: Eatingwell.com
What You'll Need:
2 1/2 Cups Old Fashion Rolled Oats
1 1/2 Cups Low Fat Milk
1 Large Egg (Beaten)
1/3 Cup Pure Maple Syrup
2 Tablespoons Canola Oil
1 Teaspoon Vanilla Extract
1 Teaspoon Ground Cinnamon
1 Teaspoon Baking Powder
1/4 Teaspoon Salt
3/4 Cup Blueberries (Fresh or frozen)
Combine the oats and milk in a large bowl. Cover and place in the refrigerator for 8 to 12 hours.
After the initial soak, set your oven to 375 degrees and coat a 12 cup non-stick muffin tin with non-stick spray (yes, you'll need non-stick spray for non-stick pan - experience has shown that non-stick pans are not exactly non-stick...avoid a mess, use some spray!)
Next, stir in the egg, maple syrup, vanilla, cinnamon, baking powder and salt into the soaked oats. Mix until well combined. Portion the mixture into 1/4 cup increments, into each muffin cup. Top each cup with 1 to 2 tablespoons of blueberries and pop the muffins into the oven for 25 to 30 minutes, or until the muffins are springy to the touch.
Allow the muffins to cool for 10 to 15 minutes before eating. Best of all, these muffins can be stored in the refrigerator (tightly wrapped) for a week or frozen for 3 months.
Yes, these muffins can be frozen, which makes this recipe ideal for "make ahead" planning. You see, you can cook up a big batch of these muffins - pop the extras in the freezer and then simply microwave them for 30 seconds to 1 minute come weekday morning and - ta da! One delicious, filling and healthy breakfast.
The best part is, these little morsels are quite tasty (especially if you're a fan of blueberries!)
Wednesday, February 4, 2015
Stuffed with Spaghetti Squash?
Good evening everyone! It is no secret that I love Mexican food. I'm quite keen to the burritos and enchiladas of the world. But most Mexican dishes are pretty calorie ridden and it's tough to find recipes that keep the flavor and loose the bulk. Tonight, I'm sharing a pretty tasty Mexican recipe that won't break the calorie bank and will definitely be a fan favorite at your house.
The Recipe: Chicken Enchilada Stuffed Spaghetti Squash
Original Recipe Adapted From: www.pinterest.com
What You'll Need:
1 Large Spaghetti Squash, cut in half and seeded
1 Tablespoon Oil
1/2 Pound Boneless, Skinless Chicken Breast, cooked and shredded
2 Cups Enchilada Sauce
1/2 Cup Black Beans
1/2 Cup Corn
1/4 Cup Cilantro, torn (optional)
1/2 Cup shredded Sharp Cheddar Cheese
1/2 Cup shredded Monterey Jack Cheese
To start, prepare the spaghetti squash. Preheat an oven to 400 degrees. Brush in the inner flesh of the spaghetti squash with the oil and season with salt and pepper. Place the squash on a heavy baking sheet, skin side up, and cook until tender, about 30 minutes.
While the squash is cooking, prepare the "inner" ingredients. In a medium mixing bowl, combine the chicken, enchilada sauce, beans, corn, and cilantro and mix well. Once the squash has cooled enough to touch, divide the mixture between the two halves. Top the squash and ingredients with equal amounts of cheese.
Place the squash back in the oven and cook until the cheese has began to melt and turn a light golden brown, about three to five minutes. Place the cooked squash on clean plates, serve, and enjoy!
The End Result:
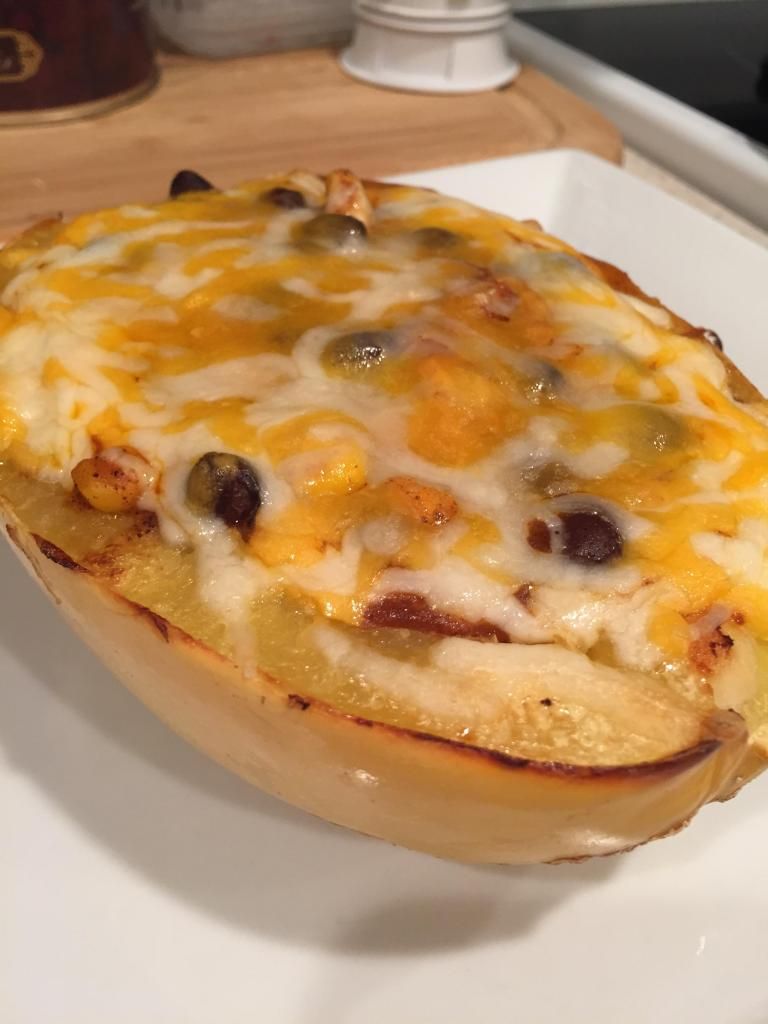
Using a spaghetti squash makes this a much healthier alternative to the traditional Mexican fare. The portions are smaller, but yet in equal parts, so it's a good way to eat sensibly. Also, when you mix all the ingredients (the chicken portion with the spaghetti squash flesh,) it tastes incredible! I'm a big fan of spaghetti squash already and this is a great recipe to incorporate a healthy take into a favorite type food!
That's all we have for you tonight. Keep checking back for more delicious ideas to bring into your kitchen. Until then,
~Cheers!
The Recipe: Chicken Enchilada Stuffed Spaghetti Squash
Original Recipe Adapted From: www.pinterest.com
What You'll Need:
1 Large Spaghetti Squash, cut in half and seeded
1 Tablespoon Oil
1/2 Pound Boneless, Skinless Chicken Breast, cooked and shredded
2 Cups Enchilada Sauce
1/2 Cup Black Beans
1/2 Cup Corn
1/4 Cup Cilantro, torn (optional)
1/2 Cup shredded Sharp Cheddar Cheese
1/2 Cup shredded Monterey Jack Cheese
To start, prepare the spaghetti squash. Preheat an oven to 400 degrees. Brush in the inner flesh of the spaghetti squash with the oil and season with salt and pepper. Place the squash on a heavy baking sheet, skin side up, and cook until tender, about 30 minutes.
While the squash is cooking, prepare the "inner" ingredients. In a medium mixing bowl, combine the chicken, enchilada sauce, beans, corn, and cilantro and mix well. Once the squash has cooled enough to touch, divide the mixture between the two halves. Top the squash and ingredients with equal amounts of cheese.
Place the squash back in the oven and cook until the cheese has began to melt and turn a light golden brown, about three to five minutes. Place the cooked squash on clean plates, serve, and enjoy!
The End Result:
Using a spaghetti squash makes this a much healthier alternative to the traditional Mexican fare. The portions are smaller, but yet in equal parts, so it's a good way to eat sensibly. Also, when you mix all the ingredients (the chicken portion with the spaghetti squash flesh,) it tastes incredible! I'm a big fan of spaghetti squash already and this is a great recipe to incorporate a healthy take into a favorite type food!
That's all we have for you tonight. Keep checking back for more delicious ideas to bring into your kitchen. Until then,
~Cheers!
Wednesday, January 28, 2015
Lickety-Fast, Finger Licking Pasta
Good evening everyone! At some point, every family (or couple) needs a dinner that meets three criteria: lightning fast to prepare, appealing to every pallet, and not too complicated ingredients. If it's healthy for you too, that's an added bonus. Tonight, I'm creating a dish that meets all FOUR of those cooking criteria and produces some delicious results.
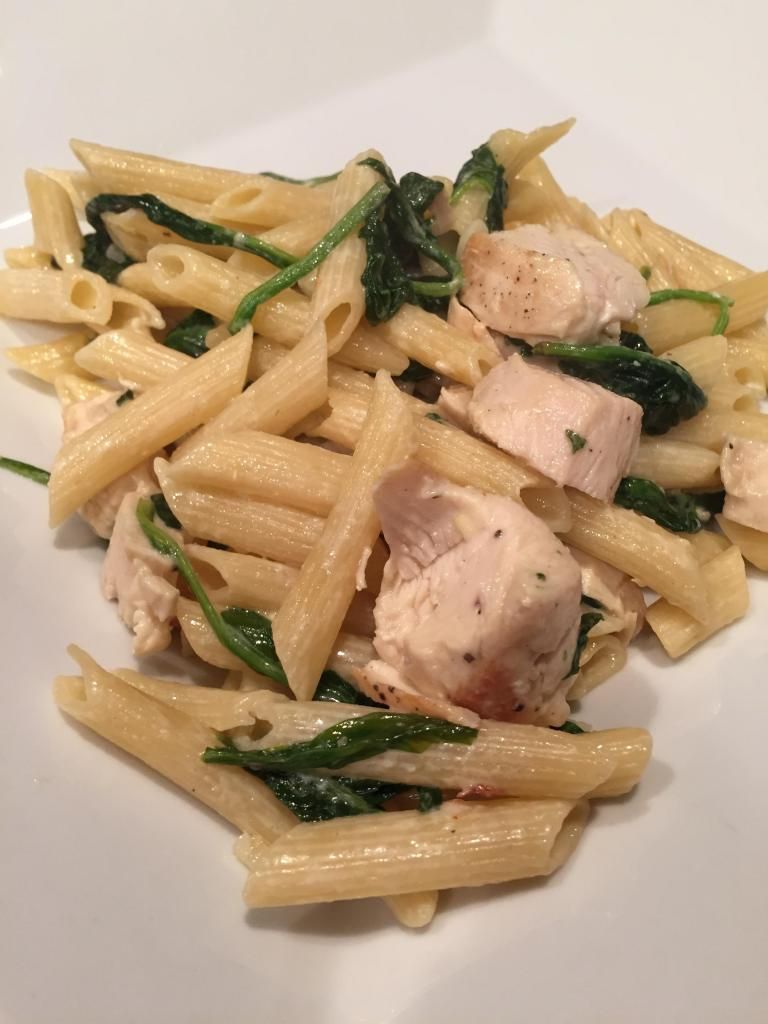
The Recipe: Two-Cheese Penne with Chicken and Spinach
Original Recipe Found In: Cooking Light, December 2015 Issue
What You'll Need:
8 Ounces uncooked, quick-cooking Penne
12 Ounces Boneless, Skinless Chicken Cutlets
1 Tablespoon Extra-Virgin Olive Oil
7 Ounces fresh Spinach
1/4 Teaspoon crushed Red Pepper Flakes
2 Garlic Cloves, minced
1 Tablespoon Lemon Juice
2 Ounces fresh Pecorino Romano Cheese, shredded (about 1/2 Cup)
2 Ounces 1/3-Less-Fat Cream Cheese (about 1/4 cup)
To start, bring a large saucepan of water to a boil and cook pasta according to cooking directions. Once cooked, drain in a colander over a bowl, reserving 1/4 cup of pasta cooking water.
Next, heat a large skillet over medium-high heat and coat the pan with cooking spray. Place the chicken on a clean plate and sprinkle both sides of the chicken with salt and pepper. Once the skillet is heated, add the chicken. Cook for three minutes on each side, or until the chicken is just done. Remove the chicken from the skillet and thinly slice against the grain.
Return the skillet to the stovetop and reheat again the medium heat. Add the oil and swirl to coat. Add the spinach, red pepper flakes, and garlic. Cook for three minutes, or until the spinach begins to wilt. Add the cooked pasta, reserved pasta water, chicken pieces, lemon juice, and cheeses to the skillet. Toss to coat and cook until the cheese begins to melt, between one to three minutes. Serve and enjoy!
The End Result:
The cheeses used are very light on the tastebuds, but does add some substantial flavor. While a thicker sauce or even oil could be used, it's best to use the cheese mixture and it won't disappoint. The chicken adds a mean portion of protein and the spinach also amps up the vitamin quota. But the true, shining point of this recipe is that it takes no time flat to create, which is great when there's not a lot of time to slave over a stovetop.
Thanks for joining us tonight! Keep checking back for more delicious dishes that will surely inspire the cook in you. Until then,
~Cheers!
Wednesday, January 21, 2015
More Soup to Shake a (Soup) Spoon At!
Good evening everyone! Continuing on my soup conquest, I bring you a fall/winter time favorite ingredient, that might not be used as often as anticipated. Granted, there's a whole menagerie of squashes out there, but to use one in a soup like this is quite tasty. Plus, it's paired with a cheesy crouton that evens out all the flavors.
The Recipe: Butternut Squash Soup
Original Recipe From: My Fitness Pal app
What You'll Need:
Two Tablespoons Olive Oil
1 Large White Onion, chopped
2 Medium Carrots, chopped
1/2 Medium Butternut Squash, cut into 1/4-inch pieces
6 Cups Low-Sodium Chicken Broth
2 Sprigs of fresh Rosemary
1/2 Small Baguette, sliced
4 Ounces of Sharp Cheddar Cheese, shredded
2 Scallions, thinly sliced
To start, head the oil in a large saucepan over medium heat. Add the chopped onion and season with salt and pepper. Stir all the ingredients together and cover, cooking for six minutes, stirring occasionally.
Once the onions have cooked, add the carrots and the squash, stir and cover. Cook this mixture for five more minutes, stirring occasionally also. Add the chicken broth and the rosemary and bring the mixture to a boil. Once at a boil, drop the heat and let simmer for 12-15 minutes, or until the vegetables are tender.
While the vegetables are cooking, heat the oven broiler. Place the sliced baguette pieces on a foil lined baking sheet and sprinkle with the shredded cheddar cheese. Place the baking sheet in the oven and broil under the cheese has melted, about one to two minutes. Remove from the oven and set aside.
Once the vegetables have cooked, remove and discard the rosemary. If you are using a stainless steel saucepan, use a corded immersion blender and blend until all the ingredients are thoroughly mixed. If you used a nonstick saucepan, carefully pour the ingredients in a blender and pulse to puree the ingredients. Pour into serving bowl, top with scallions and the cheese croutons, and enjoy!
The End Result:

The soup will be surprisingly sweet, as the butternut squash is naturally that way. The carrots help to enhance that flavor and no onion can be found. But the cheese croutons, as I have so lovingly named them, will add a depth to the soup that can't be found elsewhere. While they might look pretty on top the of the soup, submerge them in the liquid and add with your slurps of soup. The bread will give the soup something to cling to and the sharp cheddar cheese is a nice contrast with the squash flavor. Overall, a great, fresh soup recipe to add to your soup arsenal!
That's all we have for you this week. Check back frequently for more tasty additions to your recipe book. Until then,
~Cheers!
The Recipe: Butternut Squash Soup
Original Recipe From: My Fitness Pal app
What You'll Need:
Two Tablespoons Olive Oil
1 Large White Onion, chopped
2 Medium Carrots, chopped
1/2 Medium Butternut Squash, cut into 1/4-inch pieces
6 Cups Low-Sodium Chicken Broth
2 Sprigs of fresh Rosemary
1/2 Small Baguette, sliced
4 Ounces of Sharp Cheddar Cheese, shredded
2 Scallions, thinly sliced
To start, head the oil in a large saucepan over medium heat. Add the chopped onion and season with salt and pepper. Stir all the ingredients together and cover, cooking for six minutes, stirring occasionally.
Once the onions have cooked, add the carrots and the squash, stir and cover. Cook this mixture for five more minutes, stirring occasionally also. Add the chicken broth and the rosemary and bring the mixture to a boil. Once at a boil, drop the heat and let simmer for 12-15 minutes, or until the vegetables are tender.
While the vegetables are cooking, heat the oven broiler. Place the sliced baguette pieces on a foil lined baking sheet and sprinkle with the shredded cheddar cheese. Place the baking sheet in the oven and broil under the cheese has melted, about one to two minutes. Remove from the oven and set aside.
Once the vegetables have cooked, remove and discard the rosemary. If you are using a stainless steel saucepan, use a corded immersion blender and blend until all the ingredients are thoroughly mixed. If you used a nonstick saucepan, carefully pour the ingredients in a blender and pulse to puree the ingredients. Pour into serving bowl, top with scallions and the cheese croutons, and enjoy!
The End Result:
The soup will be surprisingly sweet, as the butternut squash is naturally that way. The carrots help to enhance that flavor and no onion can be found. But the cheese croutons, as I have so lovingly named them, will add a depth to the soup that can't be found elsewhere. While they might look pretty on top the of the soup, submerge them in the liquid and add with your slurps of soup. The bread will give the soup something to cling to and the sharp cheddar cheese is a nice contrast with the squash flavor. Overall, a great, fresh soup recipe to add to your soup arsenal!
That's all we have for you this week. Check back frequently for more tasty additions to your recipe book. Until then,
~Cheers!
Thursday, January 15, 2015
Mighty Fine Meat
Good evening everyone! There are often times where becoming a vegetarian wouldn't be so bad of an idea. Promote a more healthful status while giving new fruits and veggies I've never heard of before a shot. While I romanticize the idea, it's recipes, like this one tonight, that make me think otherwise and remember that I like being an omnivore.
The Recipe: Roast Beef Tenderloin with Cognac Butter
Original Recipe Found In: Cooking Light, November 2014 Issue
What You'll Need:
For the Tenderloin:
1 Tablespoon Dijon Mustard
2 Teaspoons Honey
1 Teaspoon Lower-Sodium Soy Sauce
3/4 Teaspoon Salt
1/2 Teaspoon Black Pepper
1 (2 Pound) Beef Tenderloin, trimmed
2 Tablespoons chopped fresh Thyme
For the Cognac Butter:
1 1/2 Teaspoons Butter
3 Tablespoons minced Shallots
3 Tablespoons Cognac
6 1/2 Tablespoons Butter, softened
1 Tablespoon fresh Thyme leaves
1/8 Teaspoon Black Pepper
Start by preheating an oven to 425 degrees and prepare the cognac butter: melt 1 1/2 teaspoons butter in a small, nonstick skillet over medium-low heat. Next, add the shallots and cook for two minutes or until tender, stirring shallots occasionally. Carefully stir in the cognac and cook for one minute or until the liquid has reduced by about one-third. Remove the skillet from the heat and cool.
Next, place the 6 1/2 tablespoons butter in a small bowl and stir in the cooled cognac mixture, one tablespoon thyme leaves and 1/8 teaspoon black pepper. Cover with plastic wrap and chill in the refrigerator for ten minutes. Bring the mixture from the fridge and divide it in half. Scrape each half of the butter mixture onto a piece of plastic wrap. Shape each portion into a four-inch long log. Wrap each butter log in plastic wrap and refrigerate or freeze one log for another use.
To prepare the tenderloin, combine the mustard, honey, soy sauce, 3/4 teaspoon salt, and 1/2 teaspoon of pepper in a medium mixing bowl and stir with a whisk. Spread the mustard mixture over all the sides of the tenderloin and sprinkle with two tablespoons of thyme. Place the tenderloin in a shallow roasting pan. Place the pan in a 425 degree oven and cook for 38 minutes or until a thermometer inserted reads 135 degrees. Cover the tenderloin with foil and let stand for ten minutes.
Remove the tenderloin from the roasting pan and onto a cutting board. Cut the tenderloin crosswise into 16 slices. Arrange the slices on a serving plate and cut one butter log into eight slices and top each serving with one butter slice. Serve and enjoy!
The End Result:
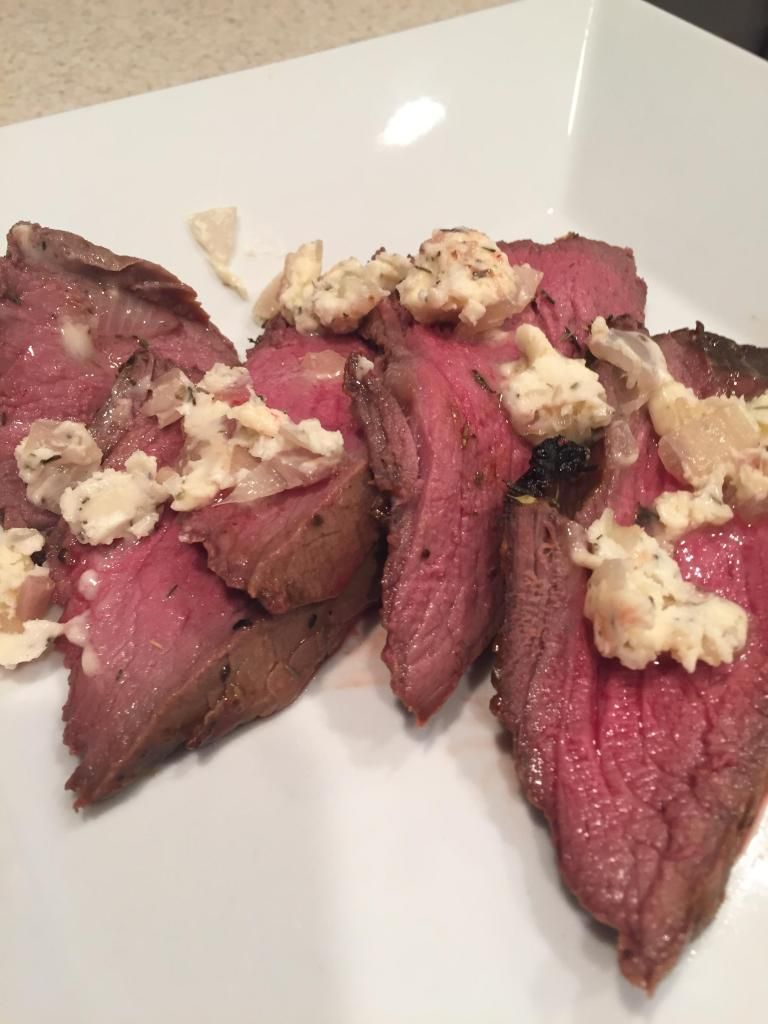
I've been raised to like my meat at just under well done to well done, but lately I have been enjoying my cooked meat to still have some pink in the middle. But for this recipe, it's well worth it. I've never cooked with a beef tenderloin, but it is, by far, the best meat you can purchase and cook yourself. Served with a wee bit of a boozy butter, it's quite fantastic. If you don't like your meat that undercooked, you are welcome to cook it for longer, but just remember to let it rest once it is done cooking - your pallet will thank you!
Thanks for joining us and we continue to share our culinary adventures. Until next time,
~Cheers!
The Recipe: Roast Beef Tenderloin with Cognac Butter
Original Recipe Found In: Cooking Light, November 2014 Issue
What You'll Need:
For the Tenderloin:
1 Tablespoon Dijon Mustard
2 Teaspoons Honey
1 Teaspoon Lower-Sodium Soy Sauce
3/4 Teaspoon Salt
1/2 Teaspoon Black Pepper
1 (2 Pound) Beef Tenderloin, trimmed
2 Tablespoons chopped fresh Thyme
For the Cognac Butter:
1 1/2 Teaspoons Butter
3 Tablespoons minced Shallots
3 Tablespoons Cognac
6 1/2 Tablespoons Butter, softened
1 Tablespoon fresh Thyme leaves
1/8 Teaspoon Black Pepper
Start by preheating an oven to 425 degrees and prepare the cognac butter: melt 1 1/2 teaspoons butter in a small, nonstick skillet over medium-low heat. Next, add the shallots and cook for two minutes or until tender, stirring shallots occasionally. Carefully stir in the cognac and cook for one minute or until the liquid has reduced by about one-third. Remove the skillet from the heat and cool.
Next, place the 6 1/2 tablespoons butter in a small bowl and stir in the cooled cognac mixture, one tablespoon thyme leaves and 1/8 teaspoon black pepper. Cover with plastic wrap and chill in the refrigerator for ten minutes. Bring the mixture from the fridge and divide it in half. Scrape each half of the butter mixture onto a piece of plastic wrap. Shape each portion into a four-inch long log. Wrap each butter log in plastic wrap and refrigerate or freeze one log for another use.
To prepare the tenderloin, combine the mustard, honey, soy sauce, 3/4 teaspoon salt, and 1/2 teaspoon of pepper in a medium mixing bowl and stir with a whisk. Spread the mustard mixture over all the sides of the tenderloin and sprinkle with two tablespoons of thyme. Place the tenderloin in a shallow roasting pan. Place the pan in a 425 degree oven and cook for 38 minutes or until a thermometer inserted reads 135 degrees. Cover the tenderloin with foil and let stand for ten minutes.
Remove the tenderloin from the roasting pan and onto a cutting board. Cut the tenderloin crosswise into 16 slices. Arrange the slices on a serving plate and cut one butter log into eight slices and top each serving with one butter slice. Serve and enjoy!
The End Result:
I've been raised to like my meat at just under well done to well done, but lately I have been enjoying my cooked meat to still have some pink in the middle. But for this recipe, it's well worth it. I've never cooked with a beef tenderloin, but it is, by far, the best meat you can purchase and cook yourself. Served with a wee bit of a boozy butter, it's quite fantastic. If you don't like your meat that undercooked, you are welcome to cook it for longer, but just remember to let it rest once it is done cooking - your pallet will thank you!
Thanks for joining us and we continue to share our culinary adventures. Until next time,
~Cheers!
Sunday, January 11, 2015
In The Morning, We're Making Waffles!
Hello again everyone! For most folks, the process of making waffles involves adapting pancake batter to the "waffle" instructions on the side of the box. We're not excluded from that generalization - for the longest time our waffle making process was simply adjusting the quantity of liquid to the pre-packaged mix.
The results aren't bad - we're not here to rag on the boxed pancake mix - but they're not all that waffles could be. You see, waffles from pancake mix are typically thicker which makes for a dense little waffle that is heavy in the stomach and that doesn't take well to a lot of toppings or other culinary uses. True waffle batter should yield a flavorful waffle (that can shine on it's own accord, without toppings if necessary) that is also light and fluffy.
Enter, Alton Brown. Who has crafted a basic waffle recipe that achieves all of these goals - best of all it contains only things you'll typically find in your pantry and it doesn't take any longer than the pre-package pancake batter does. Given that, why would you make waffles any other way? (You wouldn't...or shouldn't!)
The Recipe: Waffles...REALLY Good Waffles
Original Recipe By: Alton Brown
What You'll Need:
1 Cup All Purpose Flour
1 Cup Whole Wheat Pastry Flour
1/2 Baking Soda
1 Teaspoon Baking Powder
1 Teaspoon Salt
3 Tablespoons Sugar
3 Whole Eggs (Beaten)
2 Ounces Unsalted Butter (Melted)
16 Ounces Milk (Buttermilk is the original requirement, we used almond milk)
Coat your waffle iron with non-stick spray and heat according to its instructions.
Combine all the dry ingredients in a large bowl and stir to incorporate. In a separate bowl, combine all of the wet ingredients (eggs, milk, butter) and whisk until combined. Finally, add the wet ingredients to the dry ingredients and whisk until a majority of the lumps have been removed. DO NOT stir until all the lumps are gone - this will over toughen the batter and make things a bit too thick. After a few stirs to makes sure all of the dry and wet ingredients have melded nicely, simply walk away. You'll want to keep stirring. Don't! Just put the whisk down, and walk away.
Allow the batter to rest for 5 minutes before adding it to the waffle iron and cooking until you reach the desired doneness.
Top with syrup for a traditional flare, or use them for any variety of uses such as bread pudding, ice cream sandwiches, or whatever you can craft up (Seriously, the realm of uses for waffles is vast - start checking your recipe books, they're used EVERYWHERE).
The Results:

These simple little waffles truly outshine their boxed counterparts in every way. They're light, fluffy, flavorful and much more versatile than the thicker, heavier product that comes from pancake batter. In short, when it comes to waffles, if you want to do it right, you'll want to follow this recipe!
(By the way, this recipe will likely cook up more waffles than you can handle in one sitting. The great part is, they freeze beautifully. Simple slide them into a zip top bag and store in the freezer. To reheat, simply pop them in the toaster, just like their big box frozen cousins, they work nicely as a quick and easy breakfast meal right out of the freezer).
That's all we have for you today - but we're back next week with another brand new recipe, followed by a tasty treat utilizing the versatile little blueberry - look out for that next Sunday. Until then,
~Cheers
The results aren't bad - we're not here to rag on the boxed pancake mix - but they're not all that waffles could be. You see, waffles from pancake mix are typically thicker which makes for a dense little waffle that is heavy in the stomach and that doesn't take well to a lot of toppings or other culinary uses. True waffle batter should yield a flavorful waffle (that can shine on it's own accord, without toppings if necessary) that is also light and fluffy.
Enter, Alton Brown. Who has crafted a basic waffle recipe that achieves all of these goals - best of all it contains only things you'll typically find in your pantry and it doesn't take any longer than the pre-package pancake batter does. Given that, why would you make waffles any other way? (You wouldn't...or shouldn't!)
The Recipe: Waffles...REALLY Good Waffles
Original Recipe By: Alton Brown
What You'll Need:
1 Cup All Purpose Flour
1 Cup Whole Wheat Pastry Flour
1/2 Baking Soda
1 Teaspoon Baking Powder
1 Teaspoon Salt
3 Tablespoons Sugar
3 Whole Eggs (Beaten)
2 Ounces Unsalted Butter (Melted)
16 Ounces Milk (Buttermilk is the original requirement, we used almond milk)
Coat your waffle iron with non-stick spray and heat according to its instructions.
Combine all the dry ingredients in a large bowl and stir to incorporate. In a separate bowl, combine all of the wet ingredients (eggs, milk, butter) and whisk until combined. Finally, add the wet ingredients to the dry ingredients and whisk until a majority of the lumps have been removed. DO NOT stir until all the lumps are gone - this will over toughen the batter and make things a bit too thick. After a few stirs to makes sure all of the dry and wet ingredients have melded nicely, simply walk away. You'll want to keep stirring. Don't! Just put the whisk down, and walk away.
Allow the batter to rest for 5 minutes before adding it to the waffle iron and cooking until you reach the desired doneness.
Top with syrup for a traditional flare, or use them for any variety of uses such as bread pudding, ice cream sandwiches, or whatever you can craft up (Seriously, the realm of uses for waffles is vast - start checking your recipe books, they're used EVERYWHERE).
The Results:
These simple little waffles truly outshine their boxed counterparts in every way. They're light, fluffy, flavorful and much more versatile than the thicker, heavier product that comes from pancake batter. In short, when it comes to waffles, if you want to do it right, you'll want to follow this recipe!
(By the way, this recipe will likely cook up more waffles than you can handle in one sitting. The great part is, they freeze beautifully. Simple slide them into a zip top bag and store in the freezer. To reheat, simply pop them in the toaster, just like their big box frozen cousins, they work nicely as a quick and easy breakfast meal right out of the freezer).
That's all we have for you today - but we're back next week with another brand new recipe, followed by a tasty treat utilizing the versatile little blueberry - look out for that next Sunday. Until then,
~Cheers
Wednesday, January 7, 2015
Prepare Yourself with a Whole Lot of Garlic!
Good evening everyone! I absolutely love the combination of cheese and pasta! To me, there is no greater combination of foods that can be put together. Sure there are quite a few that can compare, but for comfort food, when cheese wraps itself around pasta, it's sure to be a hit. When I found this recipe to enhance the traditional mac and cheese with garlic, it was worth whipping up a batch and see what would happen!
The Recipe: Roasted Garlic Mac & Cheese
Original Recipe Found In: Cooking Light, October 2014 Issue
What You'll Need:
2 Whole Garlic Heads
1 Tablespoon Olive Oil
3 Tablespoons Water
10 Ounces Whole-Grain Penne
2 3/4 Cup 1% Low-Fat Milk
3 1/2 Tablespoons All-Purpose Flour
1 Teaspoon Kosher Salt
1/2 Teaspoon Black Pepper
4 Ounces Sharp Cheddar Cheese, shredded and divided (about 1 cup)
2 Ounces Part-Skim Mozzarella Cheese, shredded (about 1/2 cup)
To start, bring a large saucepan of water to a boil and cook pasta according to package directions. Once cooked, drain in a colander and set aside.
Next, remove the white, papery skin from the garlic heads, but do not peel or separate the cloves. If you've ever worked with garlic, this is a hard concept to follow through since in most recipes it calls to separate the garlic cloves. Tempting as it may seem, keep the cloves intact, but try to remove as much skin as possible. Place the garlic heads in a microwave-safe bowl and rub the garlic heads with oil. Pour the water in the bottle of the bowl and cover the entire thing with plastic wrap. Place the bowl in the microwave and cook on high for 4.5 minutes or until the garlic is very tender. Remove the bowl from the microwave and let it cool slightly.
Next, combine the milk and flour in a medium saucepan, stirring with a whisk. Bring the mixture to a boil over medium-high heat, stirring frequently. Cook the milk mixture for three minutes or until thickened. Once cooked, remove from the heat and add the salt, pepper, 1 ounce of cheddar and mozzarella cheeses. Stir until smooth and the cheeses have melted. Set this aside.
Begin to preheat an oven broiler. Meanwhile, from the microwaved bowl, separate the garlic cloves and squeeze to extract the garlic pulp. Some of the garlic cloves will still be pretty warm, but if you work quickly, it should be a light task. Place the garlic pulp and two cups of the milk mixture in a blender. Process until the sauce is smooth. Stir the garlic mixture into the remaining milk mixture and stir until well incorporated. Add the pasta and stir to coat.
Spoon the pasta mixture into a broiler-safe 11x7 glass or ceramic baking dish coated with cooking spray. Alternatively, you could use 6 (10 ounce) ramekins or gratin dishes. Once in the desired baking vessel, sprinkle with the remaining three ounces of cheddar cheese. Broil for two minutes or until the cheese has melted and begin to turn brown. Let the cooking vessel stand for five minutes, serve, and enjoy!
The End Result:
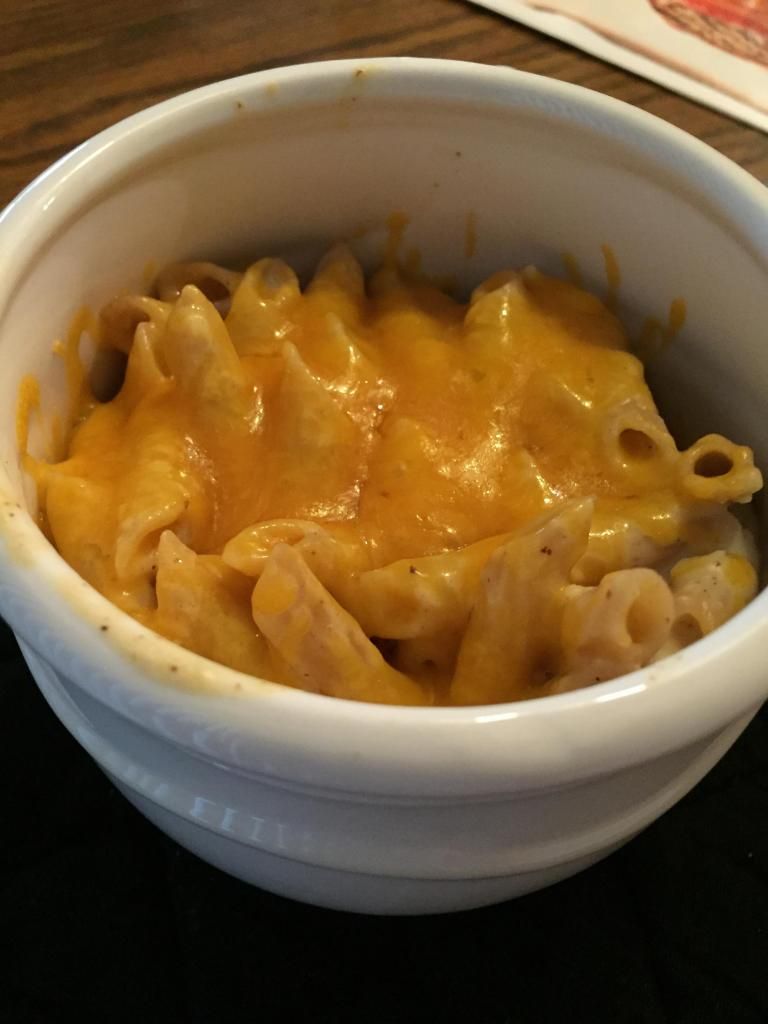
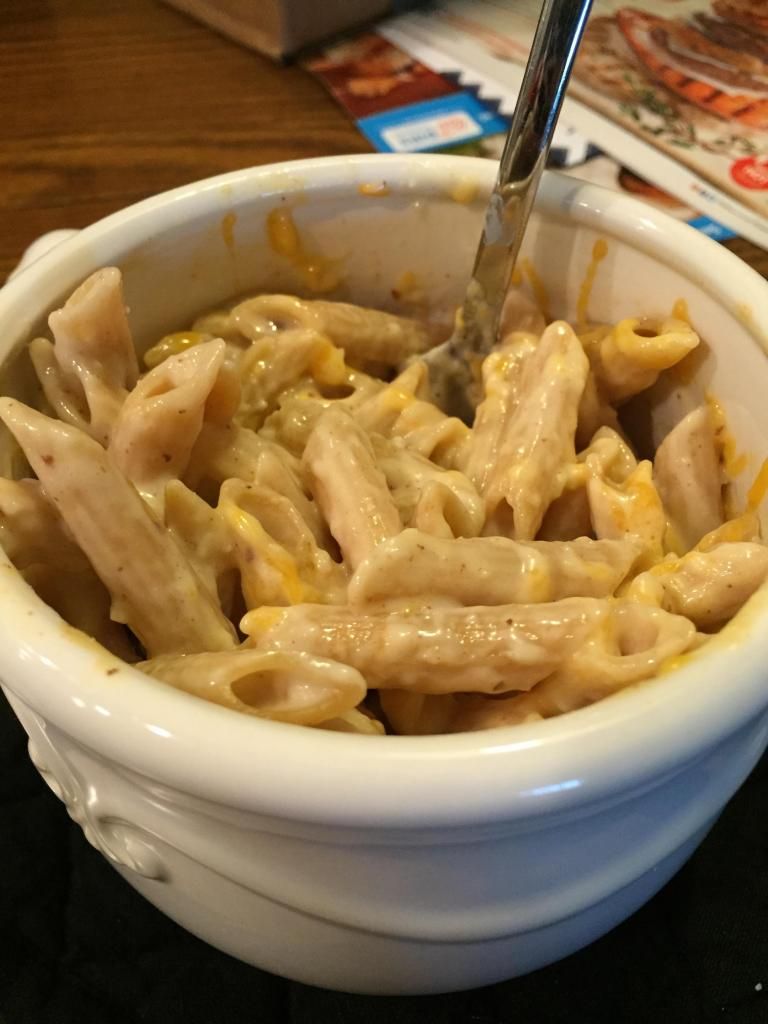
If you are not a fan of particularly strong garlic flavor, this mac and cheese will not be for you. If you love garlic infused in every single bite, along with some potent cheese flavor, then be careful not to eat the entire batch in one sitting! I didn't quite process the garlic to a smooth consistency, as instructed, but the flavor made itself known and was quite delightful. While there was only two cheeses in this recipe, you could fool anyone with the outstanding cheese flavor. If you want to kick up your mac and cheese game, this recipe is for you!
Join us next week as we continue our quest for awesome recipes to present to you. Until then,
~Cheers!
The Recipe: Roasted Garlic Mac & Cheese
Original Recipe Found In: Cooking Light, October 2014 Issue
What You'll Need:
2 Whole Garlic Heads
1 Tablespoon Olive Oil
3 Tablespoons Water
10 Ounces Whole-Grain Penne
2 3/4 Cup 1% Low-Fat Milk
3 1/2 Tablespoons All-Purpose Flour
1 Teaspoon Kosher Salt
1/2 Teaspoon Black Pepper
4 Ounces Sharp Cheddar Cheese, shredded and divided (about 1 cup)
2 Ounces Part-Skim Mozzarella Cheese, shredded (about 1/2 cup)
To start, bring a large saucepan of water to a boil and cook pasta according to package directions. Once cooked, drain in a colander and set aside.
Next, remove the white, papery skin from the garlic heads, but do not peel or separate the cloves. If you've ever worked with garlic, this is a hard concept to follow through since in most recipes it calls to separate the garlic cloves. Tempting as it may seem, keep the cloves intact, but try to remove as much skin as possible. Place the garlic heads in a microwave-safe bowl and rub the garlic heads with oil. Pour the water in the bottle of the bowl and cover the entire thing with plastic wrap. Place the bowl in the microwave and cook on high for 4.5 minutes or until the garlic is very tender. Remove the bowl from the microwave and let it cool slightly.
Next, combine the milk and flour in a medium saucepan, stirring with a whisk. Bring the mixture to a boil over medium-high heat, stirring frequently. Cook the milk mixture for three minutes or until thickened. Once cooked, remove from the heat and add the salt, pepper, 1 ounce of cheddar and mozzarella cheeses. Stir until smooth and the cheeses have melted. Set this aside.
Begin to preheat an oven broiler. Meanwhile, from the microwaved bowl, separate the garlic cloves and squeeze to extract the garlic pulp. Some of the garlic cloves will still be pretty warm, but if you work quickly, it should be a light task. Place the garlic pulp and two cups of the milk mixture in a blender. Process until the sauce is smooth. Stir the garlic mixture into the remaining milk mixture and stir until well incorporated. Add the pasta and stir to coat.
Spoon the pasta mixture into a broiler-safe 11x7 glass or ceramic baking dish coated with cooking spray. Alternatively, you could use 6 (10 ounce) ramekins or gratin dishes. Once in the desired baking vessel, sprinkle with the remaining three ounces of cheddar cheese. Broil for two minutes or until the cheese has melted and begin to turn brown. Let the cooking vessel stand for five minutes, serve, and enjoy!
The End Result:
If you are not a fan of particularly strong garlic flavor, this mac and cheese will not be for you. If you love garlic infused in every single bite, along with some potent cheese flavor, then be careful not to eat the entire batch in one sitting! I didn't quite process the garlic to a smooth consistency, as instructed, but the flavor made itself known and was quite delightful. While there was only two cheeses in this recipe, you could fool anyone with the outstanding cheese flavor. If you want to kick up your mac and cheese game, this recipe is for you!
Join us next week as we continue our quest for awesome recipes to present to you. Until then,
~Cheers!
Sunday, January 4, 2015
Express Sheperd's Pie
Good evening everyone! When it comes to traditional winter
dishes, it’s hard to beat shepherd's pie. Built like a pot pie, a shepherd's pie is typically a bit thicker (think “gravy” to a standard pot pie’s “stew”
filling) and topped with mashed potatoes. The distinctions between shepherd's pie and pot pie aren’t too grand, but they are significant enough to make them
two distinct dishes.
So, therein lies the challenge – can we take traditional shepherd’s pie, cut down the prep time and make it a healthy weekend meal
option? We found a recipe that gives it a good shot, and with our adaptations the
results are worth duplicating.
The Recipe: Quick Shepherd's Pie
Original recipe adapted from: Eatingwell.com
Original recipe adapted from: Eatingwell.com
What You’ll Need:
1 Pound Ground Turkey (Lean)1 Medium Onion
1 Cup Frozen Corn
1 Cup Frozen Green Beans
¾ Cup Frozen Peas
14.5 Ounces (1 Can) Low Sodium Chicken Broth
3-4 Medium Yukon Gold Potatoes
All Purpose Flour (amount will vary)

Traditional shepherd’s pie is a lamb based dish that is slow
roasted all day and topped with a thick layer of mashed potatoes, then baked to
the point of turning those spuds crispy.
That’s the long way of saying: you’re not going to duplicate
true shepherd’s pie flavor in a quick (or healthy) fashion. You can, however,
create something close – and that’s what this dish does well. You still have
rich flavors – you still have a savory potato topping – but you only have to
invest 35 minutes into the dish and it’s caloric content finishes in the
300-400 range, rather than 700 to 800 of the original. All in all, not a bad
trade off to make.
~Cheers
Subscribe to:
Posts (Atom)