Saturday, December 31, 2011

Best Of 2011: Double Recipe Edition

Good evening everyone! As 2011 draws to a close, we're closing out our look back at the best culinary creations from our blog during the year. Tonight we've got two of Maggie's recipes to look at. Her original pita chip creation was a surprisingly tasty and simple dish that was very easy to make. The true star of Maggie's portfolio last year, however, was her peanut butter cookies with chocolate chunks. This round little morsels from heaven are still one of the best cookies I've ever tried. Check out both recipes below:

****

The Recipe: Pita Chips
This is an original Out Of The Culinary Creation!

What You'll Need:
5 Pieces of Pita Bread (note, use the non-pocket variety)
Olive Oil
Salt

Good afternoon everyone!  As Tyler mentioned, this a rare treat for our frequent blog readers.  Not only one, but TWO recipes that are quick, easy, and not to mention tasty.  My inspiration for the pita chips came from my company holiday party a week ago.  They had delicious hors de vours including warm fluffy pita chips with spinach artichoke dip.  While I was trying to duplicate the dish and go for the warm, fluffy pita chip approach, I did end up with warm pita chips.  Fluffy...not so much...


Start by cutting with a large chef's knife (or slicing with a pizza slicer) the pita bread into eight sections - cutting the bread in half, that half into another half, so on and so forth until they form little triangles.  In a small ingredient bowl, pour a tablespoon of olive oil.  With a pastry brush, coat front and back of the pita bread with a thin layer of oil.  Prepare a baking sheet or two with cooking spray. When the pita bread is coated, layer the baking sheet with the pita bread.


Preheat the oven to 425.  Meanwhile, sprinkle or grind the salt over the sliced pita bread, but do not over coat the bread with salt.


Place the baking sheets in the oven for five minutes.  Take out the pita chips and, using a metal spatula, carefully flip them over.  Once these are all flipped, pop them back in the oven for five more minutes.  Remove and enjoy with your favorite dipping condiment.

The End Result:


A word to the wise:  don't let the pita chips be in the oven more than five minutes.  If you do, you won't have fluffy pita chips, you will have crunchy pita chips.  But these little morsels are delicious with any dip or condiment that you might have on hand.  Spinach and artichoke dip, salsa con queso, hummus, sour cream, you name it.  And, not to mention, they are incredibly healthy, since they were baked, not fried.  So, if you're in the mood for something a little different, and easy to prepare, pita chips are for you!


Now, on the not-so-healthy side of things, I also made some cookies.  I was perusing the cook book section of our nearest Barnes and Noble (like we always do,) and I came across a new cookbook.  Whilst I saw this recipe, the Starbucks in shop was making a fresh batch of cookies and I knew I had to have this book.  Fortunately, all the ingredients we had were at home and we didn't need to run to our nearest grocery store.


The Recipes:  Peanut Butter Cookies with Chocolate Chunks
The Original Recipe Found In:  Relaxed Cooking with Curtis Stone: Recipes to Put You in My Favorite Mood

What You'll Need:

1 Cup All-Purpose Flour
1/2 Teaspoon Baking Soda
1/2 Teaspoon Salt
1 Cup Natural Chunky Peanut Butter
1/2 Cup (packed) Light Brown Sugar
1/2 Cup Granulated Sugar
8 Tablespoons (1 Stick) Unsalted Butter, at room temperature
2 Tablespoons Honey
1 Large Egg
1 Teaspoon Pure Vanilla Extract
5 Ounces Semisweet Chocolate, coarsely chopped

Begin by preheating the oven to 350 degrees and line two large heavy baking sheets with parchment paper.


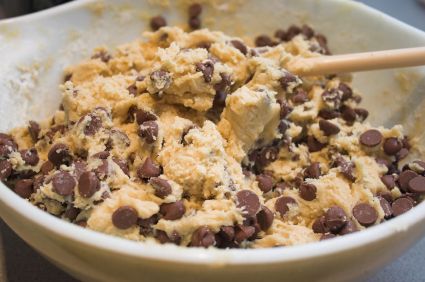
Mix the flour, baking soda, and salt in a medium bowl.  In a large bowl, add the peanut butter, brown sugar, granulated sugar, butter, honey, egg, and vanilla.  Using an electric mixer, beat all these ingredients until well blended.  Stir the dry ingredients into the peanut butter mixture, in two additions, making sure all the ingredients are well incorporated both times.  Stir in the chopped chocolate.


Using a cookie scoop or eyeballing three tablespoons full of dough for each cookie onto the baking sheets.  Give them enough space to plump up.  Bake for about 12 minutes or until they just begin to brown on top.


Let the cookies cool on the baking sheets for five minutes.  Using a metal spatula, transfer the cookies to a wire rack.  Enjoy the cookies warm and let them cool completely.


The End Result:


Oh...my...goodness...!!  Now, if you are not a big chocolate and peanut butter fan, I think you might become one after you make this recipe.  Everything was so well incorporated and it was so delicious and moist.  Even after you let the cookies cool, they are still incredibly delicious and makes for a great dessert!


****

That's our brief look back at some of 2011's best recipes from our blog. There certainly were many more recipes worth focusing on - but we're saving those for another cookbook installment (maybe). Either way, it was fun looking back at some of our creations from 2011. Here's hoping 2012 is a great year for you & yours. Thank you for spending a few hours a week with us during 2011 - we'll see you in 2012! 

~Cheers 

Friday, December 30, 2011

For A limited Time Only!

We're happy to announced that our cookbook: The Out Of The Culinary Cookbook - 2010's Best Recipes From The Blog, is now on sale for a limited time from Blurb. You can jump right to our bookstore by clicking: HERE


For the low cost of $24.95, you receive a great, softcover cookbook chocked full of of the best recipes from our first year of cooking. It's a large cookbook, with full color photos, glossy pages and great detail. We put a lot of hours into making these recipes, and we made sure to put an equal amount of effort into putting out a high quality cookbook.

We're kicking around the idea of making a 2011 edition of our cookbook - but we haven't decided what to do exactly yet. If you want to see a new edition of a high quality cookbook, support our cause and purchase the 2010 edition today! This price is only good for a limited time, (currently $5 off) so be sure to buy your copy today!

Thursday, December 29, 2011

Best Of 2011: Beer Battered Tilapia

Good evening everyone! Tonight we're continuing our look back at 2011's best recipes with a visit to a very unique and delicious dish that wont impact your waistline. Beer battered tilapia fillets that were full of flavor and a lot of fun to make!

****

The Recipe: Beer Battered Tilapia
Original Recipe Found On: Eatingwell.com


What You'll Need:

2-4 X Tilapia Fillets
3 Tablespoons Whole Wheat Flour
2 Tablespoons All Purpose Flour
1/4 Teaspoon Ground Cumin
1/4 Teaspoon Salt
1/8 Teaspoon Cayenne Pepper
1/2 Cup Beer*
4 Teaspoons Canola Oil (Divided Into 2 Teaspoon Sections)

-The batter creates enough to bread 4 fillets (If you're only cooking two fillets you will only need 2 teaspoons of canola oil)

*You're looking for a lager or pilsner for the beer in this section. The idea is to add moisture and flavor to the dish without weighing down the batter or overpowering the dish with an alcohol flavor. Skip the Guinness and other stouts and opt for something like Heineken - it's a light lager that will pack a lot of flavor without over burdening the batter. (Plus, you can drink the extra while you cook! Win-win!)

This dish originally calls for tilapia, which is ideal because it is a thin, flat cut of fish that tastes great with a breading. I had originally planned to use talapia in our version of the dish, only to find that my inventory of tilapia was not as full as I had originally thought. I opened our freezer last night to find we only had one tilapia fillet left. Needless to say, cooking one talapia fillet for two people really isn't much of an option. So, I had to improvise. Luckily, we had two cod fillets left in the freezer. Since cod and talapia are both white fish fillets, they can be substituted without much worry about flavors clashing. The only downside is that cod is much thicker and oddly shaped than talapia, which makes breaded the fillet (and cooking the breading evenly) much more of a challenge. Since I didn't pay close enough attention to our inventory - it's a challenge I'll have to take on. However, I'd strongly recommend using thin cut talapia fillets for this recipe, as it will greatly lower the cooking challenge.


Begin by combining the whole wheat flour, all purpose flour, cumin, cayenne, salt and beer in a medium bowl. Whisk together until all the lumps have been removed to create the batter. Be aware, the batter is going to react strangely at first, as all of the carbonation in the beer bubble up and reacts violently to the mixture. Just keep whisking and within 20 seconds or so, the batter will start to take shape.


The first method in creating a healthy batter that isn't full of high fat dough (or deep fried) is substituting some of the all purpose flour for whole wheat flour. The whole wheat flour changes the batter's flavor profile slightly, adding a more 'grain/wheat' flavor to the dough - similar to the flavor that is achieved by deep frying regular batter. This simple substitution allows for the flavor to stay - but a bad cooking method (deep frying) to be removed.

Next, cover your talapia pieces in the batter. Now, although the original recipe doesn't really specify how to create a great, even batter - they simply assume that telling someone to 'dip the fillet in batter' will result in a evenly coated delight that cooks with ease. Not so fast. I've been down this breading road many times before (especially with fish) and I'll be the first to tell you that you need to make certain steps first or else you'll be cursing out the frying pan and eating poorly breaded fish fillets for dinner.

First, make sure the talapia fillets are completely dry. Use a paper towel (or two) and soak up all the moisture you can before you even think about breading the fillets. Moisture creates a barrier between the fillet and the breading, meaning that once the heat comes into the equation, the breading wont seal to the fillet - rather it simply lets go and falls into the pan.

Secondly, don't just 'dip' the fillets in the batter. Take a few extra moments and carefully dredge the fillet through the batter (both sides) making sure to work the batter in the cracks and crevices on the fillet. Once properly dredged through the batter, allow the fillet to drip off excess batter and (ideally) put the breaded fillet directly into a prepared skillet.

Speaking of a prepared skillet - you can prepare your own skillet by adding 2 teaspoons of canola oil to a large, non stick skillet and bringing it to a shimmering point on medium high heat.

Some breading recipes will tell you to bring the canola oil to a light smoke. I tend to shy away from this due to the nature of canola oil. Canola oil has a very high smoke point, which is why it's ideal for browning / frying fish. It can become very hot without smoking the fish out of the pan. Ideally to create a nice browned fillet, you would want your oil slightly smoking (as that indicates it is at its highest heat). I've found (through trial and error) than bringing canola oil to a smoke point just makes the cooking a little too fast for my liking. The oil is too hot and it forces you to cook at a faster pace than necessary in order to prevent the fillet from burning. Instead, I've found that bringing the canola oil to a shimmering point and simply adding a minute or two to the cook time has resulted in a more evenly cooked, less stressful fillet 99% of the time.

Once your oil is shimmering, add the fillets to the skillet (two at a time) and cook 4 minutes per side or until the breading is crispy and golden. If you're cooking more than two fillets, transfer the finished fillets to a plate loosely tented with aluminum foil and set aside. Add another 2 teaspoons of canola oil to the skillet, heat until shimmering and repeat the process. If you're only cooking two fillets - congratulations! You're done! Serve with tartar sauce (or 'naked' as it has a great flavor on its own) and enjoy!


The Results:


Sometimes the healthy version of a classically 'unhealthy' recipe is hard to create. The flavors don't quite match up or the dish just fails to compare to the fat laden original dish. Thankfully, tonight's dish earns a 'very close' rating when compared to the original dish. While you're never going to be able to recreate a breading that tastes 100% like deep fried batter without...well...deep frying, this batter comes very close to the original. It has a great 'beer batter' flavor without all the calories. Clocking in at 230 calories per fillet - this healthy dish is a great addition to any family's evening menu!

****

That's all we have for you tonight. We're continuing our best of 2011 flashback with another revisit tomorrow night. Until then, 
~Cheers

Wednesday, December 28, 2011

The Best Of 2011: Oven Baked Chicken

Good evening everyone! We're continuing our look back at 2011's best recipes with a trip into February of 2011. Maggie was battling gallbladder problems and her diet was greatly limited. The challenge we were facing was creating great tasting dishes with a very limited ingredient list to choose from. This limited range still allowed us to create great dishes like the one we're featuring tonight. Check it out:

****

The Recipe: Oven Baked Chicken
Original Recipe Found On: Eatingwell.com

What You'll Need:

4-5 Chicken Drumsticks (Skin removed)
1/3 Cup Breadcrumbs (Fine or as small as possible)
1/4 Teaspoon Paprika
1/4 Teaspoon Onion Powder
1/4 Teaspoon Salt
2 1/2 Teaspoons Vegetable Oil
1 Large Egg

Preheat your oven to 425 degrees.

Place a wire rack on a large rimmed baking sheet and spray the rack with cooking spray. Set aside.

Begin by mixing your breadcrumbs, paprika, salt and onion powder together in a large bowl. Next, add the oil, making sure to mix well. At first, the oil is going to cause a lot of clumping and not really want to disperse all that well. However, a little elbow grease and vigorous stirring with a fork should break up the clumps and eventually distribute the oil evenly throughout the breading mixture. If you feel the crumbs after this point, they should have a slight 'damp' feel to them and should cling fairly easily to your fingers.


Next, crack the egg into a medium bowl and whisk briefly with a fork. Set this bowl aside.

Just like any other breading recipe we've done on the blog - the easiest method of breading is assembly line style. Line up the bowls so the egg mixture is first, followed by the breading mixture. Place a plate or the rimmed baking sheet at the end of the assembly line and you're ready to get started.


Simply dunk the chicken into the egg mixture, making sure it is evenly covered. Allow the excess egg to drain off before rolling the chicken in the breading mixture.

I'll admit, this is the best breading I've managed to achieve since we started the blog. I've had many encounters with breaded chicken (and fish) and have had my share of horror stories (and some successes - but a lot of horror stories) about how badly some of the breading adhered to the meat. Tonight's method could not have been easier. The breading clung to the chicken with ease - a few quick turns in the bowl and everything was taken care of.


Simple repeat this process until all the drumsticks are covered. Place the drumsticks on the wire rack and into the oven. Cook for 20 to 30 minutes, or until the center of the thickest drumstick registers at 165 degrees on a digital thermometer. Serve with honey mustard sauce and enjoy!


The Results:


Surprisingly delightful! The breading mixture pack a lot of flavor without all of the extra mess or poor nutritional value that other breading can fall victim to. The chicken held a lot of moist flavor, while being boosted by the nice crunch of the breading - a win, win situation when it comes to oven roasted chicken. With the ease that the breading went on, combined with the amazing flavor, this breaded chicken recipe (and technique) has taken a place on top of my list of favorite breading. It's worth a shot for those of you following along at home. You won't be disappointed!

****

That's tonight's recipe flashback - stop in tomorrow to see another 'best of' recipe from 2011. 

Tuesday, December 27, 2011

Best Of 2011: Pulled Chicken Sandwiches

Hello again everyone! I hope everyone had a healthy and happy holiday. Maggie and I are reluctantly returning to work after a weekend of food, family and lots and lots of fun. This week, with our work schedule being a little odd and another big holiday (NEW YEAR!) coming up - we thought we'd take the opportunity to feature the best of 2011 this week. Each day, we'll highlight the one of our favorite recipes from 2011. Let's dive right in to tonight's 'best of'.

****


I spoke a few weeks ago about seeing certain recipes and then becoming motivated to make them. Last time, it was french toast that spurred me into action. This week, it's pulled pork sandwiches. The pulled pork sandwich seems to vary from region to region. Some regions prefer a sandwich that is dripping with a light, almost soupy BBQ sauce. Others prefer the sauce and pork to 'fuse' together, creating a thick almost stew like mixture. Some sauces are sweet, some are tangy, some are spicy. The only consensus on the pulled pork sandwich is that there is no consensus on how it's 'properly' done.

I'm using that lack of consensus to my advantage tonight and making one large change to the classic pulled pork sandwich. I'm removing the pork. This isn't in some dramatic attempt to shake things up - I'm actually removing the pork because pork and my digestive system don't get along too well. While the flavor of a pulled pork sandwich would be great; the all night long full of discomfort and suffering would really put a damper on things. As such, I'm substituting pork with chicken.

For this recipe, it is best to use boneless, skinless chicken thighs over any other piece of chicken. This is because the thighs of a chicken are dark meat - and a little more dense. While breast meat is leaner, chicken it also isn't as 'absorbent' when marinating all day. Thigh meat tends to be a little more moist than breast meat, and given the recipe we're making today - all the moisture we can get, we will take.

The major difference between the two is that thighs tend to be higher in fat than breasts. However, since we are using boneless, skinless thighs, you are cutting a significant portion of fat (from the skin) out of the equation. If you are like us, and cannot find boneless skinless thighs, that problem can be remedied with a good pair of kitchen shears and a few minutes of extra work.

Simply take you shears and trim the skin right off of the the chicken. If you start in the middle of the thigh, you should be able to work and easy seam right down the center. Simply lift the skin like a book page, and it should completely rip off on the side or at the very least expose where one extra snip is needed.

Before


After
We didn't go to the extra work of removing the bones from the thighs for this recipe - I didn't see a lot of advantages for all of the extra work. Since we're shredding the meat from the bone at the end of the recipe anyway - no sense in making extra steps for things that can be remedied later on.

Once all the prep work is out of the way - all you need is a good BBQ sauce recipe and you're ready to go. During last summer, I came across a BBQ sauce recipe that blew Maggie and myself away. We could not believe the flavor that this particular recipe delivered. I've made up a batch or two since that time, but only to keep in a jar and use as a table BBQ sauce with other recipes. I've been looking for a way to feature this sauce again and tonight I have finally found the place to do so. If you have your own favorite homemade BBQ sauce recipe, it can easily be substituted into this dish as well. Now, let's get cooking!


The Recipe: Savory BBQ Chicken Sandwiches
This is an Out Of The Culinary original recipe!


What You'll Need:

For the BBQ sauce-

1 Cup Ketchup
3 Tablespoons Molasses
3 Tablespoons Cider Vinegar
2 Tablespoons Grated Onion (Minced Onion OK Too)
2 Tablespoons Maple Syrup
2 Tablespoons Worcestershire Sauce
2 Tablespoons Dijon Mustard
1 Teaspoon Chile Powder
1/4 Teaspoon Cayenne Pepper

4-6 Boneless, Skinless Chicken Thighs

It is important to choose a mild or 'original' flavored molasses - as lighter styles are more bitter and will ruin the rich, smokey flavor you're looking for in a BBQ sauce.

Begin by mixing all of the BBQ sauce ingredients together in a large mixing bowl. Whisk until everything is blended very well.

I'm always amazed by the metamorphosis this sauce makes while its being blended together. When everything is first piled into the bowl, it's black, soupy and pungent smelling (thanks mainly to the molasses). However, after a few minutes of elbow grease, the mixture develops into a deep crimson colored, thick and certainly BBQ-like smelling concoction. For those that still doubt that this hodgepodge of pantry items can create a fantastic BBQ sauce, I invite you to take a little taste of the mixture now. See? Told ya so.
Fresh BBQ Sauce

Normally, with this BBQ sauce recipe you'd have to cook the mixture in a skillet or pot for about 15 minutes to thicken the sauce up and bring out all of the great smokey flavor. However, since you're cooking the sauce with the chicken for at least 5 hours - I don't really think the 15 minutes of stove top cooking is going to make a lot of difference in the long run.

All that's left to do is pour a little bit of the sauce into the bottom of a 4 to 5 quart slow cooker. Next, nestle the chicken thighs in the bottom of the cooker and pour the remaining sauce over the chicken. Make sure everything is evenly covered with sauce.


Set the slow cooker to low and allow to cook for at least 5 hours before serving.

Just before you're ready to serve the chicken. Remove the thighs from the slow cooker (set the cooker to warm) and place them on a large tray or in a large bowl (I found that a bowl works best). You wont have to do much more than pick up the chicken pieces with a pair of tongs - the meat should be dropping right off of the bone. Simply transfer the chicken pieces over to the bowl, toss with the tongs until the meat is shredded to the desired consistency and pick out the bones.

The bones literally fell right off the meat
The one thing I wasn't expecting with this recipe was that the BBQ sauce would break down during cooking. While the sauce went in thick and crimson - by the end of a 8+ hour cook - it was soupy and a little black. You can still make use of the sauce here, however, while it may not look visually like BBQ sauce - it certainly still tastes like BBQ sauce. Simply use a ladle to spoon the sauce into the bowl (as much or as little as you prefer) with the shredded chicken, toss with tongs and serve. 

The Results:


Last summer, when I first made up a batch of this BBQ sauce, I claimed that it was the best sauce I had ever tasted. I still stand by that claim. This sauce produces a rich, smokey flavor that walks the fine line between spicy and hot - all the while delivering that 'fresh off the woodsmoker' flavor without all of the fuss of the wood and smoke. The chicken was amazingly tender and still incredibly moist - and as a bonus, it had absorbed the great flavoring of the BBQ sauce after stewing in the mixture all day.

This recipe is the definition of simple cooking. With about 20 minutes of total prep time (even less if you don't have to skin the chicken) you can whip this up before work, let it cook all day and then return home to a delicious dish that will taste like it took you hours to prepare. All day flavors, a few minutes prep time - that's what I like to call the best of both worlds.

****

That's all we have for you tonight. We're back tomorrow with another revisit of one of 2011's best recipes. Until tomorrow, 

~Cheers

Tuesday, December 20, 2011

Simple, Yet Incredibly Tasty

Good evening everyone! It's unbelievable to think that Christmas is only five days away and the end of 2011 is shortly thereafter. Tonight, I'm tackling a completely different and new recipe to the traditional Christmas week dish. It doesn't have any of the traditional fixings, which is sort of the point. With all of the holiday cooking we’re about to undertake – it’s nice to have a non-holiday dish to distract us to start the week. It may not be festive, but it sure looks appetizing!


The Recipe: Gnocchi with Tomatoes, Pancetta, and Wilted Watercress
Original Recipe Found In: www.eatingwell.com

What You'll Need:

2 Ounces Pancetta, chopped
3 Cloves Garlic, minced
2 Large Tomatoes, chopped
1/2 Teaspoon Sugar
1/4 Teaspoon Crushed Red Pepper
2 Teaspoons Red-Wine Vinegar
1/4 Teaspoon Salt
1 Pound Gnocchi
4 Ounces Watercress, tough stems removed, coarsely chopped
1/3 Cup Parmesan Cheese

Note: we are omitting the watercress from this dish, because honestly we won't have a use it if there's any left over. In addition, we’ve tried watercress before in another recipe and were not overly fond of the flavor it provided.


Also, we are swapping the gnocchi for a big shell variation. Granted, I was really excited to try gnocchi, our local grocery store does not sell it - which I was almost certain they did. So, we're using a similar pasta with hopefully similar results. (gnocchi is essentially a closed up shell anyway, so its not too much of a stretch to use big shells in its place).


Organic pasta...who knew?


To start, begin a pot of water to boil the gnocchi/big shell pasta. As the water boils, you can begin to cook the pancetta. In a large nonstick skillet over medium high heat, stir the pancetta occasionally until it begins to brown, 4 to 5 minutes. The excess oils from the pancetta will give a good base for the next ingredients. Add the garlic, stirring for 30 seconds. Add the tomatoes, sugar, and crushed red pepper, and cook, stirring until the tomatoes are almost completely broken down, about five minutes. Stir in the vinegar and salt. Remove from heat.


Getting the sauce ready


Once the water has started to boil, add the gnocchi and cook until they float, 3 to 5 minutes (or according to package directions for whichever pasta you use.)  If you're using watercress, add to a colander and drain the gnocchi over the watercress, wilting it slightly.  Add the gnocchi (and watercress) to the sauce in the pan, toss to combine.  Serve with Parmesan cheese and enjoy!


The End Result:


The pancetta and tomatoes give the dish a nice salty bite that's not too overbearing.  The sugar that was added during the sauce making process makes the acidic ingredients have a nice pop and round out the entire dish.  The pasta really soaks up the sauce nicely and the sauce completely coats the pasta, without it dropping off the shells.  The Parmesan also adds to the dish nicely, without it being overly cheesy (which is something I can, surprisingly, do without for one night.)  It was simple, yet the flavors melded together so well.  From my disaster last week, this was a great recovery.


That's all we have for you tonight.  Our holiday schedule only allows us to do one recipe this week.  We wish everyone a Merry Christmas, Happy Holidays, and safe travels wherever they take you.  Until next time,


~Cheers!

Monday, December 19, 2011

Around The Culinary World

Good evening everyone! It’s Monday once again and the holiday season is creeping ever closer. It’s hard to believe that it is currently December 19th, looking out the window, you could argue it was early November or (after yesterday’s 50 degree day) late October. I’m not a fan of snow (I know, why am I living in the Midwest? I can’t give you an answer to that one) so the longer the white stuff stays away the better. (This obviously no longer applies if you live in New Mexico, upper Texas, Colorado or Kansas...enjoy the snow!)


Beautiful weather aside, the fact remains – Christmas, New Year’s Day...Kwanzaa – all of the winter holidays are upon us. That means cooking, baking, planning and traveling for everyone – including your favorite amateur chefs. This means today's edition will be our last ‘Around The Culinary World’ of 2011. I’d like to tell you we’re going out with a bang and that today’s stories are worth ending a year on…but the truth is, today’s stories are good – but the culinary news cycle is pretty sparse during this time of the year. We’ll make the best with what we have – let’s dive in!


With Christmas rapidly approaching, the unofficial ‘weight gain’ season is upon us. Many Americans find that their holiday eating tends to lead to an unhappy surprise when they step on the scale the following morning. (Most find they’ve set a ‘high score’ that they weren’t really aiming to break). Researchers have found that this phenomenon is actually not at all rare. During the winter months, the average individual consumes an extra 200 calories per day than they normally would consume during the others months of the year. What is the reason behind this shift? Believe it or not, it may all boil down to a combination of DNA, history and your brain. (Although, the three trips through the pie line at your family Christmas party probably don’t help matters). Check out the reasons behind everyone’s expanding holiday waistline HERE.


One way to avoid gaining the extra pounds over the holidays is to eat better (…duh…). Easier said than done, right? Actually, it’s not as hard as you might think. By simply taking into account how your brain works, what your body needs and remembering to keep things in reasonable portions, you may find the holidays to be a less taxing time on your belly. There are some great tips for keeping your brain happy and stomach satisfied HERE.


Texture, color & variety - 3 big keys to healthy eating this holiday season

We frequently feature ‘top picks’ of alcohol on the blog as I am a fan of bourbons, whiskeys and other tonics of the sort. Maggie enjoys a good wine as much as I enjoy a good whiskey, so it’s only fair to share THIS STORY featuring some great tips on wines for the holiday season.


It’s well documented that one of the biggest culprits in America’s relatively recent weight gain are sodas and sugar filled drinks. Over the past 15 to 20 years they’ve become more convenient, easier to access, relatively cheaper and a whole lot more common. In fact, studies show that most Americans are well aware the sugary drinks are directly related to weight gain, but they continue to drink them anyway. The Johns Hopkins Bloomberg School for Public Health decided to try an alternative method for curbing kid’s appetites for soda. Rather than listing the calories and throwing numbers at them, they took a different approach and (somewhat surprisingly) found that it worked. Check out their tactic HERE.


The culinary community (along with this very blog) were up in arms after Congress failed America’s children by (essentially) creating a new category of vegetable; pizza. Apparently, they didn’t just stop there. This much maligned bill was filled with all sorts of other provisions, restrictions and rulings that did just as much damage to the health and future of our kids. Michele Simon, a public health lawyer, contributed an editorial to the Huffington Post that pulls no punches and points out all of the recent Congressional missteps in this bill. It’s a scathing article, but well worth a read. Check it out HERE.


That’s all the news that’s fit to blog about this week. We’ve got a short week lined up – only Maggie will be taking to the kitchen (on Tuesday) this week. After that we’re off for the holidays. Right now, we’re tentatively planning to return to cooking on 12/28 for one recipe and then on another travel break until after the first of the year – stay tuned to our Facebook & Twitter pages to see if that changes.

Be sure to stop in Tuesday night to see what Maggie has cooking. Until then,

~Cheers

Wednesday, December 14, 2011

Out Of The Ordinary Stew

Good evening everyone! One of my favorite times of the year is when a brand new issue of Cook’s Illustrated arrives in our mailbox. It’s always full of interesting recipes, new ideas, product reviews and all sorts of culinary fun. Every once in awhile, there is a recipe in within the latest issue that makes me stop and go “Wow, I have to try that”. The latest issue had once such recipe that as soon as I laid eyes upon it, I knew I had to try it.


Tonight’s dish is a wintertime staple – beef stew. However, this beef stew is unlike any other that I’ve ever made. Tonight’s dish finds its roots in the Mediterranean – this change in culture changes the entire complexion of the dish. Every other beef stew recipe I’ve made has used stew beef, red wine and even a little beef broth. Tonight’s recipe flips the script by using white wine, a different cut of beef, cinnamon and even sugar. Supposedly, this change completely changes the way beef stew presents itself. Is it delicious, or do we end up with a dud recipe? Let’s find out!


The Recipe: Catalan-Style Beef Stew With Mushrooms
Original Recipe Found In: Cook’s Illustrated (December 2011 Issue)

What You’ll Need:

2 Tablespoons Olive Oil
2 Large Onions (Finely chopped)
½ Teaspoon Sugar
2 Plum Tomatoes – Grated, Pulp Reserved (Skins discarded)*
1 Teaspoon Smoked Paprika
1 Bay Leaf
1 ½ Cups Dry White Wine
1 ½ Cups Water
1 Large Sprig Fresh Thyme
¼ Teaspoon Ground Cinnamon
2 ½ Pounds Boneless Beef Short Ribs (Cut into 2 in. cubes)

For The Picada**

¼ Cup Whole Blanched Almonds***
2 Tablespoons Olive Oil
1 Slice White Sandwich Bread (Crust removed, torn into 1 inch pieces)
2 Garlic Cloves
3 Tablespoons Fresh Minced Parsley
½ Pound Oyster Mushrooms (Trimmed of stems)
1 Teaspoon Sherry (Or red wine) Vinegar

*Alternatively, you can substitute a tablespoon of tomato paste and adjust with more, to taste, as necessary.

** Picada is a very common base in Mediterranean dishes. It’s used almost as a sauce, but is typically placed IN dishes while cooking. The base creates a great flavor and also acts as a way to thicken the dish it’s been added to. Tonight, this base is crucial to our stew for two reasons – first, it is the thickening agent to the stew and secondly, it’s a major part of the flavor profile of this dish.

*** If you cannot find blanched almonds, it’s reasonably simple to blanch them yourself. Simply add the almonds to a bowl and cover with about an inch of boiling water. Allow the almonds to rest for one minute before draining the bowl. Rinse the almonds in cold water and drain again before removing the almonds from the bowl

Beef short ribs are preferred for this dish over stew meat for two reasons as well. First and foremost, a boneless beef rib is actually more tender and contains a better flavor than the standard variety of ‘stew beef’. Secondly, and – for this dish, most importantly, this cut of beef lends itself to elongated cooking times without losing excess amounts of moisture or its structure. You’ll be able to cook this in the oven and still enjoy firm beef cubes when it’s all said and done. That’s a rare accomplishment when it comes to beef stew.

To begin making the stew, adjust your oven rack to the middle position and set your oven to 300 degrees. Next, heat the olive oil in a large Dutch oven over medium low heat until the oil begins shimmering. Add the onions, sugar and ½ teaspoon of salt and cook the onions, stirring constantly, until they have completely caramelized. This will take about 30 to 40 minutes.

Next, add your tomatoes (or tomato paste if you choose) the smoked paprika and the bay leaf. Cook this mixture, continuing to stir often, until the mixture turns a deep golden brown. This will take about 5 to 10 minutes.

Next, add the white wine, water, thyme and cinnamon to the pot - making sure to use a wooden spoon to scrape up and browned bits that are stuck to the bottom of the pan. (Much like making an onion soup, this step almost acts as a ‘deglazing’ of the caramelized onions. The flavor that is cooked onto the bottom of the pot is incredible; you don’t want to leave any of that behind!)

Season the beef with a pinch of salt and pepper and add that to the pot as well. (I actually marinated our beef in a smoked paprika, pepper and salt blend for an hour before using - this ended up adding another element of flavor to the final dish - but is absolutely optional)


 Traditionally, when making a beef stew, you brown the beef to ‘kick-start’ the flavor of the beef – however, with the small amount of liquid the beef ribs are being cooked in (in addition to the way the ribs cook) they will actually brown while in the pot – reducing the time you need to spend with the beef!

Bring the mixture to a simmer before transferring the pot to the oven (uncovered). Allow the stew to cook one hour before removing to stir (the beef tends to settle after an hour of cooking, stirring redistributes the beef and ensures even cooking). Return the pot to the oven and cook (uncovered) for an additional 1 ½ to 2 hours. (Until the beef is tender)

While the stew is in the oven, you can begin working on the Picada. Begin by heating the almonds in a large skillet with 1 tablespoon of the olive oil (Medium high heat). Stir the almonds often and cook until the almonds become golden brown, roughly 3 to 6 minutes. Use a slotted spoon to transfer the almonds to a food processor. Set aside. Return the skillet to medium heat and add the bread cubes. Stir the cubes often and allow them to brown on all sides – roughly 2 to 4 minutes. Transfer these bread cubes to the food processor with the almonds. Add the garlic to the bowl as well and process the mixture until it is finely ground. This should take about 20 seconds. Transfer the blended mixture to a bowl and stir in the parsley. Set aside.


Once your stew has reached the desired tenderness, remove the bay leaf and stir in the Picada, mushrooms and vinegar. Stir to incorporate the mixture. Serve and enjoy!


The Results:

So - it doesn't photograph well, but it's DELICIOUS anyway


I would go as far to say that this recipe is misnamed. While it is technically stewed beef (thereby making it BEEF STEW) it doesn’t have the same flavors or even composition of the traditional beef dish. This dish is very Mediterranean in flavor. It’s fresh, very light on the palette and full of great, original flavor. The beef absolutely shines in this dish – which makes the decision to go for a higher end cut of beef a wise one. While this is not like any beef stew you’ve tried before, I’d argue that isn’t a bad thing at all. Sure, this recipe isn’t really “beef stew” but who cares? What it can be called is delicious, and that’s all that really matters in the end.

That’s all we have for you this week. It was an adventurous one for sure. Maggie’s dish was a little bit of a culinary disaster. We learned the hard way on that one and ended up with a story to tell and experience to build on, but nothing really to eat in the end. My dish was an adventure of its own, but this adventure ended up quite successful with a very untraditional but still tasty dish at the end. Like we say, we’re amateur chefs who are cooking right along with you. We try the recipes and make the mistakes (sometimes) so you (hopefully) won’t run into the same problems. Taking cooking down to its simple elements sometimes comes with bumps along the road. Live and learn, right? We’re back next Monday with another trip ‘Around The Culinary World’ – until then,

~Cheers

Tuesday, December 13, 2011

Adaptions Don't Always Turn Out

Good evening everyone! As Tyler proved last week, you can make a wicked good, classic chili. Tonight, I'm trying another variation of chili. Chili is the type of soup that you could try any one of various options and end up with a great result. Call me obsessed, but I'm bound and determined to find those variations for those non-traditional chili lovers. 

The Recipe: White Bean and Hominy Chili
Original Recipe Found In: Cooking Light, December 2011

What You'll Need:
2 (15 oz) cans no salt added Cannellini Beans (or other white beans,) rinsed, drained, and divided
1 Tablespoon Olive Oil
1 (4 oz) Meatless Mexican Chipotle Sausage, finely chopped
1 1/2 Cups chopped White Onion
3 Garlic Cloves, minced
2 Poblano Chiles, seeded and chopped
2 Teaspoons Chili Powder
1 Teaspoon Ground Cumin
1 1/2 Cups Water
2 Tablespoons chopped fresh Oregano
2 Teaspoons Hot Pepper Sauce
1/2 Teaspoon Salt
1 (15.5 oz) can White Hominy, rinsed and drained*
2 Tablespoons thinly sliced Green Onions
2 Tablespoons chopped fresh Cilantro
8 Lime Wedges

*Hominy is a form of dried white corn (typically ground up) that is used for fritters or other southern inspired cooking. We couldn't track down any hominy locally, so we're using white corn meal in its place. 

Note: we are omitting the sausage, poblano chiles, and cumin because we don't really enjoy spicy foods. Obviously you can adjust this as needed.  

To start, mash 2/3 cups of the beans with a fork. Next, heat a large Dutch oven over medium heat. Add oil to pan, swirl to coat. Add sausage and saute for four minutes. Add onion, garlic, and poblanos, sauté for six minutes. Add chili powder and cumin, cook for 30 seconds, stirring constantly. 

Add the mashed beans, whole beans, 1 1/2 cups water, oregano, hot sauce, salt, and hominy (or corn meal in our case.)  Bring to a boil, cover, and reduce heat, and simmer for 20 minutes. Stir in the green onions and cilantro. Serve with lime wedges and enjoy!


The End Result:


I'm sure if I added the sausage, the entire dish would be really spicy. But by omitting it, the dish lost an element it needed.  In hind sight, a mild chorizo or even chicken would have been a good addition.  And also, using the white corn meal made the soup INCREDIBLY thick.  Using the equal amounts of corn meal as hominy made it a viscous mixture. Having never worked with hominy, I was unsure how to substitute cornmeal and opted to use a straight one to one substitution. It should have been at least a third of what I put in.  I think I used 4 1/2 cups more water than what the recipe called for, just to thin it out a smidge, but to no avail.  It was still rather thick.  So my chili ended up being not so much a soup, but more of a dip.  Although, it was quite tasty on crackers.


Sometimes things like this happen. I tried to adapt a recipe and it didn't work. Sometimes you adapt and create an amazing dish - sometimes your chili turns into a dip. We don't claim to be perfect, while we do have a nice record of making recipes work, sometimes we hit a dud. Unfortunately, I always seem to be the one that 'learns the hard way' but that's what happens when you like to take risky recipes. Sometimes they fail. Live and learn and try to take what you learned and make better recipes next time around. 


Tune in tomorrow as Tyler tries his hand at a variation of classic winter recipe. His recipe is just as unique as mine, hopefully he'll have better luck! Until then,


~Cheers~

Monday, December 12, 2011

Around The Culinary World

Good evening everyone! It’s Monday once again and quickly approaching the Christmas season. It’s hard to believe that 2011 is drawing to a close, the holidays are here and 2012 is knocking on the door. Our culinary stories for this week are well aware of the impending calendar change – we’re fans of ‘best of’ lists and ‘worst X of 2011’ lists, so this week seemed like a great time to feature a few glances back at 2011 fast food disasters as well as a showdown between the American favorite – French fry. We’ve got a few other stories in there for good measure (as always!) Here’s all the news that’s fit to blog about this week:


The Daily Meal is a food news blog that puts themselves in some…interesting situations at times. For example, I would not want to have been the writer responsible for their feature on 2011’s worst fast food dishes. Some of these dishes look like they would kill even a healthy human (via instant clogged arteries). Personal favorites (if you want to call them that) the indigestible Domino’s cheese stuffed cheese bread and the Denny’s maple bacon sundae. If you can stomach those, congratulations – your arteries or stomach (maybe both) must be made of steel. Check out the full list of ‘winners’ HERE.


Although we do not advocate the frequent consumption of this product, even your health conscious cooks from Out Of The Culinary will admit, fast food French fries are quite the guilty pleasure. While we’re partial to a few of the smaller joints offerings (specifically Smashburger and B-Bops) most of the country likes to duke it out amongst the ‘big 3’ fast food joints. Wendy’s, Burger King and McDonald’s. So, who can lay claim to king of the fried tater? Check out the results HERE.


Channeling their inner Breaking Bad apparently (Side note: if you haven’t watched AMC’s amazing drama about a chemistry teacher who is diagnosed with cancer, given a few months to live and subsequently decides to cook meth as a way to make money for his family to survive on after he passes – DO IT. This is the best show on television. You can buy seasons 1-3 on DVD now and season 4 is on the way. You will not regret the time spent in front of this amazing drama) some criminals decided they had the greatest idea when it came to smuggling drugs across the border. How did these ‘brilliant’ individuals attempt to smuggle nearly $140,000 in meth across the border? Check it out HERE.


Remember, as a child, when your mom was making cookies and all you wanted to do is eat the cookie dough straight from the bowl? (If not, I pity our cookie free and adventure free childhood…I really do). But mom always warned “Don’t eat that, you’ll get sick!” Turns out, she wasn’t lying. Check out the facts behind the worlds most dangerous dough (not really) HERE.


Do you have a chef on your Christmas list this year? Are you struggling on what to buy them for the holiday season? Cathy Erway has a few suggestions…of things NOT to buy the chef in your life. Check out the ‘don’ts’ HERE.


Norway has a butter shortage. Try to remain calm – it’s tough news to take, but somehow we’ll get through this. In a state where we construct entire COWS out of butter...it's hard to process someone running OUT of it. Seriously though, I have no other commentary to add…the title sort of speaks for itself. (Someone..arrange for a few extra Wisconsin cattle to be sent overseas...ASAP!) Check out the full details HERE.


That’s all the culinary news we can serve up this week. Be sure to stop in tomorrow night when Maggie takes to the kitchen with a brand new recipe. I’ll follow her on Wednesday night with a completely new dish of my own. Until tomorrow night,

~Cheers

Wednesday, December 7, 2011

Challenging Conventional Chili

Good evening everyone! Tonight, we're trying a new recipe for the blog - one I though I'd never attempt. Chili. Not white chili, not some variation of chili - but straight up, American style, chili. We've been adverse to trying a chili recipe on the blog in the past due to my bad experiences with the dish. My digestive system doesn't like acidic products - especially tomato sauce. Obviously, most chilis are swimming in tomato sauce. However, I've learned from past experiences that if I substitue tomato sauce or marinara sauce for natural tomatoes or even crushed tomatoes, I am able to enjoy the dish. So, when I stumbled upon this classic chili recipe that replace the traditional tomato sauce bath with crushed tomatoes and pureed tomatoes - I thought maybe, just maybe, we could create a chili that even my picky digestive system could enjoy. Let's get cooking!

The Recipe: All American Beef Chili With Kidney Beans
Original Recipe Found In: Cook's Country Cookbook

What You'll Need:

2 Tablespoons Vegetable Oil
2 Onions (Minced)
6 Garlic Cloves (Minced)
1/4 Cup Chili Powder
1 Tablespoon Ground Cumin
2 Teaspoons Ground Coriander
1 Teaspoon Red Pepper Flakes
1 Teaspoon Dried Oregano
1/2 Teaspoon Cayenne Pepper
2 Pounds 85% Lean Ground Beef*
2 (16 Ounce) Cans, Dark Red Kidney Beans**
1 (28 Ounce) Can, Diced Tomatoes
1 (28 Ounce) Can, Tomato Puree

* If you're health conscious like we are, the 85% lean ground beef makes you a little hesitant at first. We typically don't buy anything lower than 95% if we can control it. However, for this chili (with the spices used and the cooking method) you are going to want to find and use 85% lean beef. Fattier beef (70%) will cause a greasy chili while leaner beef will completely disappear in the dishes' other great flavors.

** Dark red kidney beans are used because they are more durable and hold their shape better than traditional kidney beans. One of my 'dislikes' in regards to chili is the abundance of soft, squishy beans. I don't care for the texture and their lackluster flavor is unappealing to me. Dark red kidney beans are supposed to hold their shape and texture- regardless of how long they are submerged and hold their flavor. We reduced the called for cans to 1, as Maggie is not a big fan of beans either.


*** This recipe originally called for a chopped red bell pepper as well. I'm not a fan of the flavor of red bell peppers and we both dislike a lot of heat in our recipes. We omitted the bell pepper, but if you're a fan of heat, feel free to add it right back in.

Begin by heating the vegetable oil in a large dutch oven over medium high heat until the oil begins to shimmer. Once shimmering, add the onion, garlic, chili powder, cumin, coriander, red pepper flakes, oregano and cayenne pepper to the pot. Stir to mix everything together. (Yes, there will be one heck of a spicy aroma arising from this pot!)

Cook the onions until they soften and begin to brown.* Be sure to stir occasionally to prevent sticking. This should take about 10 minutes. Resist the urge to add water here. Yes, the mixture is going to be very sticky and thick, but remember that we are using a fattier beef. Once you add the beef, you'll be glad you didn't dilute the mixture with water.

Next, increase the heat to medium high and add 1 pound of ground beef. Cook until the beef begins to slightly brown (it's okay to still have touches of pink). About 3 to 4 minutes. Add the second pound of beef to the pot and repeat, cooking until slightly browned, for an additional 3 to 4 minutes.


*Now, this is one of those "cookbook" directions. You know the ones I mean, they tell you one thing, but once you try it - it's very, very clear that what they are telling you is impossible. In this instance, once you add the chili powder, cayenne pepper, red pepper flakes etc. The mixture will turn a deep reddish brown. I.E. you will no longer be able to see if the onions are white, translucent or brown. Telling you to wait for the onions to brown is asinine. You can't see their color. Simply cook them for 10 minutes.


You can eyeball the mixture here and see if you think the beef is a little too fatty or not. You want a little bit of liquid in the pot, but you don't want it to resemble soup already (remember, so far the only moisture is melted fat - so lots of moisture is equivalent to lots of unnecessary fat.) I chose to strain out a little bit of the fat before moving on to the next step. You results may vary.


Next, add the beans, (I prefer to rinse my beans before using them. They are typically stored in a sodium heavy solution, most of which clings to the beans when you cook with them. Simply give them a good rinse in a strainer before use and you can reduce the amount of sodium you'd be taking in by about 50%) both cans of tomatoes (crushed and puree) and a pinch of salt. Bring this mixture to a boil and then reduce the heat until it reaches a nice simmer. Cover the pot and allow to cook, stirring occasionally, for at least 1 hour. After the first hour, remove the lid and allow the mixture to continue to simmer for another hour.

This slow stewing process is going to greatly enhance the flavor of the recipe. The tomatoes lose their 'pre cooked' flavor and begin to take on a great, almost, "roasted" flavor when they're allowed to slowly simmer for 2 hours. This cooking process is why we needed a fattier beef (some of that fat has been cooked right out by now) and a heartier bean.

Once the chili has turned a darker color and has thickened nicely, give it a taste test and adjust the seasoning with a little salt as needed. If you're finding the chili is sticking slightly, you can add 1/2 cup of water to the mixture to thin it out a little.

Once you find the sweet spot (to your preference, obviously) serve and enjoy!

The Results:


This was a whole new level of chili. The only chili I've ever had has been more reminiscent of soup - with tomato sauce being the star of the show. This chili is thicker, and almost like a stew, but no one ingredient really wins the day. The great beef flavor is prevalent (something that is usually lost in chili) bu is not overbearing. The tomato base was exactly what I hoped for, present but not overpowering. Slow simmering this sauce for 2 hours really aided in the spices and tomatoes marrying nicely. The dish was neither too spicy or too acidic - but a nice, delicious blend in between. All in all, a successful dish!

That's all we have for you this week. We're back next Monday with another trip Around The Culinary World. Until then,

~Cheers