Wednesday, March 25, 2015

Perfect Pilaf

Good evening everyone!  The premise behind Chef Zakarian's latest book is that to create a delicious meal is lurking just inside your pantry.  He lists 50 readily available ingredients and creates a multitude of recipes from these.  One of these ingredients is long-grain brown rice.  While most of us serve it as an afterthought, Chef Zakarian uses it to create a filling, yet delicious meal, with some vegetable goodness.

The Recipe:  Brown Rice Pilaf
Original Recipe Found In:  Geoffrey Zakarian's My Perfect Pantry

What You'll Need:
1/4 Cup Extra-Virgin Olive Oil
1 Cup finely chopped Bell Pepper (green or red will do just fine)
1 Cup finely chopped Carrot
1 Cup finely chopped Onion
2 Garlic cloves, finely chopped
2 Teaspoons chopped fresh Oregano
2 Teaspoons chopped fresh Thyme
1 Cup long-grain Brown Rice
2 1/2 Cups Chicken Stock
2 dried Bay Leaves
1 Cup chopped Scallions (white and green parts)
2 Tablespoons unsalted Butter, cut into pieces

To start, place the oil in a medium-sized Dutch oven and heat over medium heat.  When the oil is hot, add the bell pepper, carrot and onion.  Cook these vegetables until they begin to soften, about seven to eight minutes.  Add the garlic, oregano, and thyme and cook until the fragrances release themselves, about one minute.

Next, add the rice and stir to coat with the ingredients in the Dutch oven, insuring the rice begins to toast in the oil, about two minutes.  Add the chicken stock and bay leaves and bring to a boil.  Once at a boil, bring the heat to a bare simmer, cover the Dutch oven, and cook until the rice is just tender, and still a little chewy, about 45 minutes.  Remove the pot from the heat and let sit, covered, for about ten minutes.

Uncover the pot and fluff the rice with a fork.  Add the scallions and the butter, stir to combine to melt the butter.  Once the butter is melted, remove the bay leaves and season with salt and pepper.  Serve and enjoy!

The End Result:


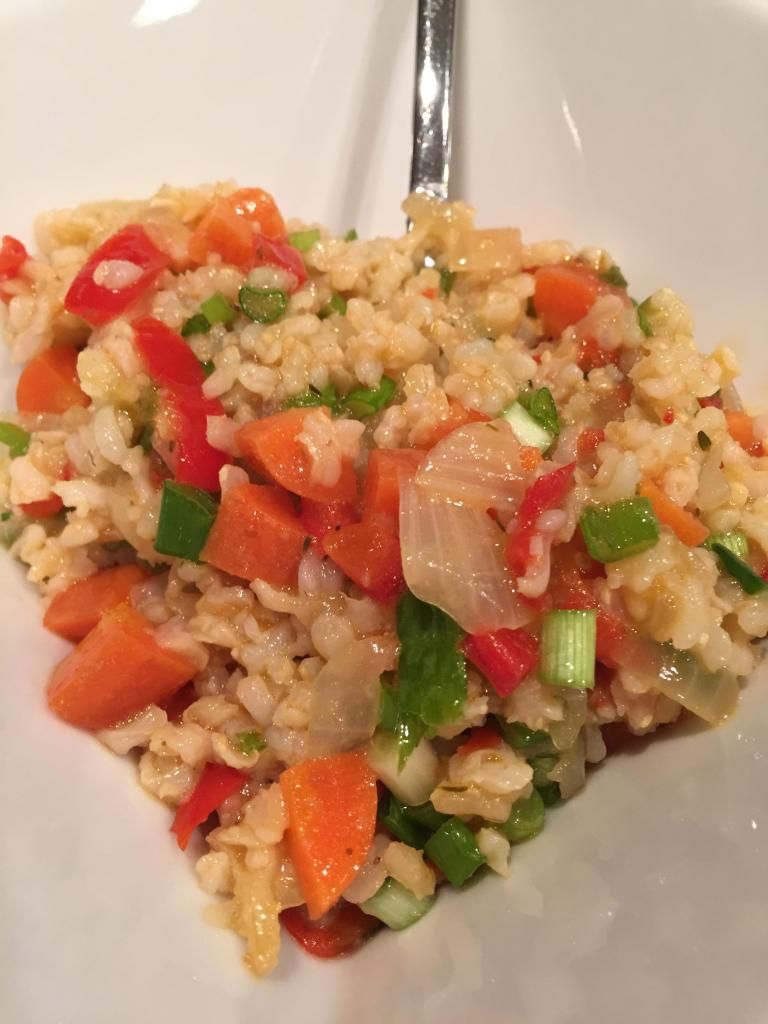
While it's hard to ignore all the beautiful colors in this dish, the rice remains the star.  Perfectly seasoned in chicken stock, it almost melts on your tongue with each bite.  But all the ingredients have taken on that stock flavor and have harmonized together.  While this dish might not be a week-night favorite (since it does take over an hour to cook,) it's something delicious to try using the resources that might be in your pantry!

Wednesday, March 18, 2015

Bountiful (Meat-Free) Burritos

In the endless pursuit that is my obsession with Mexican food, I found this little gem.  While it may not be an overly complicated recipe and packed to the gills with meat, its simplicity won me over and what a delicious delight this dish turned out to be! 

The Recipe:  Cheesy Baked Bean and Rice Burritos
Original Recipe Adapted from a Recipe Found On:  www.pinterest.com

What You'll Need:
1 (16 Ounce) can of Refried Beans
2 Tablespoons of jarred Salsa (your favorite will suffice)
1 Teaspoon packaged Taco Seasoning Mix
1 (10 count) package medium soft, taco-sized flour Tortillas
1 Cup prepared Mexican Rice
1 Cup shredded Sharp Cheddar Cheese
1 Cup shredded Monterey Jack Cheese

To start, preheat an oven to 400 degrees and prepare a baking sheet by covering it with foil and top with non-stick cooking spray.  In a small mixing bowl, add the refried beans, taco seasoning, and salsa and thoroughly mix.  Set the bowl aside.

Warm the entire stack of tortillas in the microwave for 20 seconds, just to slightly warm them.  Place a tortilla on a cutting board and place a couple of tablespoons of the refried bean mixture in the center of the tortilla.  Next, layer a couple of tablespoons of the rice and finally top with some cheddar and Monterey Jack cheeses.  Fold in both sides and then roll the tortilla up.  Place seam side down on the prepared baking sheet.  Continue the process with the remaining tortillas.  Coat the tops of the burrito with additional cooking spray.

Once all the burritos have been prepared, bake at 400 degrees for ten minutes.  Remove the baking sheet from the oven and using tongs, very carefully flip each burrito over to brown the other side.  Return the baking sheet to the oven for an additional five to ten minutes or until each sides has browned slightly.  Serve and enjoy!

The End Result:

I realize refried beans aren't the best to photograph after I took this picture!
If you are looking for a quick, simple, meatless Mexican dish to whip up, this recipe is for you!  Sometimes, it's nice to go au natural when creating a timeless dish.  This dish, packed with cheesy, protein-rich goodness is delightful, and never heavy.  If you want to serve with addition salsa or sour cream, be my guest.  But this one is best left alone and you will be rewarded!

Sunday, March 15, 2015

Perfect Pulled Pork

Hello again everyone! Spring appears to have finally arrived in the midwest, as the past week has seen temperatures in the 50's, 60's and even 70's. As to be expected, the warm weather has brought the grills from the garage back to the patio - we've already fired ours up as well!

Yes, warm weather means grilling and BBQ, but the downside with these early spring days is that the temperature isn't consistently warm. So, what are you to do when you want great BBQ flavor but the outdoor temps aren't cooperating? Turn to the slow cooker, of course!

The Recipe: Barbecue Pulled Pork
Original Recipe Found in: Food Network Magazine (January / February 2015 Issue)

What You'll Need:

1/4 Cup Dark Brown Sugar
1 Tablespoon Chili Powder
2 Teaspoons Ground Cumin
1 Teaspoon Ground Mustard
1/2 Teaspoon Ground Allspice
1/2 Teaspoon Cayenne Pepper
4 Pounds Boneless Pork Shoulder (Excess fat trimmed)
1 Tablespoon Vegetable Oil
1 Onion (Chopped)
4 Cloves Garlic (Chopped)
1 Tablespoon Tomato Paste
2 Cups Low Sodium Chicken Broth
1/2 Cup Ketchup
1/4 Apple Cider Vinegar

In a medium bowl, combine the brown sugar, chili powder, cumin, ground mustard, allspice, cayenne pepper, and a pinch of salt and pepper. Once combined, rub this spice mixture all over the pork shoulder, making sure to get the spices into every crevice of the meat. Once completely covered, tightly wrap the shoulder in plastic wrap and store it in the refrigerator for 1 to 4 hours (the longer the better - feel free to leave it for up to 8 hours, if you can).

Next, set a large skillet over medium high heat and add the vegetable oil. Once the oil is shimmering, add the onion and garlic and cook until softened. Add a pinch of black pepper along with the tomato paste, chicken broth, ketchup and cider vinegar and a cup of water. Bring the mixture to a simmer and allow to thicken slightly.

Transfer the pork shoulder to a slow cooker, and cover with the BBQ sauce. Set the slow cooker to low and allow it slow roast for 5 to 7 hours. After the initial roast, use a part of tongs or forks (whatever you feel most comfortable with) to tear apart the pork. Serve on fresh buns with a pickle and enjoy!


Wednesday, March 11, 2015

Dessert for Breakfast? Yes, Please!

Need a brunch idea fast, but in not a lot of time?  These pancakes will be sure to delight and will make you crave for some more!

The Recipe:  Carrot Cake Pancakes
Original Recipe Found In:  Cooking Light 350 Calorie Dishes

What You'll Need:
5.6 Ounces All-Purpose Flour (about 1 1/4 cups)
1/4 Cup chopped Walnuts
2 Teaspoons Baking Powder
1 Teaspoon ground Cinnamon
1/4 Teaspoon Salt
1/8 Teaspoon freshly ground Nutmeg
Dash of ground cloves
Dash of ground ginger
1/4 Cup Brown Sugar
3/4 Cup Low-Fat Buttermilk
1 Tablespoon Canola Oil
1 1/2 Teaspoons Vanilla Extract
2 Large Eggs, lightly beaten
2 Cups finely grated Carrot (about 1 pound)

To start, weigh or lightly spoon 5.6 ounces of flour into dry measuring cups and level with a knife.  Combine the flour, walnuts, baking powder, cinnamon, salt, nutmeg, cloves, and ginger in a large mixing bowl.  Stir these ingredients with a whisk until well combined.  In a medium mixing bowl, add the brown sugar, buttermilk, oil, vanilla extract, and eggs.  Thoroughly mix until all the ingredients have incorporated themselves.  Slowly pour the sugar mixture into the flour mixture and stir until just moist.  Fold in the carrot until it has incorporated itself into the batter.

Next, heat a large, nonstick skillet over medium heat.  Coat the pan with cooking spray.  Once the pan has heated, spoon a 1/4 cup portion of the batter into the skillet, leaving room for three more pancakes.  Gently spread the batter, but don't overcrowd the pan.  Cook each pancake for two minutes or until the tops have begun to bubble and the edges look colored.  Very carefully turn the pancakes over and cook for another minute, or until lightly browned.  Repeat this procedure with the remaining batter.  Serve with butter and/or syrup or nothing at all and enjoy!

The End Result:


These little pancakes are the most decadent, moist pancakes you will ever meet!  The carrots will make it taste like carrot cake, and if you are a fan of it (but not the amount of time it takes to make it,) you will love these pancakes!  You will have to be very careful on latter batches of the pancakes, because they will cook very quickly, if you aren't watching.  The original recipe called to serve with the honey and butter, but I stuck with good ol' maple syrup and it tasted delicious.  You could serve it with a multitude of sweet toppings, or, like Tyler did, ate them by themselves and the delicious factor was still in place.  Give these pancakes a try, you will NOT be disappointed!