Thursday, April 28, 2011

Fresh & Zesty Tostadas

Good evening everyone! As Maggie mentioned in the beginning of her tostada recipe last week, we like to add a little spice to our menu every once in a while by cooking 'south of the border' if you will. A little Mexican influence is the easiest way to take our normal meal options and spice them up. Case in point, Maggie's fantastic tostadas from last week. On the surface, it's nothing more than a sloppy joe on a taco shell, but with the right blend of ingredients it blends into a supernova of flavor and deliciousness that easily ranks up there in Maggie's top 10 recipes. Now, once we do a theme, we like to give it a week or two to breathe. We don't want to seem redundant and overdo one particular cooking category. This week, we're breaking that rule for one reason and one reason only - we have a whole heck of a lot of tostadas left! The only package we could find at our local grocery store was a 24 pack. We only used 6 for Maggie's recipe last week, so my challenge this week was to find a recipe that used tostadas - because, you never want to waste food if you can avoid it! So, for the simple purpose of 'we have extra tostada shells' here's my recipe for the week:


The Recipe: Turkey (or) Chicken Tostadas
Original Recipe Found On: Eatingwell.com

What You'll Need:

1 Can Petite Diced Tomatoes (For extra heat, choose the kind that includes jalapenos)
1 Medium Onion (Thinly sliced)
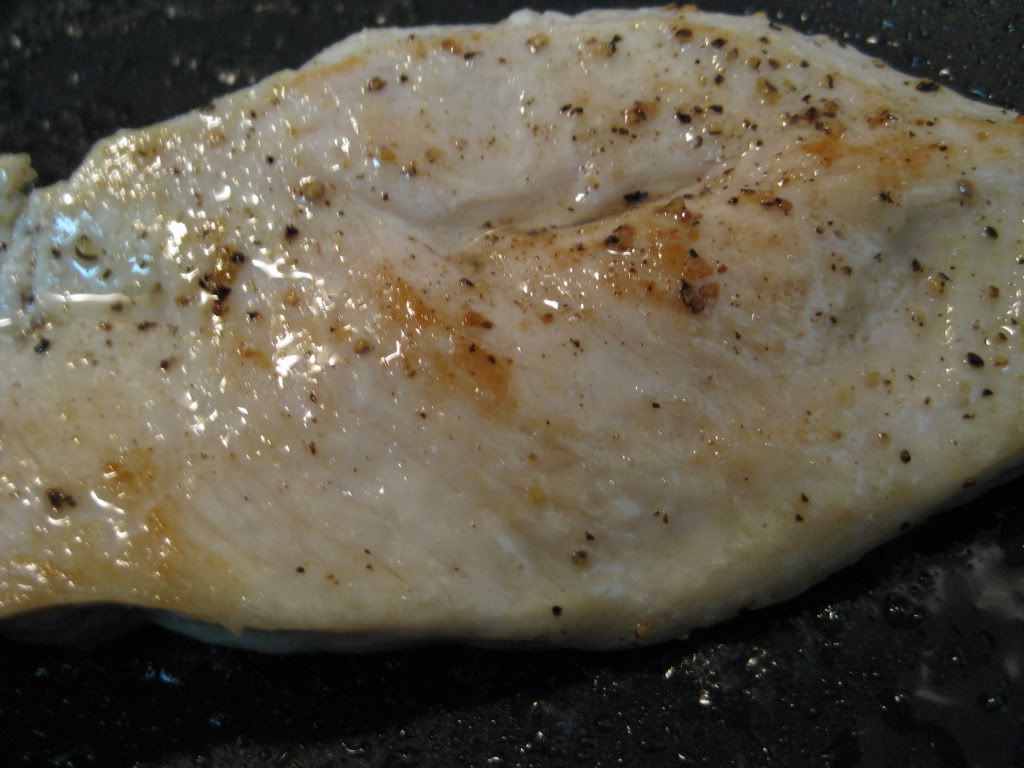
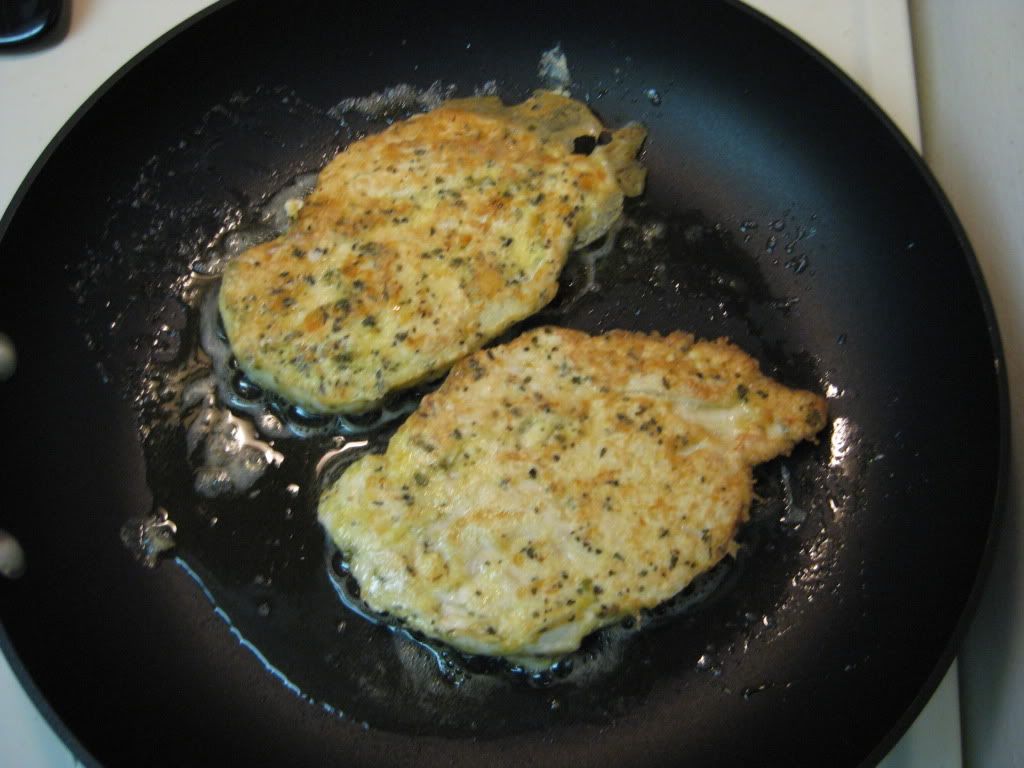
8 -12 Ounces Shredded Cooked Turkey or Chicken (See photo below)
1 Avocado Pitted (See note below)
1/4 Cup Prepared Salsa
2 Tablespoons Reduced Fat Sour Cream
2 Tablespoons Fresh Chopped Cilantro
1/2 Cup Shredded Monterrey Jack Cheese


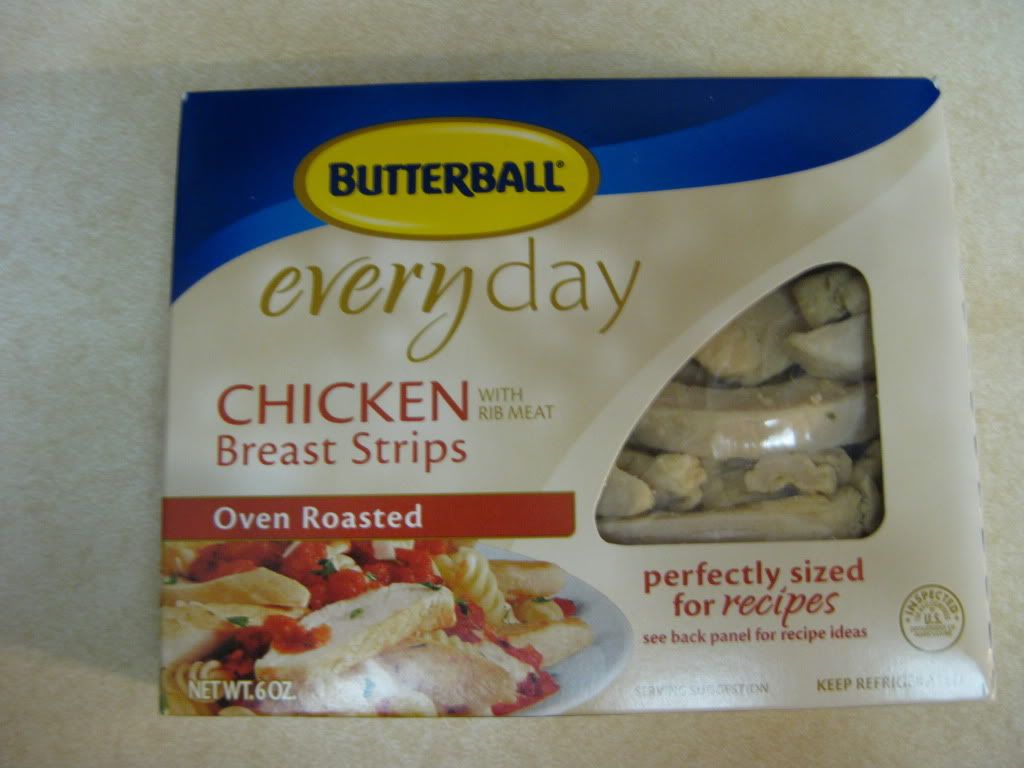
A great shredded chicken option


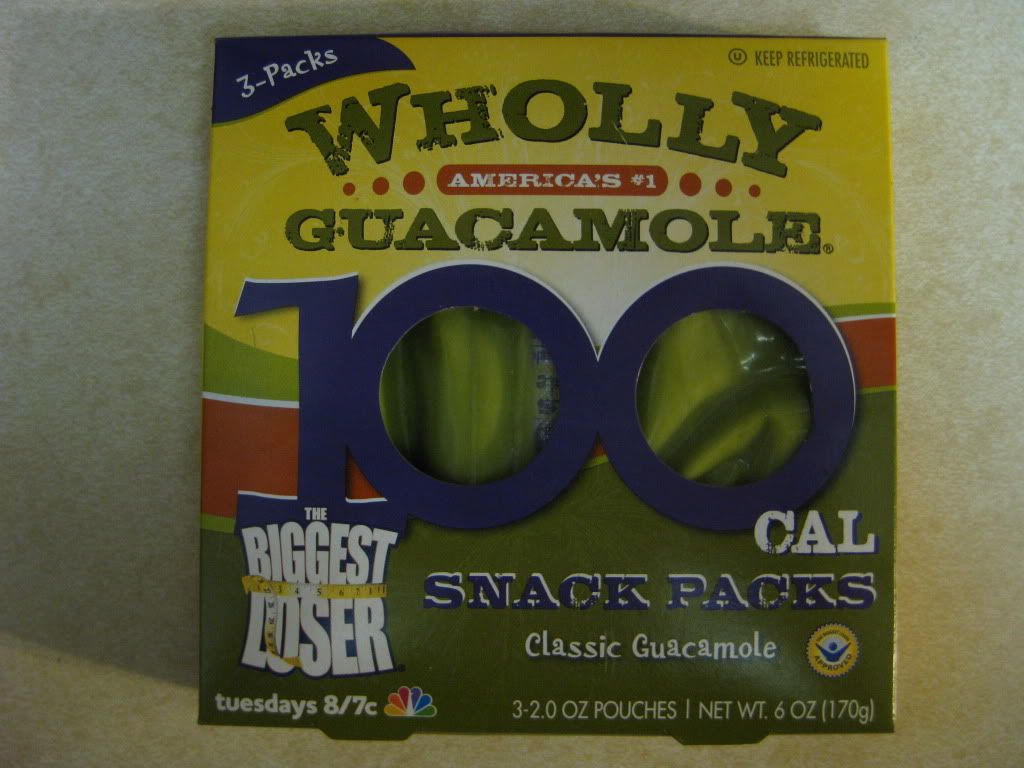
Note: If you don't want to go to the hassle of pitting and preparing an avocado (not my favorite thing to do) you can purchase pre-prepared avocados in the form of avocado paste or prepared guacamole. Check the ingredient list if you're purchasing prepared guacamole. So long as the contents are limited to avocado and very little else, it works as a great substitute. We use 'Wholy Guacamole' (photo below) in place of avocados for all of our recipes.


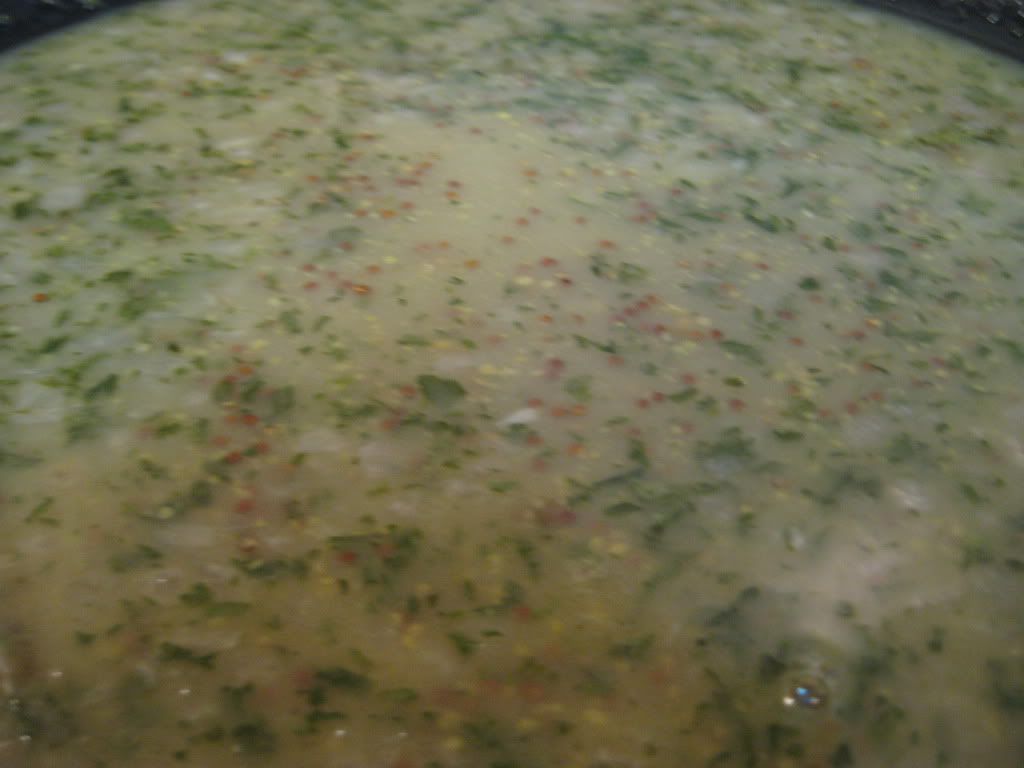
Begin by bringing the diced tomatoes (juice included) to a boil in a medium saucepan over medium high heat. Once boiling, add the onion and cook until the onion has softened and the juice has slightly reduced in the tomatoes (the mixture will become less like a soup and more like a thick stew) this should take about 15 to 20 minutes.

Next, add the turkey (or chicken) and cook until heated through, roughly 2 to 5 minutes. This is why pre-cooked chicken/turkey is the key to this recipe. All you're trying to do here is infuse the flavor into the meat and bring everything up to temperature. Attempting to actually cook the poultry in the tomato mixture would double cooking time and lead a rubbery, bland chicken texture when everything was complete. If you opt to cook the poultry yourself - be sure to pan fry the chicken or turkey prior to starting on the recipe. The poultry has to be pre-cooked.

Next, (if you're using fresh avocados) mash the avocados in a bowl (that's why we say you can use paste or guacamole - it's all going to end up mashed anyway!). Add the salsa, sour cream and cilantro and stir until combined. Set the mixture aside.

If you don't have tostadas on hand, you can make your own by coating a regular flour tortilla with cooking oil and baking on the upper rack of a 375 degree oven for 10 to 15 minutes, or until they're lightly crispy. However, as we established - we had extra tostada shells, so we skipped this step.

Next, you can begin to assemble your tostadas. Spread a thin layer of avocado mixture on the bottom of the tostada. Next, add the chicken mixture and top lettuce, shredded cheese and extra sour cream if you so desire. All that's left is to enjoy!

The Results:


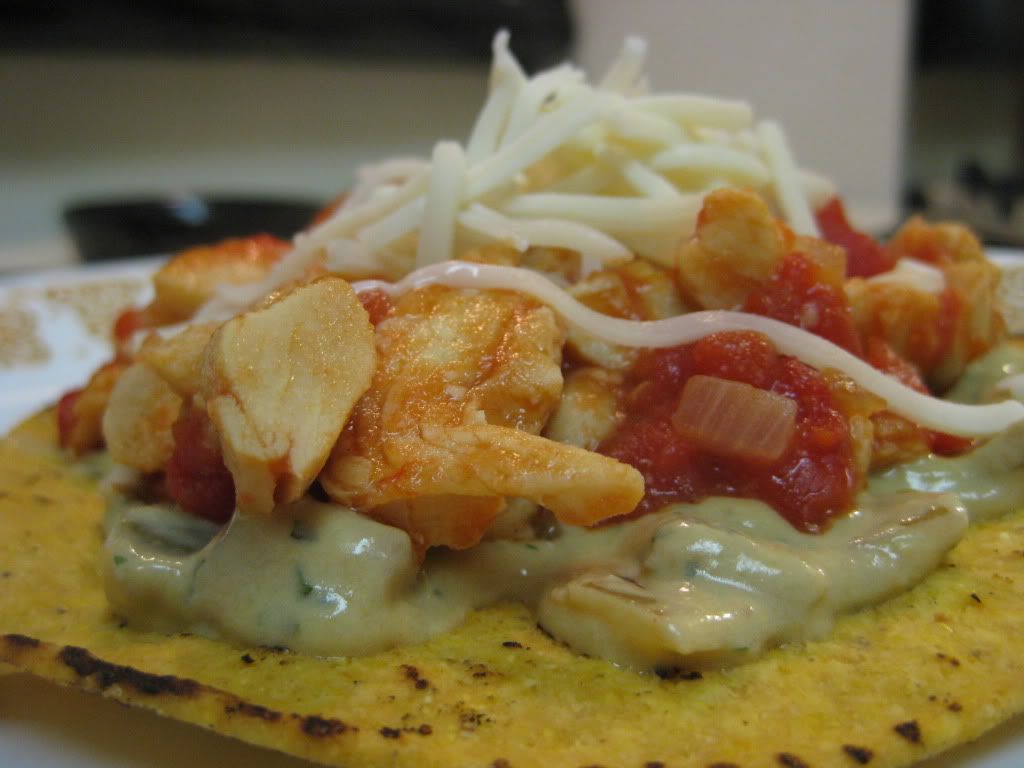
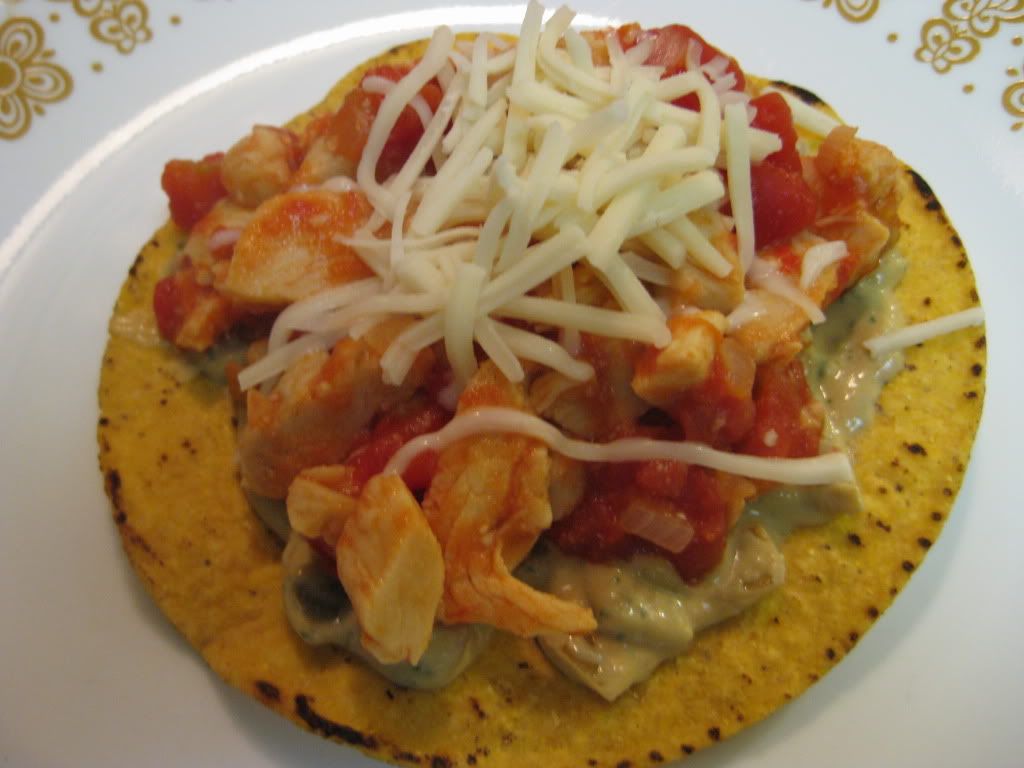
My recipe tonight was similar to Maggie's from a week ago in construction and concept, but it differed greatly in ending flavor (in a good way). Maggie's dish tasted like a fantastic taco - full of spicy and zest Mexican flavor. My tostada ended up tasting light and fresh - not at all like a traditional taco or burrito, but it still packed a very authentic Mexican cuisine taste. With 30 minutes of total preparation time and a clean, fresh (yet distinctly Mexican) final flavor, this recipe joins Maggie's dish from a week ago as 'sure fire' hits for the whole family. Give them both a try ASAP!

That's all we have for you this week. I know our summer schedule has been light, but it has allowed us to do 2 things. First, we've been able to walk every night the weather has cooperated, which is a nice relaxing way to end a busy day for the both of us. Secondly, we've been able to dedicate more time to our blog posts. We're able to research the recipes more, put more time and thought into our blog posts and really work to put out a high quality finished product. Three posts a week seem to be the 'sweet spot' for quality and quantity on the blog. We've seen a great surge in traffic lately, we're actually averaging over 1,000 page views a month now. It's great to see our little 'hobby' that started up (almost) one year ago today is starting to draw an audience. Welcome new readers, thank you old readers and to everyone - thanks for sharing in our cooking for this week! We're back on Monday with another trip around the culinary world, until then, have a great weekend and as always,

~Cheers

Tuesday, April 26, 2011

A New Twist on Asian Cooking

Good evening, everyone!  I’ve noticed that all the recipes I create week after week, have some sort of story to them.  Granted, I can’t really place why I do this, but it is a reoccurring them I have.  After this week, that will hopefully change – wish me luck! 

With that being said, after the suggestion from a blog follower, my middle sister Katie, asked if we could do a recipe that might cater to special diets, for instance, gluten-free diets.  There is a growing amount of the population that is allergic to gluten (check the healthy section of your local supermarket, you’ll see the proof of gluten-free products spanning the whole section.)  Granted, I am no expert in the food sciences or any sort of doctor, but it makes you wonder if certain people are born with any kind of food allergy or if it progresses as a person ages.  Anyway, time to step off the soap box and on to cooking.

Trying to find a recipe that was gluten-free was some sort of a challenge for me.  I tend to lean toward the carb heavy recipes.  But I really wanted to push myself and find something that is considered “gluten-free” and also incredibly flavorful.  I think this recipe might do just the trick.

The Recipe:  Mahogany Glazed Chicken
Original Recipe Found In:  www.kitchendaily.com

What You’ll Need:
(serves 4)
1/2 Cup Rice Wine or Medium-Dry Sherry (we opted for the sherry in our version)
1/4 Cup Strong-Brewed Black Tea
1/4 Cup Unsweetened Pineapple Juice or Orange Juice
2 Tablespoons Reduced Sodium Soy Sauce
1 Tablespoon Honey
1/2 Teaspoon Ground Cinnamon
1/2 Teaspoon Ground Ginger
1/2 Teaspoon Freshly Ground Pepper
1/4 Teaspoon Salt
4 Boneless, Skinless Chicken Breasts, Trimmed
1 Tablespoon Peanut or Canola Oil, Divided
1 Small Red Bell Pepper, Diced
2 Scallions, Sliced
1 Clove Garlic, Minced

To begin, combine the rice wine/sherry, tea, juice, soy sauce, and honey in a two cup glass measuring cup.  Set this combination aside.  We scoured our local grocery store for “unsweetened pineapple juice” and let me tell you, it was very hard to find.  We weren’t about to go to another store to try to find it (like we do with many exotic ingredients) so we opted for a unique choice.  We bought a can of pineapple chunks, in a no sugar added juice, and used the juice from the can for our recipe.  It might be a little unconventional, but cooks have to improvise in the kitchen, right? 

Next, combine the seasonings (cinnamon, ginger, pepper, and salt) in a small bowl.  Give the chicken a good nice rub down with the spices and make sure both sides are coated evenly.

In a large skillet, heat 1 1/2 teaspoons of oil over a medium-high heat.  Gently add the chicken and reduce the heat to medium.  Cook the chicken until a nice golden color forms and is no longer pink in the middle, a good five minutes on each side.  Set the chicken aside.

Perfectly seasoned chicken


Add the remaining 1 1/2 teaspoons of oil to the skillet and add the bell pepper, scallions, and the garlic.  Sauté these for a minute.  Add the sherry-tea mixture and bring to a boil, making sure to scrap up any browned bits of veggies.  For four minutes, reduce this liquid by half.

Delicious veggies!


Return the chicken to the skillet and turn the heat to low.  Gently spooning the sauce over the chicken, simmer until heated through, which should take about two minutes.  Slice the chicken in diagonal portions, spoon the sauce and veggies over, serve, and enjoy!

The End Result:


I wasn't expecting the recipe to have such a kick to it, but it most certainly did.  It wasn't a kick in a seat kick, but it was a back of the mouth warming sensation.  All the flavors were an interesting combination and definitely unique.  It had a very Asian inspired taste any sort of fried rice or plain rice would have complemented the dish to a 'T'.  Overall, it's something we've never had before and well worth the experience.

That's all we have for you this evening.  Check back in on Thursday for my variation on a recipe we did last week.  Until then,

~Cheers!

Sunday, April 24, 2011

Around The Culinary World

Good evening everyone and happy (end of) Easter! If you don't celebrate, then happy Sunday night! As always, we like to get the new week of blogging started off with a little trip around the culinary world in search of the most interesting news stories regarding cooking and culinary delights. Sometimes, we're blessed with a grand assortment of topics to break down, analyze and speculate about. Other times, we're left with...well, not too much to discuss. Sadly, this week falls into the latter category. We've still got a few stories to share though - so without further ado, here is this week's (brief) Around The Culinary World:


We dove into the lawsuit between Taco Bell and their critics about a month ago. If you don't recall, the argument boiled down to this: a law firm levied a suit against Taco Bell, claiming that their beef didn't meet the minimum requirements to be defined as 'beef'. Their claim was that Taco Bell only used 35% beef and filled the rest with fillers and other additives. (If you'll recall, federal guidelines say that beef has to be at least 40% beef to be advertised as...well...beef. This was the part of the story that shocked us the most the first time around!) Taco Bell fought back - HARD. They took out full pages ads, they ran commercials. They screamed from the rooftops that they were telling the truth. We said at the time that Taco Bell better be telling the truth, otherwise there would be no recovering from the negative press. It turns out - they were telling the truth. The law firm withdrew the suit last week. No money changed hands, no agreements were reached. Clearly, the law firm found they had little ground to stand on and retreated with their tail between their legs. This week, Taco Bell took out the following full page ad:


Well - they have a point! Well done by Taco Bell in all of this - their marketing and communication with the public has been impressive. I smell a countersuit for defamation coming for one particular law firm... 


Burrito purveyor Chipotle happens to be one of Maggie and my favorite places to eat. Fresh ingredients, simple premise, all in all a very good dinner destination. Sadly, they've had some issues with hiring not-so-legal citizens lately. Those issues are still popping up and now the federal government is getting involved. Read the full story HERE.


If you're like Maggie, your seasonal allergies are currently kicking your bum. Did you know that what you're eating can help alleviate the symptoms? (Notice, alleviate, not cure - you can't suddenly eat a mango and be cured forever of allergies and dry eyes...as much as we wish that were the case.) Check out the full story HERE to see if a diet change could help you suffer and sneeze a whole lot less.


And yes, that is all we have for stories worth blogging about this week. (Most of our favorite sites were full of Easter recipes and that doesn't really do a whole lot of good for a Sunday evening / Monday morning feature) We're running our usual schedule this week. Maggie is taking Tuesday and I'll be cooking Thursday. Stop back in Tuesday night to see what Maggie has cooking. Until then,

~Cheers

Thursday, April 21, 2011

It's Like an Open Face Taco

Good evening everyone!  As Tyler and mine's food tastes have evolved, Mexican food has led the way in our experimentation. The flavors, spices and ingredients are new and exciting and are typically things we don't normally get to play around with. So, when we see a good Mexican dish, we make a note of it and save it for later. As such,  I have a lot Mexican style recipes in the hopper.  But obviously, a string of Mexican recipes would bore some of you (and some of you would be extremely excited about it.)  Tonight, I try out of those recipes.  Would it be el authentico or para nada?

The Recipe:  Beef Tostadas
Original Recipe Found In:  Food Network Magazine, April 2011 issue

What You'll Need:
2 Tablespoons Vegetable Oil
1/2 Small Red Onion, Chopped
2 Cloves Garlic, Minced
3/4 Pound Ground Beef
2 Tablespoons Tomato Paste
1 Tablespoon Chili Powder
1 15 Ounce Can Refried Beans
1/3 Cup Sour Cream
8 Corn Tostadas
1 1/2 Cups Shredded Monterey Jack Cheese
Shredded Lettuce, Hot Sauce, and/or cilantro, for topping

Begin by heating the vegetable oil in a large skillet over medium-high heat.  Next, add the onion and cook until it softens, but before it browns, this should take about five minutes.  Add the garlic and cook for one minute until fragrant. Add the beef and 1/2 teaspoon of salt into the skillet and break up the meat and cook until browned, which takes about three to six minutes.  Finally, add the tomato paste and chili powder, stirring, and cook for about two more minutes.

Skillet of deliciousness


Meanwhile, in a small saucepan, heat the refried beans (which have to be the most visually grotesque party of any mexican dish. Luckily they taste decent!)  Moisten the sour cream with two tablespoons of water and stir it until it becomes thin.


Spread the beans on the tostadas (which are essentially flat, hard taco shells; you can find them in the Mexican aisle in your local grocery store.)  Then top with beef and cheese.  If so desired, add the sour cream, hot sauce, lettuce and/or cilantro.

The End Result:


An incredible flavor combination!!  Most people complain about Mexican food being too spicy.  But this recipe was definitely not (if you're like me, the hot sauce can be almost too hot, that's why it's optional.)  But the flavor in the meat was wonderful and the beans almost didn't add another flavor, but then enhanced the quality of the tostada.  Topped with monterrey jack cheese and sour cream made it a complete dish.  Tyler and I both raved as we scarved down our tostadas.  This recipe is not only repeat worthy, but cookbook worthy (if we decide to do another cookbook - (Tyler's Note: which doesn't look too promising due to the total lack of sales of our original...if you've been meaning to buy it but haven't yet - what are you waiting for? You could be the first, (sadly) to own your very own copy of our cookbook. Follow the link on the upper right hand side of the blog to get your own copy!)

That's all we have for you this evening. Thanks for sharing another week of recipes and stories with us here at Out Of The Culinary. Check back Monday for another edition of Around the Culinary World.  Until then, enjoy your weekend (happy Easter) and,

~Cheers

Wednesday, April 20, 2011

Recipe Quick Hit: Strawberry Shortcake Smoothies

Good evening everyone. As promised, we've got a quick hit recipe for your reading pleasure this evening. This simple little smoothie is not only delicious, but with the only sugar coming from the pound cake, it actually leans towards the healthier side of eating as well. Here's how you can make your own delicious smoothie:

What You'll Need:

(Makes 1 smoothie)

3/4 Cup Milk
3/4 Ice
1/2 Cup Pound Cake (Or Angel Food Cake)
1/2 Cup Sliced Strawberries


Combine everything into a blender and pulse until the mixture is smooth. Top with whipped cream if you so desire. We like to add an extra helping of strawberries to really boost the flavor.  That's all there is folks! Simple and delicious. Stop in tomorrow night to see what Maggie has got cooking. Until then,

~Cheers

Tuesday, April 19, 2011

Simple, Sauteed & Saucy

Good evening everyone! We're changing things up a little bit from our original schedule. Maggie was slated to be cooking tonight, but my work schedule is more conducive to me cooking tonight sooo - here I am! Back in my usual Tuesday cooking spot. It's good to be home! Tonight, I'm returning to one of my favorite cooking aides - the fantastic cookbook from the amazing folks at America's Test Kitchen. I have yet to cook up a dish from this book that has been anything less than astounding and delicious. With a return to my favorite cookbook, I'm also returning to my favorite dish - chicken cutlets with a pan sauce. While simple in premise, chicken cutlets with pan sauce are probably the most diversified dish you can create. The options are wide open and really allow you to get creative with the flavors. Let's get started on tonight's dish:


The Recipe: Sauteed Chicken Cutlets
Original Recipe Found In: The Complete America's Test Kitchen TV Show Cookbook: Every Recipe from the Hit TV Show With Product Ratings and a Look Behind the Scenes, 2001-2011


What You'll Need:

2-4 Boneless, Skinless Chicken Breasts, Trimmed of Fat
3 Tablespoons Vegetable Oil
1 Medium Shallot (Minced)
1 1/4 Cups Apple Cider
2 Tablespoons Cider Vinegar
2 Teaspoons Whole Grain Mustard
2 Teaspoons Minced Parsley
2 Tablespoon Unsalted Butter

Begin by preheating your oven to 200 degrees and adjusting the oven rack to the middle position.

Cover your chicken breasts with a square of plastic wrap and beat the living daylights pound them with a meat tenderizer until they reach 1/4 inch of thickness. Depending on the thickness of the chicken breast, you may find it easier to slice the breast in half before tenderizing. Here's a free tip - to make slicing the breast a little easier, place it in the freezer for about 10 minutes before cutting. It will firm up - but it won't freeze, allow you to maneuver the knife through the breast much easier.

In a 12 inch non stick skillet, add 1 tablespoon of vegetable and heat over medium high heat until the oil begins to shimmer. Place your cutlets into the skillet and cook (undisturbed) until they are golden brown. This should take about 4 to 8 minutes. (The thinner the cutlet, the faster the cook time). Next, flip the cutlet and cook for an additional 2 to 5 minutes, or until the chicken reaches 165 degrees. I've found that this usually takes closer to 8 minutes on the second side. Place the cutlets on an oven safe plate and into the 200 degree oven to keep warm.


Now you can begin making the pan sauce. In the same skillet you cooked the cutlets in - add the remaining 2 tablespoons of vegetable oil and the shallots. Keep the skillet off of the heat and allow the residual heat from the skillet to soften the shallots. This should take about 30 seconds to 1 minute.


Return the skillet to medium high heat and add the cider and the vinegar. Bring the mixture to a simmer. Be sure to use a wooden spoon to scrape the bottom of the skillet, the residual browning from the chicken will add a great flavor to the pan sauce, so you don't want to leave those tasty little baked on bits behind. Simmer the mixture until it reduces to about 1/2 a cup of liquid - roughly 6 to 8 minutes.


Off of the heat, stir in the mustard and parsley. Next, whisk the butter into the sauce, one tablespoon at a time, until completely melted. Season with salt and pepper to taste and serve over the chicken cutlets. Enjoy!

The Results:


Delicious. We always say, sometimes the best dishes are the simple dishes. This is one of those dishes. A quick pan fry to create a beautifully cooked and golden brown cutlet. Juicy on the inside, crisp on the outside, the method of frying up these cutlets is simply foolproof. Perfect cutlets combined with one of the most simple flavored sauces creates a very straightforward yet amazing deep flavor profile for this dish. It tastes like it should be on a menu, and you can cook it up (easily) yourself in about 20 minutes. Give this one a try ASAP!

That's all we have for you tonight. Tomorrow we'll be sharing a 'quick hit' recipe. We have a great smoothie recipe that is not only full of flavor, but contains very little sugar (you'll see just how little tomorrow) and yet is sweet and full of fruit! Be sure to stop back tomorrow night to see our smoothie recipe. Until then,


~Cheers

Sunday, April 17, 2011

Around The Culinary World

Hello there everyone! It's (almost) Monday once again (boo) which means a sorrowful trot back into the working world. As always, we here at Out Of The Culinary are bound and determined to find a little beam of light in the darkness that is Monday mornings (or Sunday evening if you're reading this early) by providing a little culinary entertainment. So, wether you're reading this at your desk (we won't tell) or if you're home from work having survived another Monday, welcome to this week's edition of Around The Culinary World:


Have you seen the Olive Garden TV commercials that claim they send their 'top chefs' to a culinary school in Tuscany every year where they learn the greatest culinary secrets from Italian chefs? They even have their own YouTube channel where they show little 20 second clips of their chefs tasting wine, learning buy fresh ingredients at a Tuscany market - the whole nine yards.  Here's one of the videos:


Now, if you're the optimist, you're thinking 'wow - how cool is it that Olive Garden really tries to make their cooking authentic!?' If you're more of the pessimistic tilt - the thought is probably more like 'how full of crap are these marketers?' In this case, it turns out that the pessimist is right. Oh - Olive Garden does send people to Tuscany every year...it's just not as 'culinary institute' -ish as they want you to believe. Read the full story HERE.


It turns out beef is bad for you - no matter how you slice it (no pun intended). We touched on the fact that the FDA is reactive to beef safety last week - we've discussed how the standards of raising beef and chicken are resulting in some terrifyingly bad chemicals being in your food. Now, we have another thing to add to the list. Beef is full of bacteria. Not just any bacteria - SUPER bacteria. Read the full (frightening) story HERE.

Above: Super bacteria - they mean business 


With spring here and summer right around the corner, it's officially grilling season. (A perfect time to grill up some of that bacteria laden meat!) One of the hardest parts of grill season has to be the 'bun purchase' in the grocery store. There are literally dozens of bun selections at any and every grocery store. They all claim to be the best  - but most are subpar or simply 'meh'. Which buns are the worthy of your purchase? Check out this head to head competition from AHT (A hamburger today) where they crown a winner.

There were so many choices, this guy just gave up! 


Burger King launched a new 'kill you in one bite' burger this past week. Similar to the KFC Double Down (A chicken sandwich that is composed of only chicken and what appears to be pure, liquified heart attack) the new BK sandwich packs the same 'liquid death' look. The 'burger' which tops off at 1,160 calories made its debut in (of all places) Japan. Check out the culinary monster HERE. No word on when this will invade other countries yet. We'll keep you posted.


According to a new study, there is a difference in Organic food's taste versus non organic food. Or is there? It turns out that the flavor boost that most people think accompanies organic food might all be in your head and it's not entirely your fault. Read the full details HERE.


Apparently, in America's restaurants, the alcohol is kept very, very close to the children's beverages. What other excuse is there for THIS story happening. The worst part is that this story is a second occurrence. Later in the week another story surfaced about an Olive Garden (boy, we're full of bad press for them this week aren't we?) accidentally served up the wrong beverage to a toddler. Check out that story HERE. I realize accidents happen, but these types of accidents should not happen. EVER - let alone twice in a week.

Um, excuse me...I ordered the apple juice!? 


That's all the news that is fit to blog about this week. We've got another week of recipes lined up for you. Maggie will be taking to the kitchen on Tuesday to get us started, and I'll be closing out the week on Thursday with another new recipe. Two new recipes, two more entertaining nights of cooking! (Hopefully) be sure to stop back in tomorrow night to see what Maggie has cooking. Until then,

~Cheers

Thursday, April 14, 2011

South Of The Border

Good evening everyone! It's been a little while since we've gone bold with a recipe on the blog. Sometimes, as a chef (amateur or otherwise) it's just easier to fall into recipes that you know you'll enjoy and that you're sure will turn out every time. Over the past few weeks, Maggie and I have been playing it pretty safe. Not to say that we were being lazy, but we certainly were not branching out and being adventurous. The only real 'gamble' we took was last week's fajita burger, which ended in split reviews, but even that recipe was far from being bold.

Tonight, I'm getting a little more bold by branching into a little exotic cuisine. Tonight's recipe, arroz con pollo (that's chicken with rice for those who failed Spanish) is an adaptation on a traditional Mexican dish. While the ingredients are fairly standard (frozen veggies, brown rice, tomato sauce) I'm not sure how well they will combine, or how well Maggie and I will like the final result. The only way you learn is to try right? With that thought in mind, I dove into tonight's dish.


The Recipe: Arroz Con Pollo
Original Recipe Found On: Eatingwell.com

What You'll Need:

2 1/2 Pounds Bone-In Chicken Thighs (Or Drumsticks) Skin Removed, Fat Trimmed
1/2 Teaspoon Salt
2 Tablespoons Canola Oil
1 Large Onion (Chopped)
4 Cloves Garlic (Minced)
1/2 Cup Tomato Sauce
1 1/4 Cups Low Sodium Chicken Broth
1 Cup Instant Brown Rice
1 Cup Frozen Vegetable Medley (Thawed slightly)


Begin by seasoning both sides of your chicken pieces with 1/4 teaspoon salt. Next, add the canola oil to a dutch oven and bring to a shimmer of medium-high heat. Once the oil is shimmering, add the chicken pieces and cook until lightly browned, about 4 to 8 minutes.


Normally, we like to cook chicken in the dutch oven with the skin still on, this keeps the natural juices within the meat while the chicken is cooking. However, with tonight's recipe we're going to be infusing both chicken broth and tomato sauce into the chicken in later stages, so losing a little of the natural juices is okay in this case. In addition, pulling the skin and fat from the chicken at the beginning creates a much healthier dish when it's all said and done.

Once all of your chicken pieces are browned, transfer them to a plate and set aside. Next, add your onion, garlic and tomato sauce into the dutch oven (don't wipe it out after cooking the chicken, utilize the natural flavors left behind in the browning process to enhance the dish - you can drain the excess oil if you feel too much has been left behind, however). Cook the mixture on medium heat for about 1 minute. Next, add the chicken broth to the mixture. Stir until everything is combined. Increase the heat to medium high and add the remaining 1/4 teaspoon of salt. Bring the sauce to a boil.


Once the sauce is boiling, add your brown rice, stirring to make sure it is evenly incorporated. Next, return your chicken to the pot and nestle amongst the rice. Cover the dutch oven and allow to simmer until the chicken reaches 165 degrees on an instant read thermometer. This typically takes about 10 to 15 minutes. Once your chicken has reached the 'safe to eat zone' add the (not so) frozen vegetables and allow them to cook until heated through. The original recipe claims this takes 2 minutes, I've found that 5 is a more accurate number.

Once the vegetables are done, you are ready to serve the chicken on top of the rice and enjoy!


The Results:


I was surprised with the flavor of this dish. I honestly thought the end result would be something more resembling Italian cooking, given the grain + tomato sauce combination. In reality, the flavor was decidedly spanish, with the tomato sauce, veggies and rice all creating a great 'spanish style rice' (as seen on restaurant menus) flavor. The chicken was delicious and juicy and (as expected) full of tomato based flavor. With relatively low difficulty and a great, out of the ordinary flavor, this recipe is certainly worth a shot for those of you cooking along at home.

That's all we have for you this evening. As always, thank you for stopping by and sharing in our hobby for another week. We're back on Monday with another edition of Around The Culinary World, where we'll share all the news that's fit to blog about. Stop back in on Monday for that feature, until then,

~Cheers

Wednesday, April 13, 2011

Recipe Flashback: Baked Pasta Casserole

Good evening everyone! Our summer schedule continues tonight as Maggie and I are taking the night off to enjoy the great weather. You're not totally out of luck, however, as we are posting one of our classic recipes from last summer for you to revisit. This baked pasta casserole is so good, it made our cookbook. Check it out again (or maybe for the first time) and be sure to give it a try yourself:

***


I used to never be a fan of pasta. That's because I've always held this 'image' in my mind of what pasta is. Spaghetti, canned tomato sauce and parmesan cheese...'pasta'. As we've been diving into the multiple cookbooks that now line our shelves, I'm come to realize that pasta is so much more. It's penne with vodka sauce, it's a base for great french chicken and it can even be naked! Not to mention, most pasta dishes seem to be fast and easy to prepare, with fantastic results.

I decided to try another unique pasta recipe tonight; 'Baked Cheesy Pasta Casserole'. My normal association with that phrasing is boxed noodles that come with some dried cheese (I.E. 'just add milk') concoction that is all too perfectly yellow and doesn't really taste like cheese. Unfortunately, the common casserole has become so mass produced and 'easy' that what you can find from Hamburger Helper and in the freezer section has just become 'acceptable'. Well, with tonight's recipe - I'm hoping to dispel that myth. My recipe tonight is quick, easy and (hopefully) delicious.

The Recipe: Baked Pasta Casserole

What You'll Need:

2 Slices High Quality Bread (White or Wheat)
1 Ounce Parmesan Cheese, Grated (About 1/2 Cup)
4 Ounces Italian Fontina Cheese, Shredded (About 1 Cup)
3 Ounces Gorgonzola Cheese, Crumbled (About 3/4 Cup)
1 Ounce Pecorino Romano Cheese (Or Substitute) *
1 Pound Penne
2 Teaspoons Unsalted Butter
2 Teaspoons All Purpose Flour
1 1/2 Cups Heavy Cream

As always, pre-measure before you begin


*Pecorino Romano cheese proved a little tricky for us to track down this week. We did find some, but it came in large quantities (when we only needed an ounce, it seemed like overkill). Pecorino Romano, also called 'Romano' cheese is made from goat's milk in Italy. However, the North American version comes from cow's milk - meaning substitutes for this cheese are fairly simple to find. Pecorino Romano is a sharper cheese, with a salty finish. This means you can substitute with cheeses such as parmesan, asiago or any pecorino cheese.  In our situation, I simply substituted the spendy Italian cheese with the relatively cheap parmesan cheese.

The cheeses!


Begin by taking two high quality slices of white or wheat bread (this can be bread you've made yourself - or if you don't want to take the extra effort, by buying some higher end bread. Pepperidge Farms' Whole Wheat bread is a very high quality bread that works well here) and slice them into quarters. Our slices of bread had extra crumbly and tough crust, so I opted to remove the crust and break them down separately. Place these strips of bread into a food processor and pulse until the bread has been reduced to crumbs. This should take about 15 to 30 seconds.

Who knew it was so easy to make breadcrumbs? 


Add the bread crumbs into a small bowl and mix in 1/4 cup of parmesan cheese along with a dash of salt and pepper. Set this bowl aside for later.

Mixing the cheese and breadcrumbs 


Set your oven rack to the middle spot, and preheat the oven to 'full whack' 475-500 degrees (depending on the range of your oven). Next, place of large pot (roughly 4 quarts) of water on high heat and bring it to a boil.

While you are waiting for the water to come to a boil, you can get a head start on shredding your cheeses. Once shredded, mix all three (pecorino, fontina and gorgonzola) in a large bowl and set aside.

Adding the cheese together


Once your water is boiling, add the penne along with a pinch of salt. Stir often and cook until al dente.


While your penne is cooking, melt two tablespoons of butter in a small saucepan. Once melted, slowly whisk in your flour and stir until all the lumps are gone. Next, slowly pour in your heavy cream, whisking it in with the butter/flour mixture until everything is well blended. Turn the heat up to medium and bring the mixture to a boil, stirring often. (It doesn't so much 'boil' as does 'foam'. Once the surface of the mixture starts to solidify and rise up, you have reach the boiling point.) Reduce the heat to low immediately and allow to simmer for another minute.


When your penne has reached al dente, drain it. Add the penne to the bowl with your cheese mixture and immediately pour the heavy cream over everything. Cover with aluminum foil and allow to rest for three minutes. You goal here is to melt all of your cheese into one nice, gooey, cheese ball. After three minutes, remove the foil and mix everything together with a rubber spatula. It will take a few folds to get everything mixed, but the longer you spend on mixing, the better the blend - so it's well worth the time.


Finally, transfer the noodles to a 13 X 9 inch baking dish. Press down on the noodles to get them nice and compact. Sprinkle your bread crumb / parmesan mixture evenly over the entire dish and press down once again. Place your baking dish in the 500 degree oven and set the timer for 7 minutes. After 7 minutes, your bread crumb topping should be nice and golden brown (if not, add a few minutes). All that is left is to serve and enjoy!

The Results:


Judging by Maggie's satisfied 'gurgle' as she took the first bite of the casserole, it turned out quite well. The three unique cheeses all blended superbly into one delicious (and not too cheesy!) dish. It was surprising that these cheeses worked so well together, actually as they were so diverse before we combined them.

Maggie (my official cheese taste tester) was munching on extra pieces of the fontina cheese as I was grating it. She described it as a 'softer version of mozzarella'. Parmesan is, of course, standard parmesan - a sharper cheese with a slightly saltier finish. Gorgonzola, well...gorgonzola made my cheese loving fiance gag. "Uck, that was strong!" Maggie exclaimed after eating a small piece of the multi-colored cheese. I immediately became concerned that this pungent smelling cheese would bring the demise of my recipe. In fact, I temporarily contemplated removing the cheese altogether. In the end, I decided to leave it in and it was a good thing I did.

The flavor was neither strong nor sweet and none of the cheeses overrode each other in the final dish. The bread crumb topping was a delicious crunchy addition and the extra dash of parmesan cheese mixed into the crumbs was nice flavor boost. All in all, this was one fantastically delicious recipe. Certainly going into our repeat recipe book.

Yesterday, while picking up groceries I made a mental note to compare cooking times of 'pre-made' casserole dishes. Two freezer section casseroles that were comparable to my dish tonight took 45 minutes to cook. One boxed version took 30 minutes, plus you had 'mix the cheese packet'. My recipe tonight, including waiting time for the water to boil: 25 minutes. It's faster, healthier, tastes better AND the cheese isn't neon orange. Why exactly are people buying prepackaged casserole dishes anymore?

***

That's all we have for you tonight. Thanks for reliving a 'classic' recipe with us. Tomorrow night, I'm back in the kitchen with a brand new recipe. Stop back in tomorrow evening to see what I've got cooking. Until then, 

~Cheers

Tuesday, April 12, 2011

Citrus Surprise

Good evening everyone!  On Out of the Culinary, we're always looking for new flavors that make our heads turn.  Unique flavors that inspire new ways to try dishes.  When I found this recipe and saying the name out loud, it sounded normal enough.  When I delved into the ingredients, it really hit me.  Would the different flavors work out in the end or would it end up one big mess?

The Recipe:  Lemon-Sage Chicken
Original Recipe Found In:  April/May 2011

What You'll Need:

4 Boneless, Skinless Chicken Breasts
3 Eggs, Beaten
1/4 Cup Grated Parmesan and Romano Cheese Blend
1 Tablespoon Minced Fresh Parsley
1 Teaspoon Dried Basil
1/2 Teaspoon Salt
1/8 Teaspoon Pepper
1/2 Cup All-Purpose Flour
2 Tablespoons Olive Oil

Sauce:
2 Tablespoons Chopped Shallot
3 Garlic Cloves
1/4 Cup White Wine
4 1/2 Teaspoons Lemon Juice
1 Tablespoon Minced Fresh Parsley
1 Teaspoon Dried Sage Leaves
1 Teaspoon Grated Lemon Peel
1/2 Cup Heavy Whipping Cream
3 Tablespoons Cold Butter, Cubed

Start by preheating an oven to 375 degrees.  Then flatten the chicken to 1/2 inch thickness using a meat tenderizer (note: even though you might have a stressful day and will want to pound the living daylights out of the chicken, keep it kind of thick.)  In a bowl, combine the eggs, cheese, and seasonings.  Place and smooth out the flour on a small plate.  Coat the chicken completely with flour and then dip it in the egg mixture.  Sounds like the wrong order of doing things, right?  Trust me, it will work out in the end.


In a large skillet, brown the chicken in the oil, about 3-5 minutes, depending on how brown you want your chicken to be.  Transfer chicken to a greased baking dish.  Bake in the oven for 15-20 minutes, or until a meat thermometer reads 170 degrees.


Crispy chicken


In the drippings left in the skillet, saute the shallots until tender.  Add the garlic for another minute.  Add the wine, lemon juice, herbs, and lemon peel.  If using freshly grated lemon, BE VERY CAREFUL - you don't want to have freshly grated skin in the sauce (it's not an appealing flavor or feeling.)  Cook over medium high heat until liquid is reduced by half.  Add the cream; cook until thickened, about 4 minutes.  Stir in the butter until melted, about three minutes.  


Creamy, citrusy sauce


Once the chicken is done cooking, drizzle with sauce, serve, and enjoy!

The End Results:


I expected this dish to have a real herby, earthy flavor to it.  But the potent flavor of lemon really shined through.  It gave it a nice equalized taste of citrus herbs.  Not only that, but the sauce was really creamy too (another thing I didn't expect.)  The chicken, coated in flour and eggs, gave a good solid stabilizer to the entire dish.  It helped harmonize all the ingredients that seemed kind of strange, but ended with tasty results.

That's all we have for you this evening.  Make sure to come back on Thursday for my recipe.  Until then,

~Cheers

Monday, April 11, 2011

Around The Culinary World

Good morning everyone! Welcome back to another edition of Around The Culinary World - our weekly feature where we scour the headlines and news sites, brining you all of the culinary related stories from the past week.

This week, like many of the past three to four weeks, we're running a little dry on good news material. On one hand, that's good, as most of our stories focus on controversy, recalls or some form of dishonest company and their actions. On the other hand, we also feature fun interesting stories - and there seems to be a dry spell of those as well! That being said, we still managed to turn up a few interesting gems this week. Check out this week's 'water cooler worthy' topics below:


Food recalls have been our top priority on the blog. We want to highlight the issue and keep companies accountable. The USDA this week announced a possible change in the way it inspects food, which could greatly reduce the number of recalls it actually issues. The method, being called 'test and hold' would test fresh cuts of meat for bacteria or other contaminants  before they are shipped off to grocery stores. Currently, producers are allowed to ship directly to grocery stores and then recall their product if something is found to be wrong. I don't know about you - but to me this seems like a 'Well...duh' moment for the USDA. Why exactly hasn't this been the policy from day 1? Either way, it looks like a step in the right direction for food safety. Check out the full story HERE.


With spring here, a major culinary season has begun once again - grilling. If you're fortunate enough to have the means to grill (being in a basement apartment, Maggie and I do not have the means or space to grill) you know all of the advantages that grilling can bring to your summer menu. Today's market is filled with hundreds of options for outdoor grills. From low cost to 'how much!?' there seems to be a outdoor grill for every budget. But what do all of these features mean? What features are worth the money and what are just fluff? What should I be looking for when I go out to buy a grill? Luckily, all of those issues are discussed in this handy 'How To Buy A Grill' guide from the Huffington Post. Check it out HERE.


You don't want to know what the price tag on this one is... 


Last week marked the start of the baseball season. For many, that means lazy afternoons watching the game on TV - and for a few, that means making a trek out to the local ballpark to take in a game in person. What's everyone's favorite thing at any ballpark? The food of course! But who has the best food options? The Daily Meal has created a list of the best ballpark food from around the country. Is your favorite stadium dish on the list? Check it out HERE.


What goes great with stadium food? Beer of course. Did you know you're being ripped off every time you purchase a ballpark brew? Well - of course there is the epic price increase ($6 for a small? Really!?) but I'm talking about being ripped off in a way you don't even realize. The writers over at Yumsugar recently dove into the messy world that is ballpark beer to find out just how big is a 'large' and how close is it to a 'small'. The results may surprise you. Check out the full story HERE.


There you have it folks. All the news that's fit to blog about for this week. Short & sweet, but informative and entertaining (we hope!) As usual, Maggie and I each have a recipe this week. Maggie will be getting us started off on Tuesday, and I'll be closing us out on Thursday. We'll also post a 'recipe flashback' from a classic recipe from prior blogpost. Something you may have missed the first time around. Stop back in tomorrow night to see what Maggie has cooking. Until then,

~Cheers

Thursday, April 7, 2011

Branching Out With Mixed Results

Good evening everyone! One of our favorite meals is the simple hamburger. To be fair, with our fantastic cracking burger recipe, which results in a fool proof, delicious burger 100% of the time, we can get creative with the toppings and end up with a fantastic dish every time. With such a high success rate, it's easy to become a favorite dish.

We've tried just about every known variation of the humble hamburger. From the classic, to the adventurous. You'd think we've tapped out our hamburger ideas - you'd be wrong. I came across a recipe last week that combined two interesting dishes - steak fajitas and the american hamburger. The only downside is we can't use the tried and true cracking burger recipe. Would branching out into the unknown world of untested hamburger recipes prove successful? The answer all depends on your personal tastes.


The Recipe: Fajita Burgers
Original Recipe Found On: Eatingwell.com


What You'll Need:

1 Pound Lean (90%) Ground Hamburger
3/4 Cup Chopped, Fresh Cilantro (Divided)
1/2 Cup Chopped Red Onion
1/4 Cup Chopped Scallions
2 Teaspoons Minced Garlic
1 Tablespoon Chili Powder
1 Teaspoon Ground Cumin
1/2 Teaspoon Dried Oregano
1/2 Teaspoon Ground Black Pepper
1/4 Teaspoon Salt
1/3 Cup Reduced Fat Mayonnaise
1 Tablespoon Lime Juice
1/2 Cup Shredded Monterrey Jack Cheese
2-4 Rolls (Whole Wheat or any variation of your choice)
2-4 Tomato Slices
2-4 Thin Slices Of Red Onion

This recipe can be as tame or as aggressive as you want it to be. If you're like Maggie and I (Read: wimps) you can choose to make the burger just like it is listed above. However, if you're really into spicy and fire inducing dishes (read: insane) you can add the follow ingredients to the hamburger mixture:

1 Chopped Chile (Red)
1 Teaspoon Chipotle Chile


Begin by mixing your hamburger in a large bowl with the oregano, 1/4 cilantro, scallions, cumin, onion and salt & pepper. Mix with your hands until everything is combined. This is a fairly complicated mixture, so it could take a few minutes of kneading and patting to make all of the ingredients (especially the cilantro leaves) stay within the hamburger mixture. Once mixed, break the meat into four separate patties. The original recipe calls for the patties to be broken down into oval shapes (to better accommodate an oval roll) however, there is zero reason to do this if you're using a standard bun. Work the patties into a shape that resembles your choice of roll and set aside.


Meanwhile, combine the mayo with the remaining cilantro (and chipotle chile if using) in a medium bowl and mix well. Place in the refrigerator until you are ready to serve the burgers.

Using a grill pan, grill or your own personal 'lean mean grilling machine' (a favorite of ours)


cook the hamburger patties until they reach your desired level of 'doneness'. With all of the extras floating around in this burger, the cook time increased to about 8 minutes for our burgers. However, we also made our patties a little thicker than a standard burger. Just be sure to monitor the burgers closely after 5 minutes of cooking.

Once the burgers are cooked (or slightly before) add the shredded cheese to the top and allow it to melt. Serve the burgers on the rolls/bun with the cilantro mayo and enjoy!


The Results:


Depending on who you ask, this recipe was either a success or simply 'meh'. Maggie, who is a big fan of cilantro, absolutely loved the dish. To her, the flavors that burst from the burger were the quintessential 'fajita' flavors, all molded into one delicious and juicy hamburger patty.

I personally wasn't the biggest fan of the burger. I felt like it was trying to do too much within the patty and the flavors simply ran over themselves instead of complimenting each other. On the other hand, I don't really like a lot of cilantro, and since that particular herb runs this dish - it's logical that the flavor wouldn't exactly thrill me.

In short, if you love cilantro and the flavors that accompany a steak fajita, you're really going to love this recipe as it is essentially a fajita on a bun. If you're more like me, and prefer the good old americanized hamburger, stick with our tried and true champion, the cracking burger.


That's all we have for you this week. As always, thank you for stopping by and checking out what we were cooking for the past week. We're back on Monday with all the news that's fit to blog about, and then we'll be in the kitchen on Tuesday & Thursday with all the food that's fit to eat! Have a great weekend everyone and we'll see you on Monday!

~Cheers