Thursday, July 31, 2014

Bacon and Cheese...What Could Go Wrong?

Good evening everyone!  As Tyler foreshadowed yesterday, I'm including some of the ingredients I love in tonight's recipe: bacon and cheese.  This recipe stems from one of our favorite restaurants.  While it's not in our backyard, Canal Park Brewery in Duluth, MN is a great eatery, with an even better brewery.  During our last visit, I ordered a Mac N'Beer Cheese.  The standard mac'n'cheese is amped up with a beer cheese sauce (made from a beer their brew in their restaurant) and topped with bacon.  While I was unable to find a sufficient substitute for this recipe to try this evening, I did find a mac'n'cheese with bacon and it's definitely worth trying!

The Recipe:  Chicken Bacon Mac & Cheese
Original Recipe Found In:  Cooking Light, May 2014 Issue

What You'll Need:
6 Ounces uncooked regular Elbow Macaroni
3 Bacon slices, coarsely chopped
12 Ounces skinless, boneless Chicken breasts, cut into 1/2-inch pieces
1 Teaspoon Salt, divided
1 Tablespoon minced fresh Garlic
1/8 Teaspoon ground Tumeric
1 1/4 Cups 1% Low-Fat milk
1 Cup unsalted Chicken Stock
1/4 Cup plus 1 Teaspoon All-Purpose Flour
5 Ounces Sharp Cheddar Cheese, shredded (about 1 1/4 cups)

To start, bring a large stockpot of water to a boil.  Add the pasta and cook according to package directions.  Once cooked, drain the pasta in a colander and set aside.

While the pasta cooks, preheat a large, nonstick skillet over medium-high heat.  Add the bacon and cook until the bacon has browned on both sides, about four minutes, flipping between both sides.  Remove the bacon and place on a clean plate, lined with a paper towel.  Keep the bacon covered with another plate and set aside.  

Keeping the reserved bacon drippings in the skillet, add the chicken and sprinkle in with 1/4 teaspoon of salt.  Cook the chicken for four minutes, or until slightly golden.  Add in the garlic and continue to cook for two minutes.  Sprinkle in the turmeric and cook for 30 seconds, making sure the turmeric is evenly dispersed.

In a medium mixing bowl, add the remaining 3/4 teaspoon of salt, milk, chicken stock, and flour and whisk to combine thoroughly.  Add the milk mixture to the skillet and stir as so no clumps form in the pan.  Bring the chicken/milk mixture to a boil and cook for two minutes, or until the sauce begins to thicken.  Be sure to give the entire mixture a good stir every once in a while to be sure the sauce doesn't stick to the bottom for the skillet.

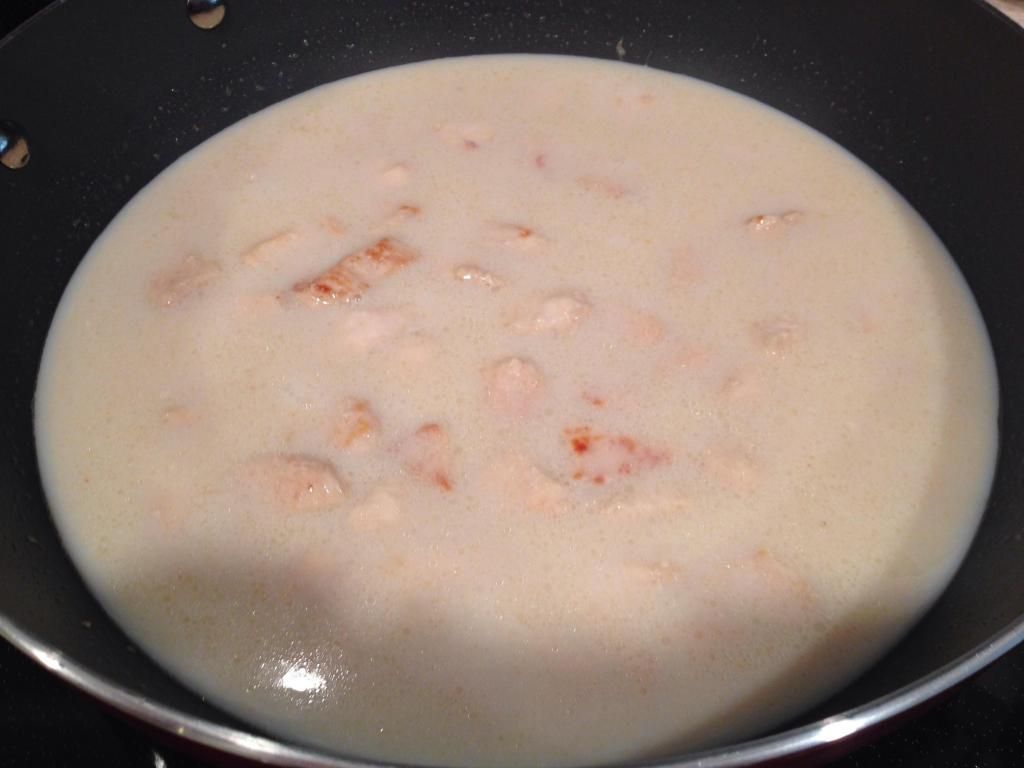
It doesn't look like much, but this is the base of a divine sauce.

Add the pasta back to the skillet and also add two ounces of cheese.  Stir the entire combination until the cheese melts and the sauce coats the pasta.  Sprinkle the top with the remaining three ounces of cheese and bacon.  Cover the skillet with a lid and keep covered until the cheese has melted.  Serve in individual bowls, serve, and enjoy!  
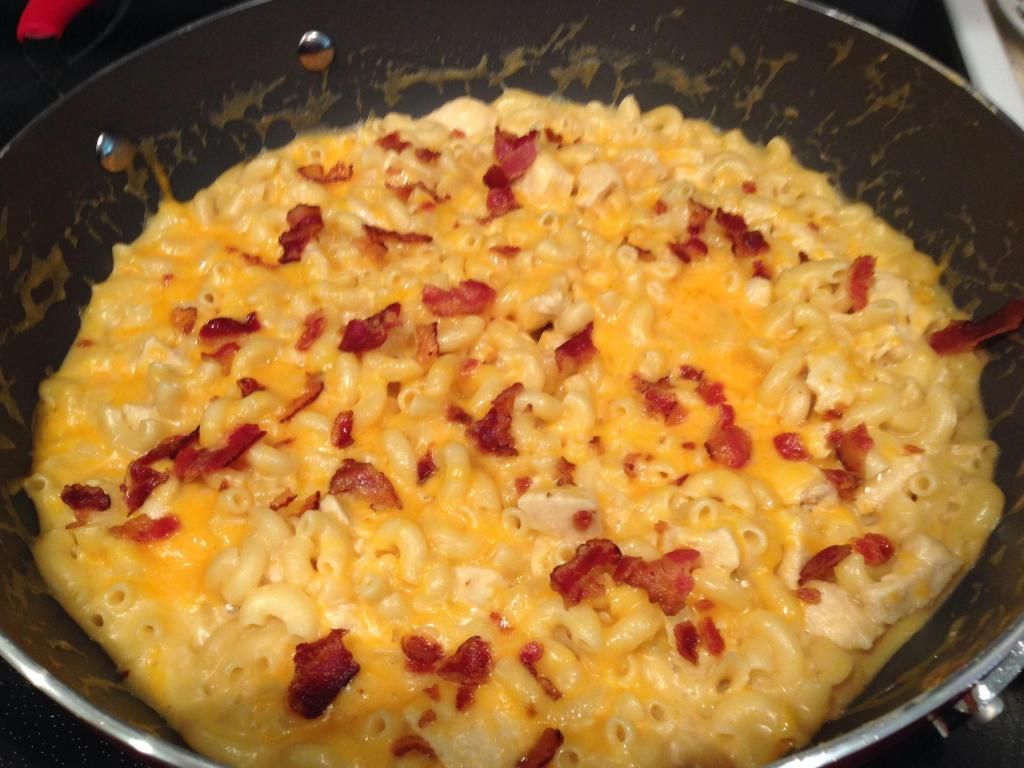


The End Result:


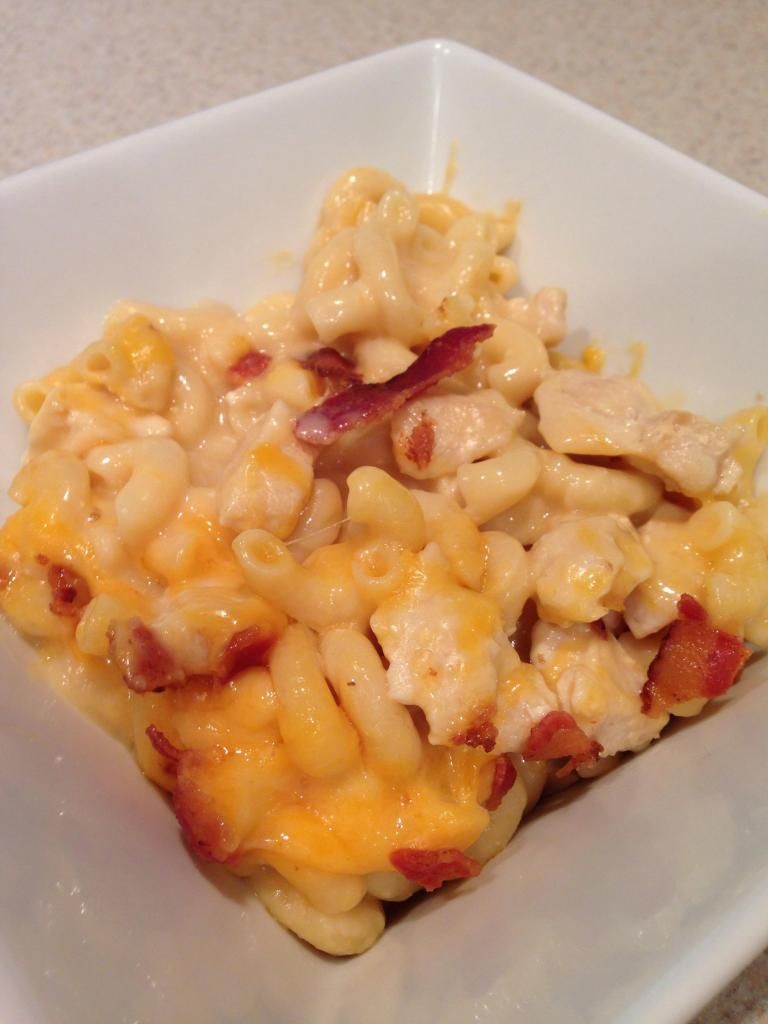
Oh my...this is quite the heavenly dish!  While some mac'n'cheese's tend to go a bit overboard with their cheese sauce, this version's sauce isn't too heavy and gives a nice hint of cheese.  The pasta becomes one with the sauce and makes it a delight to bite into every noodle.  The chicken is also cooked quite nice and is also surrounded by the sauce.  They say that everything is better with bacon and this recipe proves that, yet again.  It's a great addition to what could be a bland dish.  The smoky flavor infuses itself in every bite and makes it so awesome to eat.  The added bonus of this dish?  Per serving, it's only 343 calories!  You can eat like king and don't feel bad about it later!  I'm loving this dish and I'm hoping sometime I can create a beer mac'n'cheese from the base of this recipe.

That's all we have for you this week.  Check back next week as we showcase some brand new recipes.  Until then,

~Cheers!

Wednesday, July 30, 2014

Juicy Lucy: An American Classic

Good evening everyone! We’re continuing our 16 burgers of summer theme with a classic: the Juicy Lucy. A staple in Minnesota (nearly every burger bar in MN has a variant to call their own), a Juicy Lucy is a hamburger stuffed with cheese in the center. This dish may be the most well known “tangent” to the common cheeseburger – that’s why I was so surprised when I searched through the archives of the blog and found that we hadn’t tried to make one yet.

As a side note, while searching through the archives I realized something: we’ve come a long way. 4 years ago we were cooking in a small apartment kitchen that was no bigger than some people’s walk in closets. We had zero counter space, a substandard oven and a very limited range of tools to get the job done. With limited knowledge, limited pan selection and even more limited ingredients (at that time, our local grocery store didn’t carry much in the way of variety – especially fresh ingredients) we forged ahead and taught ourselves to cook. As the years progress our technique was refined, our tools improved and finally our space improved. Now we’re working with a sizeable portfolio of knowledge, quality (still not high end) tools and a plethora of counter space. The blog’s tone and theme, while following the same central idea, has changed and adapted as well. It was almost surreal to look back at our first posts and read the adventures – it makes you appreciate where you’ve been when you can look back like that.

Enough reminiscing, it’s time to cook!

The Recipe: The Juicy Lucy
This is an Out of the Culinary Original Creation

What You’ll Need:
(Serves 4)

1 Crackin’ Burger Recipe
½ Cup Shredded Sharp Cheddar Cheese
Salt and Pepper
Pickles, Lettuce, Tomato, Onion (Choice of burger toppings)

Begin by mixing up a batch of the crackin’ burger recipe (found HERE). However, instead of breaking the mixture down into 4 separate balls, this time work them into 8 smaller balls. Flatten each ball into a patty and then use your thumb to press the center of the patty in to form a small “well”. Repeat this for all 8 patties. (Be careful not to press too hard or too far, all it takes is a small hole in the patty to create a mess later on).

Once the patties are all dimpled accordingly, take a small pinch of shredded cheese and place it in the center of 4 of the patties. Make sure the cheese is back away from the edges of the patty and try to keep it as centrally located as possible. When you seal the patties later on, any cheese on the edges could cause the whole structure to “fail” and cheese will leak across your grill. (That’s no good).


Take the four patties you didn’t place cheese in and place them atop the patties that have cheese. Carefully pinch the edges together, making sure there are no gaps – this creates a nice tight seal. I found that after pinching, you can improve the seal even more by picking up the patty and rolling it gently between your palms. This forms the mixture into a large ball once again, but it evens out the edges nicely. Once sealed to your liking, return the ball to the cutting board / countertop / plate and press the ball back into a patty (these will be thicker patties than you’re used too – they’re stuffed with cheese, after all).

Once all the patties are formed, preheat your grill to 500 degrees, clean the grates and reduce the temperature to medium. Place the patties on the grill and cook for 3 to 5 minutes per side, until the beef is cooked through and the juices run clean. Once finished on the grill, place the burgers on a bakery fresh bun and top with your choice of toppings. Enjoy!

The Results:


The classic Juicy Lucy picture is the burger sliced in half, with the cheese oozing all over the plate. While we do love you, dear readers, we don’t love you so much that we were willing to sacrifice our own burger for the shot (and we certainly weren’t going to make a third burger just for a picture) – so what you’ll have to use is the shot above and trust us when we say that melty gooey cheese was, in fact, inside this delicious, moist burger. Until you’ve had a Juicy Lucy, it’s hard to explain why the cheese on the INSIDE of the burger tastes different than simply melting cheese ON TOP of the burger – but it does. It inherits some of the beef juices and just becomes…”one” with the flavors of the burger. All in all, this is one classic burger that you simply have to try at least once at home.

That’s all we have for you this evening. We’re back tomorrow night with a brand new recipe featuring some of Maggie’s favorite foods – all in one dish. (Long time readers may be able to guess what this recipe is already). Until then,

~Cheers

Sunday, July 27, 2014

16 Burgers of Summer: Miami Burger

Hello again everyone! We’re back, recharged and refreshed after a two week hiatus. It’s only fitting that we jump right back into cooking by picking up our 16 burgers of summer feature right where we left off. Tonight’s dish is based on one of my all time favorite sandwiches, the Cuban. Available in countless interations and variations, the Cuban is traditionally composed of pulled or roasted pork, ham, mustard, pickles and Swiss cheese before being cooked in a press until the bread is golden and delicious. While hunting for burger ideas, I stumbled across Bobby Flay’s “Miami Burger” which took the Cuban sandwich and turned it into a burger. Obviously, we had to give the recipe a try ourselves.

(As an aside: This should be implied by now but what follows is our adaptation on the original dish. The original recipe can be found at the source below. We like to add this reminder every now and again…just in case you forgot)

The Recipe: Miami Burger
Original Recipe Found On: Foodnetwork.com

What You’ll Need:
(Serves 4)

1 Pound 80/20 Ground Beef
½ Cup Low Fat Mayonnaise
8 Slices (Thin) Deli Style Ham
4 Fresh Hamburger Buns
4 Slices Provolone Cheese
Yellow Mustard
Dill Pickles

Begin by breaking the beef into four patties and seasoning each patty lightly with salt and pepper. We’re going a bit off the usual plan with this recipe. Rather than making a burger mix or using our standard “base” burger recipe, we’re simply using standard ground beef. The surrounding toppings and ingredients will do more than enough to enhance the flavors of this dish and adding anything more to the ground beef would simply make the final result a bit over complicated.

Place a large (12 inch) non stick skillet over medium high heat and bring it up to temperature. Once the skillet is hot, cook the burgers until brown and cooked through (roughly 4 to 6 minutes per side).  (You can use a grill to cook the burgers, but we’re going to be coming back to the skillet later on – so this reduces the amount of “tools” needed to complete the dish).

While your burgers are cooking, slice the buns and spread a thin layer of mayo on each bun. Split the cheese slices in half, and place one half of the cheese on the bottom bun. Next, place the finished burger on top of the cheese. Add your desired amount of yellow mustard and then top that with the slices of ham. Add the other half of the cheese slice and top it all off with the bun.

Return your skillet to medium heat and bring it up to temperature (if necessary, it may still be hot after preparing the burgers). If the beef left a lot of fat in the pan, clean it out with a paper towel before returning it to heat. A small amount of fat is okay to leave (the flavor will just transfer to the buns).

Add the burgers to the skillet and then place a sandwich press on top to “squish” the whole sandwich down. If you don’t have a sandwich press, you can substitute with a heavy cast iron skillet or even a few canned good on top of a plate, so long as it’s heavy and food safe, it will suffice.

After about 2 minutes, remove the press and flip the burgers. Return the press and cook for an additional two minutes. Once the buns have been cooked to a nice crunchy finish, remove the burgers from the skillet and lift the top bun (the cheese should cling to the ham nicely here) and add a pickle. All that’s left is to serve and enjoy!

The Results:


You won’t ever confuse this with a traditional Cuban sandwich, but the same flavors and concept are there to make this a nice “Cuban flavored” burger. The beef actually works well as a stand in for the roasted pork of the original – but if you’ve had some truly great Cuban sandwiches, you can only think “I should have just used roasted pork”. In fact, you could use ground pork in place of ground beef to create a more authentic flavor – but that would go against the spirit of our burger themed summer. All in all, this is a very tasty burger. Just don’t plan on it taking the place of a traditional Cuban sandwich on any menus.

Now that we're back, we'll be contributing our regular schedule of recipes in the coming weeks. Until then, 

~Cheers

Saturday, July 26, 2014

Breaking Out the Kebabs

Good afternoon everyone!  We are back and no, we did not fall of the face of the earth.  We took a week long vacation during one of the cooler weeks in July and it did not disappoint.  But we are back and have some great new recipes for you.  Today, I'm returning to one facet of the grill we don't use that often, and quite frankly we should.  It's a great way to cook food and should not be missed!

The Recipe:  Beef and Bell Pepper Kebabs with Rice Noodles
Orignal Recipe Found In:  Cooking Light, August 2014 Issue

What You'll Need:

For the Kebabs:
1/4 Cup Lower-Sodium Soy Sauce
2 Tablespoons Orange Juice
2 Teaspoons Honey
1 Teaspoon minced Garlic
1 Teaspoon minced fresh Ginger
3/4 Teaspoon Five-Spice Powder
1/8 Teaspoon ground Red Pepper
2 (8 Ounce) Sirloin Steaks, cut against the grain into 1/4-inch thick strips
2 Red and/or Yellow Bell Peppers, seeded and cut into 1-inch pieces

For the Noodles:
5 Ounces Rice Noodles
1 Teaspoon minced Garlic
1 Teaspoon minced fresh Ginger
2 Teaspoons dark Sesame Oil
1 1/2 Cups sliced Shiitake Mushrooms
1/2 Cup sliced Onions
1 Tablespoon Lower-Sodium Soy Sauce
1/4 Teaspoon Salt

To start, combine the soy sauce, orange juice, honey, garlic, ginger, five-spice powder, and ground pepper in a medium mixing bowl.  Whisk until the ingredients are combined.  Add the strips of beef and let marinade for 15 minutes.

While the beef is soaking, you can start the preparations of the noodles.  Bring a medium stockpot of water to a boil and add the rice noodles.  Cook the noodles according to package directions.  While rice noodles are a little more flimsy than pasta noodles, it's best to drain them in a sieve, rather than a colander.  Trust me, you'll thank me when you have to clean out a sticky, rice noodle clogged colander.

In a nonstick skillet, bring up to medium-high heat and add the garlic, ginger, and sesame oil and sauté for 30 seconds.  Add the mushrooms and onion and continue to sauté for four minutes.

This would be a good time to take out the beef from the marinate and begin to prepare the kebabs.  Thread beef and peppers onto eight skewers.  It doesn't matter which order they go in, just as long as all the beef and peppers are used.  Heat a grill over high heat and once at 500 degrees, kill one of the burners.  Place the kebabs on the grill and cook on three minutes on each side.  This will ensure the beef is done and the peppers have a nice char on them.  Remove from heat and set aside.

After the kebabs are done cooking, the mushrooms and onions should be done sautéing.  Add the rice noodles, soy sauce, and salt and stir to combine.  On a plate, place a spoonful or two of the rice noodle mixture, with one or two kebabs.  Serve and enjoy!

The End Result:


I decided the take the beef and the peppers off the kebab and eat with the noodles and I'm glad I did.  The beef was cooked just right and hints of the marinade were prevalent.  While it wasn't an overwhelming flavor, it was just enough to make it delicious.  The peppers were charred enough to subdue their pepper flavor, yet it made a nice bed to eat with the beef and noodles.  While I didn't cook my noodles with mushrooms, they complimented the grilled ingredients.  I have yet to master how to make my rice noodles that they don't stick to each other, but that might be another recipe.  Overall, a quick and flavorful grill recipe that you should definitely try on your own!

That's all we have for you today.  Tyler will continue his Burgers of Summer segment tomorrow with a unique sandwich to burger conversion that is quite tasty.  Until then,

~Cheers!

Friday, July 11, 2014

Local Restaurant Review: Malo

Good evening everyone! One of the many advantages to living in the Des Moines metro is the plentiful amount of good restaurants and pubs to sample. From downtown to the west side, the metro is a veritable bounty of unique eateries that will please even the pickiest foodie. Last week, Maggie and I sampled two newer establishments and came away impressed on both counts. I wanted to share our experiences with the first establish tonight: Malo.


Address: 

900 Mulberry Street
Des Moines, IA 50309

Website:

http://malodesmoines.com/


Photo from the Des Moines Register


Located on the western side of downtown Des Moines, Malo is a new “Nuevo Latino” restaurant that offers a menu ranging from traditional tacos and burritos all the way to southern inspired delights (like chicken and waffles). They haven’t defined their menu to one item / region, but rather to a central theme – which leaves a lot of options, which is only a bad thing because most of them sound simply fantastic.

If you know any Spanish, you likely know that malo is Spanish for “bad” which makes naming your restaurant “Malo” a bit of a bold and unorthodox move – it’s a quirky choice but it matches the rest of the vibe for the restaurant, so in an odd way – it works.

Immediately after entering Malo, you feel like you’ve stepped into a high end, trendy joint. The design feels reminiscent of the “after” shots on shows like restaurant makeover. The lighting is low on the bar side but acutely focused. The opposite side of the restaurant is brightly lit by a wall of windows, which give a nice view of the Des Moines skyline. The floors and furniture are dark, but the walls have bright pops of color from a variety of sources (“reclaimed” shutters painted brightly above the bar, vibrant industrial lighting above some of the tables and a large luchador painting on a partial wall all provide distinct eye appeal, while managing to appeal to the central theme). The service station / kitchen is partially viewable (on the bar side) a choice that some will love while others will find distracting. Personally, I didn’t find it to take away from the ambiance. Our only gripe about the interior was the large table we sat at had especially tall bar stools – stools so tall they were tough to “scoot” in. A minor gripe, but for folks closer to the ground (like Maggie) one that can be a bit frustrating to deal with. Most of the restaurant is filled with regular tables and booths - we had a large group which apparently necessitated the tall table accommodation. 

There's a lot to like about the ambiance of Malo. Every design choice adds something to the appeal - all in all, it's a perfect blend of bright colors and deep ambient lighting. 

Design and ambiance only go so far, however. It’s the food and service that really matter and Malo certainly delivered on both accounts. We were greeted by a friendly front staff and had a high energy waitress who was personable and really seemed to enjoy her job. Other staff members were quick to refill water or clear plates.

Maggie ordered the “Big ‘Ol Burrito” which, it turns out, may have been an understatement. This monstrosity was nearly the size of her head and packed full of beef, rice and other fixings. It was a delicious dish, that provided an extra meal the next day as it was simply impossible to consume the entire thing in one sitting. (As an added bonus, the staff boxes up your dish for if (when) you have extras. It’s a nice touch that makes it feel like a higher end restaurant than the prices would indicate).

I ordered the Cuban and found the sandwich to be delectable. The best part of the sandwich was the lime aioli that accompanied the standard mustard – it added a zest and bite that is hard to find on a Cuban. (It’s very easy to create a bland, uninspired Cuban that’s washed away by cheese and a subpar mustard.) The only gripe I had about the food was the French fries were a bit uninspired. They weren’t terrible, but when the rest of the dish is so good, you sort of expect the fries to deliver too.

The prices were reasonable (think sit down restaurant standard pricing - $9-$12 for a sandwich –etc.) the atmosphere was chic and relaxing and the food was fantastic. All in all, we’d highly recommend you stop by Malo during your next visit to the downtown area.

Thursday, July 10, 2014

Spice-tacular Pork Chops!

Good Evening Everyone!  As promised, I return for a second time this week with great new recipe.  I'm starting to think that any pork product and the grill were meant to go together.  I seem to find any pork recipe that also just happens to involve a grill.  While I'm not bashing the combination, I find it interesting that I'm drawn to it.  Fortunately enough, there's been enough great grilled pork recipes to share and tonight's is no exception.

The Recipe:  Paprika Pork Chops with Zucchini
Original Recipe Found In:  Cooking Light, July 2014 Issue

What You'll Need:

For the Pork Chops:
2 Teaspoons Paprika
3/4 Teaspoon Brown Sugar
3/4 Teaspoon Black Pepper
1/2 Teaspoon Salt
1/4 Teaspoon crushed Red Pepper Flakes
4 (6 Ounce) bone-in, center-cut Pork Chops

For the Zucchini:
3 Medium Zucchini, halved lengthwise
2 Teaspoons Extra-Virgin Olive Oil
2 Teaspoons Whole-Grain Mustard

To start, preheat a grill to medium-high heat.  While the grill is preheating, make the rub that will go on the pork chops.  In a small bowl, add the paprika, brown sugar, 1/2 teaspoon of black pepper, 1/4 teaspoon of salt, and red pepper flakes.  Stir to combine all the ingredients.  Place the pork chops on clean plates and apply the rub.  Make sure the mixture goes evenly on both sides of the pork chops.  

By then, the oven should be preheated and the grates are cleaned off (from any previous cooking.)  Place each chop on the grill rack.  Grill for three minutes on each side, or until desired degree of doneness.  For me, this is about six to eight minutes, flipping every three minutes, and ensuring the pork is between 140 to 145 degrees.  Once the pork is done cooking, remove the chops from the grill and cover to stay warm.

Promptly after cooking the chops, add the zucchini halves to the grill.  There might be a bit of spice residue left on the grates, but you can scrap this off with a grill brush prior to adding the zucchini.  Grill the halves on each side for four minutes, or until well marked.  Remove the zucchini from the grill and onto a cutting board.  Cut the zucchini halves into 1/2-inch pieces and place in a large bowl. Add the remaining 1/4 teaspoon pepper, 1/4 teaspoon salt, olive oil, and mustard and toss to coat.  Serve the pork chops with an ample amount of zucchini and enjoy!

The End Result:


The pork chops had the right amount of heat and sweet from the rub.  There was no prevalent flavors in the rub, but that's what made it work.  All the ingredients worked well together to create a harmonious flavor creation.  While hints of paprika and brown sugar might have popped up every now and then, the smokey flavor is what really made this pork chop something delicious.  The zucchini is something all on it's own too.  I don't think I've ever had a vegetable, like zucchini, tossed in olive oil and mustard.  It's definitely a unique flavor, but if you want to try something different with your vegetables, I would highly recommend trying it!

That's all we have for you tonight.  Check back tomorrow as Tyler gives his perspective on a new local restaurant.  Until then,

~Cheers!

Tuesday, July 8, 2014

Vegetarian Tacos are Mighty Fine

Good evening everyone!  As I began to prepare this dish, I noticed I've started to deviate from the "traditional" recipes of Mexican to sort of a vegetarian style of Mexican.  While various recipes that include meat are equally as delicious, it must be the health nut in me starting to emerge.  With vegetarian dishes, it's easy to swap out veggies that don't appeal to you or add other flavorful items can really boost a recipe.  Tonight, I'm trying a version of vegetarian tacos that you will definitely want to try!

The Recipe:  Zucchini and Corn Tacos
Original Recipe From:  www.epicurious.com

What You'll Need:
3 Tablespoons Vegetable Oil, divided
2 Cups fresh white or yellow Corn Kernels
1 Cup chopped White Onion
3 cloves Garlic, finely chopped
4 medium Tomatoes, roughly chopped
3 medium Zucchini, diced
1 Cup canned Black Beans, rinsed and drained
1/4 Teaspoon dried Oregano
8 Corn Tortillas (or Taco Shells)
1/4 Cup Green Salsa
8 Teaspoons grated Monterey Jack cheese

To start, preheat half of the vegetable oil in a large, nonstick skillet over medium-high heat.  Once the oil has heated and been swirled around the skillet, add the corn.  Cook the corn for five minutes, or until it has become lightly golden.  Season with salt and stir to ensure an even cook.  Once cooked, remove the corn from the skillet into a bowl and set aside.

Next, heat the remaining oil in the skillet and add the onion.  Cook the onion, stirring every once in a while, until it begins to caramelize, about five minutes.  Add the chopped garlic and stir until the garlic becomes fragrant, about one to two minutes.  Add the tomato and continue to cook for 10 minutes, or until the tomato has started to break down.  Next, add the zucchini and cook until the pieces are tender, between 10 and 12 minutes, and season with salt.

Add the cooked corn, beans, and oregano to the skillet.  Season with pepper.  Stir until all the ingredients are throughly mixed together and cook the mixture for three additional minutes.  Add two tablespoons worth of filling among the tortillas and top with a sprinkle of cheese.  Serve and enjoy!

The End Result:


First off, the variety of vegetables in this dish is quite fantastic and each one bringing their own unique flavor.  From the sweetness of the corn to the hint of crunch from the zucchini, it's easy to see why going vegetarian for this recipe is easy to do.  Plus all the ingredients are very filling, so while this recipe serves four, you won't be surprised if there is leftovers.  Or, there might not be enough to go around if it's gobbled up!  The cheese is a nice addition, but it might not be needed (I know, I'm shocked I'm saying that too!)  Overall, a nice alternative to a Mexican favorite that you should be tempted to try.

That's all we have for you tonight.  Check back on Thursday when I'm back, bringing the heat to the faithful pork chop.  Until then,

~Cheers!

Monday, July 7, 2014

Brilliant Brisket

Good evening everyone! If there’s a downside to being an amateur chef / cooking hobbyist it’s that when it comes to family gatherings or events, you’re sort of expected to wow the crowd with a dish. Luckily, we enjoy cooking so contributing to a gathering isn’t a chore – it’s something we enjoy.

That being said, there’s still a challenge of making up an impressive enough dish. This past weekend, we had family over for the 4th of July holiday – which as you may or may not be aware, is a traditionally BBQ heavy holiday. Simple BBQ wouldn’t be enough – oh no, I wanted to impress. The solution? Smoked brisket. And, oh boy – did it deliver.

The Recipe: Oklahoma Joe’s Smoked Brisket
Original Recipe From: Foodnetwork.com

What You’ll Need:
3-5 Lbs Brisket
¼ Cup Kosher Salt
¼ Cup Sugar
2 Tablespoons Garlic Powder
2 Tablespoons Onion Powder
2 Tablespoons Spanish Paprika
2 Tablespoons Chili Powder
1 Tablespoon Celery Salt
1 Tablespoon Lemon Pepper
1 Tablespoon Black Pepper
1 Teaspoon White Pepper
1 Teaspoon Cayenne Pepper
4 Cups Hickory Wood Chips
1 Cup Apple Juice (Plus one food grade spray bottle)

First and foremost – it may seem like you’re using your entire spice rack for this rub (and you very may well be) but trust me when I say the finished product makes this bit of early effort well worth it. Don’t scrimp or cut out any aspect of the rub. Use it all, and you’ll appreciate it.

24 Hours Before the Meal:

Add the wood chips into a large container (large enough to fill with the wood chips with room to spare) fill the container ¾ full with water and add the chips. Press them down into the water and then seal the container. Allow it to rest overnight.
Typically, the instructions call for the wood chips to be soaked for 30 minutes to an hour, but I made the change simply due to the logistics of the meal. We were going to be cooking this brisket low and slow and once we started cooking, there wasn’t going to be any way to switch out the wood chips. So, whatever I used needed to last the whole 4 hour cook time. The solution was to oversaturate the chips, that way they’d take much longer to burn.

To prepare the rub, combine all of the spices in a medium bowl and mix well (I found a fork worked best) until evenly blended. Next, trim any excess fat from the brisket (there is usually a large fat cap on the bottom of a brisket – cut this off before you begin. Also remove any areas that appear to be unnecessarily fatty). Finally, rub the spice rub all over the brisket, making sure to evenly cover all sides and fill all voids within the meat. I used the entire bowl on my 3.5 pound brisket – don’t be afraid to pile it on. Wrap the brisket tightly in plastic wrap and store in the refrigerator overnight.

To Prepare the Brisket:

Remove the wood chips from their water logged container and transfer them to a foil packet. Seal it tightly (I would also recommend using heavy duty foil and double wrapping the packet. Remember: we want smoke, but we don’t want the chips to burn if we can avoid it. The more precautions you take, the less likely “burn” will happen). Once wrapped, use a paring knife to poke several holes on the top of the packet. Place the packet directly on the burner of your grill (beneath the grate) and then set the grill to high and bring the temperature up to 500 degrees.

While the grill is heating up, remove the brisket from its plastic wrap and insert a probe thermometer into the center of the meat (into the thickest part) – if it has an alarm, set it to alert you at 180 degrees.

Once the grill is good and hot, clean the grates and reduce the heat to the absolute lowest setting. (On the side where the wood chips reside – turn the other side off). Leave the lid open for a few minutes so the grill temperature falls into the 200-220 degree range. Place the brisket over the foil packet of wood chips (which should now be lightly smoking). Make sure the wire to your thermometer isn’t touch the grates (feed it through the side of the grill of wherever there’s a handy vent) and close the lid. Resist the urge to open the lid or otherwise check on the grill for the next hour.

Seriously. No opening it. No checking. Nothing. The thermometer will tell you if something has gone awry.

After 1 hour, lift the lid and give the brisket a spritz with the apple juice. Close the lid and allow the brisket to cook for another hour. Two hours in, lift the grill lid, spritz the top with apple juice, flip the brisket and spritz again with apple juice. Close the lid and allow another hour to pass before spritzing the brisket with apple juice one final time. Close the lid and monitor the thermometer until the brisket reaches 180 degrees.

Once it hits that golden temp, remove the brisket from the grill and wrap it in aluminum foil (leave the thermometer in the meat!). Place the brisket on the “cool” side of the grill (IE the side where the burners are off) leave the other side on the lowest setting. Close the lid and leave the brisket alone until it reaches 190 degrees internally. Surprisingly, this won’t take very long at all (10-15 minutes). Once the temp reads 190 – remove from the grill and allow the brisket to rest for 10 minutes before slicing it thin and serving it atop fresh buns (and with your favorite BBQ sauce). Enjoy!

The Results:

There’s no picture of the finished result because 1) I forgot and 2) it was so good it didn’t last long enough to photograph. This was, hands down, one of my favorite things I’ve made on this grill. The spice rub plus hickory smoke combo was simply delightful and the brisket was moist and flavorful – it had elements of sweet, elements of spicy – a true culinary delight. There’s a bit of prep and a lot of patience involved…but this dish is SO worth it!

That’s all we have for you this evening. We’re back tomorrow with another brand new recipe, in a week that will feature quite a bit of content going up. Until then,

~Cheers

Sunday, July 6, 2014

16 Burgers of Summer: Breakfast Burger

Good evening everyone! Allow me, for a moment, to lift the curtain on how our recipes are created. (And no, this isn’t a “if you like the sausage, don’t ask how it’s made situation” …at least I don’t think so.) We have a variety of sources that we will look towards for inspiration or perhaps as guidance each week. We’re constantly reading or looking over these sources, so we compile a decent “back-up” at any one point in time.

Every now and again, we sift through the “back-up” and find some inspiration amongst the recipes. This week, I recalled a recipe Maggie had shared with me sometime back featuring a tater tot burger. Being that we’re doing our 16 burgers of summer feature, I thought “Why not go a bit off the rails and do something crazy this week?”  Long story short, I found the original recipe and…well, it wasn’t quite what I remembered. At first blush, this burger idea may have seemed like a solid one – but further review provided some issues.

I wasn’t in love with how the burger “patty” was constructed and I felt the original dish relied too heavily on the sauce to play star of the show. Furthermore, I didn’t like the concept of a tater tot burger served on a hamburger bun. I love my grains as much as the next guy – but that seemed a bit…much.

In the past weeks, I had wondered about cooking up a breakfast burger something that would fall under the burger “umbrella” but that could be cooked up on a Sunday morning to start your day. I never really came up with anything concrete – so I shelved the idea.

As I hit a wall with the tater tot burger, my breakfast burger idea returned to my mind and tonight’s recipe was born. We’re going a bit off the grid and playing slightly loose with the term burger (hey, it’ll be a patty!) but I think the end result is something anyone can enjoy. Let’s get cooking!

The Recipe: Tater Tot Burger (AKA Breakfast Burger)
What You’ll Need:
(Serves 4)
2 Cups Tater Tots (thawed if frozen) – Procure the “extra crispy variant if possible
2 Slices Thick Cut Hickory Smoked Bacon
6 Eggs
Maple Syrup

In a medium non stick skillet, fry the bacon over medium heat until it becomes crispy and golden. Transfer the bacon to a plate lined with paper towels and allow it to cool for a few moments. Once cooled, use a chef’s knife or kitchen sheers to chop the bacon into ¼ to 1/8 inch pieces. Transfer the bacon bits to a small plate and set aside. Remove the skillet from heat, but don’t clean it out (we’re using it later).

Next, begin mashing your tater tots in a large bowl. Once they reach a nice, even “mush” crack in two eggs and add in the bacon. Work the mixture with your hands until everything is well blended. Work the breading into four equally sized balls and then pat those balls into patties. Store the patties in the refrigerator for 10 minutes to allow the egg / tater tots to “tighten” up a bit.

Quick side note: you may be asking why we don’t just use hash browns in place of tater tots – after all they are already broken up and mashed. I toyed with the idea, but ultimately found that the small “bits” of potato that make up a tater tot were more conducive than the larger strands that make up hash browns. Since we’re making a patty, smaller and tighter binding was preferred. (You are of course free to experiment however you’d like).

Once the patties have had some time to chill, return the skillet you previously used to the heat (medium) and bring the oil up to temperature. Once the bacon grease begins to shimmer, add the patties into the skillet and cook for 3 to 5 minutes before flipping. Resist the urge to poke, prod or otherwise bother the patties when they’re in the skillet. Cooking undisturbed will allow the patties to form a nice golden crust – which is what we want!

While your patties are cooking, set a separate skillet over medium high heat and melt a tablespoon of butter. Mix the remaining eggs with a splash of milk and add them to the skillet with the melted butter. From here, you’re free to make an omelet or scramble the eggs. (They’re being served beneath the “burger” open face style, so either option works nicely. We opted to scramble.)

Once the eggs are done and the burgers are golden brown, all that’s left is the assembly. Serve up equal portions of your egg mixture and top each with a burger patty. Serve with a helping of maple syrup and enjoy!

The Results:


If you allow for a liberal use of the word burger, this is quite the breakfast burger! The tater tots worked quite well with the egg in forming a functional patty, and you could certainly serve it atop a bun if you so wish – but for the sake of avoiding a carb overload, this option atop of eggs works just as well.

There’s enough wiggle room here to get extra creative if you’d like. Work in some red peppers to the patty – top it with cheese – whatever you’d like to compliment your “burger” patty so long as it follows the breakfast theme. For being constructed out of two half baked ideas – this recipe turned out quite nicely! It’s a great option for dinner or for a weekend breakfast!

That’s all we have for you this evening. We've got a busy week lined up for you next week. There's another new burger recipe on tap as well as a great brisket recipe that you'll absolutely LOVE. Maggie also has TWO new recipes that will be going up this week as well. Not to mention, we'll have product reviews and restaurant reviews coming up shortly thereafter! (Lots of content coming!) Until then, 

~Cheers