Thursday, December 30, 2010

Closing Out 2010

Good evening everyone! What an unbelievable day here in the greater Des Moines metro! At one point today, West Des Moines was 10 degrees warmer than Scottsdale Arizona. I'll let that sink in for a minute. Iowa. In December. 10 Degrees. WARMER than Scottsdale Arizona. That is simply unheard of! Needless to say, all of our snow has melted, and it feel a lot like spring right now. Of course, this is simply a ruse, and old man winter is still planning to bear down upon us with his frosty power - and from the sound of things, that frost power makes its first appearance tomorrow. (Freezing rain, snow and a general 'yucky' outlook is all we have to look forward to for tomorrow's forecast). Impending ice storm aside, it's great to enjoy an (unseasonably) warm day every once in a long while.

This beautiful day was a great way to slowly wind down 2010. We're winding down our 2010 cooking 'season' on the blog tonight, with a very unique dish. I'll turn the keyboard over to Maggie so she can share the dish that we're closing down 2010 with:

The Recipe: Swiss Chicken Bundles
Original Recipe Found In: Taste Of Home December/January 2010

What You'll Need:

1 Small Onion (Finely Chopped)
1/2 Cup Sliced Fresh Mushrooms
1 1/2 Teaspoons Butter
1 Garlic Clove (Minced)
1 Cup Cubed Chicken Breast (Cooked)
1/2 Cup Chopped Roasted Sweet Red Peppers
1 Tablespoon Honey Mustard
1/4 Teaspoon Salt
1/4 Teaspoon Lemon Pepper Seasoning
1/4 Teaspoon Italian Seasoning
2 Cups (8 Oz.) Shredded Swiss Cheese
12 Frozen Dough Dinner Rolls (Thawed)
2 Tablespoons Butter (Melted)

Good evening everyone!  It is rather weird to say the "last blog of 2010", but it is quite amazing that we've been doing a blog for seven months and have been rather successful at it.  All "closings" aside, I wanted to close out with a bang, and this dish was definitely it.  So much so, that my gall bladder/stomach is a little apprehensive after eating this dish (even though I was advised to have a "bland diet" - which I was rather upset about.)  But it's the good bang, and not a spicy, fire-in-the hole bang.  


To start, saute the onion and mushrooms in butter in a large skillet.  If you chop the onions in a food processor, like I did, there's a fine line between chopped and something that resembles sauerkraut.  Be sure to know that line, because it will look like sauerkraut in the skillet (speaking from experience there).  After this is tender, add the garlic and cook for a minute longer.  Add the cooked chicken, peppers, mustard, and seasonings; stir and heat through, three to four minutes.  Remove from heat.  At this point, you can add the cheese, but I figure that the mixture just got off the heat and the cheese will melt right away, so I held off on adding the cheese until later.


Flatten the rolls until they are five inch circles.  Depending on how frozen the dinner rolls are will depend on how big the circles will get.  Don't be afraid to get a little aggressive with it, or else they will turn out to be small circles.  Sprinkle the cheese inside the flattened rolls, spoon the chicken mixture on top of the cheese, and add more cheese on top.  Brush the edges of the rolls with water and top with remaining rolls.  Press the edges with a fork to seal.


Place the bundles on a greased baking sheet and brush with butter.  Cook in a 350 degree oven for 18-22 minutes (I cooked for 20) or until golden brown.  Cut the bundles in half.  Serve with marinara sauce, ranch dressing, or by themselves and enjoy!


The End Result:


As I previously mentioned, these little bundles packed a mighty seasoned pow but it really complemented the dish well.  Inside these neatly compact rolls, lies a completely unique and flavorful dish.  I would definitely recommend some sort of dipping sauce, if you're not a fan of dry dishes.  All in all, it was something completely different and definitely worth a revisit, trying a different meat/cheese/seasonings.


Thanks Maggie. And with that, ladies and gentlemen, we bring the 2010 season of Out Of The Culinary to a close. Fear not, loyal reader, for 2011 is just around the corner and your favorite food bloggers will be back and better than ever! (More specifically, we're back on Monday!)

Here's hoping everyone has a safe and enjoyable New Year's celebration. 2010 was a banner year for Maggie and I. We got married, started to learn to cook, started a blog, made a cookbook - 2011 (which is still odd to type by the way) has a lot to live up to.

Speaking of cookbook - what better way to start the new year than by purchasing your very own copy of the Out Of The Culinary Cookbook? Packed with fantastic, proven recipes accompanied by full color photos - the Out Of The Culinary Cookbook is the best way to start 2011. Buy your copy today through the link on the right hand side of the blog or by visiting our Blurb bookstore.

Until Monday - Happy New Year, and as always

~Cheers


Wednesday, December 29, 2010

Recipe Revisit: Spaghetti & Meatballs

Good evening everyone! As the new year quickly approaches, and the old slowly grinds to a stop - many people (and media outlets) are looking back on 2010 and reflecting on the greatest achievements of the past year. Best of lists, greatest of 2010 list, worst of 2010 list - you name it, it's out there right now. We're doing a little 'reminiscing' ourselves on the blog and revisiting a recipe from our first full month of blogging - spaghetti & meatballs. While the finished dish was still very good (in fact, it made our cookbook as one of our best of 2010 recipes) it had some room for improvement. (Mainly due to my error in purchasing canned tomatoes with jalapenos). Tonight, I'm setting out to fix one of our earliest dishes. By combining a new sauce recipe with a tried and true meatball recipe - I hope to create the perfect spaghetti & meatball combination. Let's get started:

The Recipe: Spaghetti & Meatballs
Revisit From: Spaghetti & Meatballs - A Classic Made Delicious 

What You'll Need:

For The Meatballs:

12 Unsalted Saltine Crackers
2 Tablespoons Dijon Mustard
1 Pound Lean Ground Beef
1 Large Egg
Parsley (To Taste)

For The Tomato Sauce:

3 Tablespoons Olive Oil
1 1/2 Cups Grated Onion (1 to 2 Small Onions)
6 Medium Garlic Cloves (minced)
1/2 Teaspoon Red Pepper Flakes
1 Teaspoon Dried Oregano
6 Cups Bottled Tomato Juice
3 (28 Ounce) Cans Crushed Tomatoes
6 Tablespoons Dry White Wine
1/2 Cup Minced Basil Leaves
Parmesan Cheese

3 Pounds Spaghetti

NOTE: The spaghetti sauce recipe makes enough to serve 12 people - so if you are cooking for a smaller crowd - or just don't want a lot of leftovers, I'd recommend cutting the recipe in half.

Regular readers of the blog will recognize the meatball recipe right away. Jaime Oliver's 'cracking burger' recipe has become the standard starting point for any of our recipes calling for burgers, meatballs or meatloaf. We have yet to find a recipe that delivers a meatball with more flavor - that fact combined with the overall ease of preparation - makes Jaime's recipe a winner.

If you are a regular reader of the blog - you can now probably recite the cracking burger recipe in your head. However, for those who are not familiar with our favorite meatball combination - I'll give a brief rundown on preparing the cracking burger mix. (Full, more detailed instructions can be found HERE).

Preheat your oven to 450 degrees and preparing a large rimmed baking sheet with aluminum foil. Set a wire baking rack on top of the baking sheet and spray with nonstick cooking spray.

Begin by adding all of the meatball ingredients in a large mixing bowl. Using your hands, mash and scrunch the mixture until everything is well combined. Next, break the meat mixture into four larger balls of roughly equal size. I've found that this makes making the meatballs a lot easier.

Begin pulling off sections of meat from the larger balls and forming them into smaller, roughly golfball size, balls. You don't have to break the meat down to any particular size - it's all a matter of personal preference, however, I've found that balls that are about 1 to 1.5 inches in diameter tend to work best.

Place the finished meatballs on the wire baking rack, spaced evenly apart. Using the method described above, you should end up with about 24 to 30 meatballs. Place the baking sheet into the oven and allow to cook for 20 minutes.

While the meatballs cook, you can begin cooking the tomato sauce.

Add your olive oil to a large (nonstick) dutch oven and heat over medium-high heat until the oil begins to shimmer. Next, add the grated onion (feel free to cheat and use a food processor to chop the onion - I honestly don't think you're going to notice much of a difference between a grated or chopped onion - and the food processor makes much quicker work of everything). Cook the onion (stirring occasionally) until it begins to turn a light golden brown color. This should take about 5 to 7 minutes.

Next add your can of crushed tomatoes. (According to the fine folks at America's Test Kitchen, the Hunt's brand of crushed tomatoes are the best on the market - if you cannot find crushed tomatoes, Hunt's diced tomatoes will also work - the finer the dicing, the better).

Add your garlic, red pepper flakes and oregano as well. Stir until everything is combined and heat until the mixture begins to simmer - roughly 1 minute. Next, add the tomato juice (America's Test Kitchen also recommends Hunt's brand tomato juice - low sodium - here as well) as well as a liberal seasoning of salt and black pepper. Stir until everything is combined and cover the dutch oven. Allow the mixture to simmer for about 15 minutes before moving on to the next step.


Once your meatballs have finished cooking, remove them from the oven and reduce the oven heat to 350 degrees. Carefully move the meatballs from the wire rack to the sauce mixture, making sure they are completely submerged in the sauce. By moving the meatballs into the sauce, you add another layer of flavor to the tomato sauce, as well as infuse the meatballs with the rich tomato flavor of the sauce.


Once all the meatballs are in the sauce and completely submerged, place the dutch oven (covered) into the oven and cook for 45 minutes or until the sauce has thickened. When there is about 30 minutes left on the timer - place your large pot of water on high heat to begin cooking the spaghetti. Cook the spaghetti according to the package instructions.


Once the sauce has thickened, add a sprinkle of parsley and basil to the mixture and stir. If you prefer a sweeter tomato sauce, you can add a small sprinkle of granulated sugar to the mixture as well. Serve the tomato sauce and meatballs over the spaghetti with a sprinkle of parmesan cheese and enjoy!

The Results:


The second time was the charm for this dish. Just like my first attempt, the meatballs held a great flavor - and were still incredibly juicy. The added bonus of infused tomato flavoring only enhanced an already complex flavor profile from the delicious little morsels.

The biggest change on this revisit was the tomato sauce. Instead of simply purchasing the correct canned tomatoes and trying the same recipe again - I sought out to make my first attempt even better. I found that the tomato sauce from my first go-round was good - but overly simple in flavor. I wanted to add garlic, oregano, parsley and basil to the mixture - as well as changing the type of tomatoes used in order to create a much more complex, mature sauce. Using this new recipe was a fantastic decision. The sauce was full of flavor without being overpowering in any one area. A perfect blend of natural tomato flavor and spices greatly enhanced the meatball's already delicious taste and turned a good dish into a great dish.

It's safe to say, if we do a 2011 edition of the cookbook - this recipe will be showing up in its pages.


That's all we have for you tonight. Maggie takes to the kitchen tomorrow night with a brand new recipe, so be sure to stop in tomorrow evening to see what she's got cooking.

Also, if you haven't done so - be sure to check out our cookbook! It's full of the best recipes from 2010 - along with color photos of each dish. At only $25 - it's a great gift or just a nice addition to your cookbook library. You can buy the book form Blurb.com - either by going to Blurb and searching Out Of The Culinary - or by clicking the link on the right hand side of the blog. You can also preview the cookbook on our Facebook page - (Out Of The Culinary) click on the 'Our Cookbook' tab on our fan page and you'll see a 9 page preview of the book. We're incredibly proud of the final product and are confident you'll love the book once you get it in your hands. Buy your copy today!

Until tomorrow night,

~Cheers

Tuesday, December 28, 2010

Introducing The Out Of The Culinary Cookbook!

Good morning everyone! Today is the day of our big reveal! A few weeks ago, we teased that a big announcement was coming in regard to the blog. Tonight, we can finally reveal what that announcement is - we're published! (Okay, self published - but still published!) Tonight we proudly reveal what can only be described as a labor of love - The Out Of The Culinary Cookbook (2010's Best Recipes From The Blog).

This project started off as a Christmas present for both of our parents. I decided that a neat gift would be to take our best recipes and type them up into a collection - print them, bind them and give them out as a neat little book. I quickly discovered that typing up all of the recipes (again) and turning them into a book was going to be a lot more of a difficult process than I had first thought. So, I turned to a 'middleman' someone who would bind, print and distribute the book for me - leaving me with only the typing, layout and formatting to worry about. Enter - Blurb.com - a self publishing site - blurb allowed me to use their formatting tools and develop a comprehensive book - table of contents, back cover, front cover, page numbers, headers, footers - the whole works. When it was all said and done, I had poured over three weeks into this project. We ordered the first round of the books (one for each set of parents, one for ourselves) and waited anxiously.

When the books finally arrived a week later (not too bad a turnaround time considering how complex the whole process was to make the book!) I eagerly tore into the package. Needless to say - I was impressed. I was hoping for something presentable (that didn't have the obvious "I made it myself" appearance to it) what I ended up with was something downright professional. Our finished product looked like it just rolled off a big time publisher's press. It looked, felt and acted like a real, full blown cookbook. That's when it struck us - maybe this can BE a real, full blown cookbook.

And here it is - today, we're officially launching this cookbook on the world! We cherry picked the 28 best recipes that were shared on the blog during our inaugural 2010 season. They range from feature dishes like coq au vin, to side dishes such as green bean casserole and to desserts like pumpkin pie. Most of the recipes are accompanied by a full color photo of the finished dish. All the pages are printed on heavy duty paper, making the book fairly durable (and the pages 'splash' friendly - a plus for a cookbook!) We've included a preview of the book below - as well as a link to the book store directly. All checkouts are processed securely through paypal and (the best part) all profits of the book go back to the blog - blurb doesn't syphon off any of the book's profits. We each book ordered - blurb recoups the printing cost and the rest is left to fund further recipe creation by your two favorite amateur chefs.


We've also included a link on the right hand side of the blog - a handy little hot link to beam you right to the book's storefront. We could not be more excited about this product and hope you'll order one and enjoy the book as much as we do. A lot of hard work and long hours went into the making of this product - the end result turned out fantastically - we couldn't be any happier.

With the abundance of holiday leftovers - not to mention leftovers from last week's cooking - we're not cooking up any new dishes on the blog for today. However, we are back tomorrow night with a recipe revisit - a dish that we started off with waaaay back in the early days of the blog. It's sure to be a lot of fun (and as always - delicious) so be sure to stop back tomorrow night to see what we've got cooking. Until then,

~Cheers

(And be sure to buy the book!)

Monday, December 27, 2010

Around The Culinary World

Good evening everyone! I hope everyone had an enjoyable Christmas holiday - it seems like only yesterday that Maggie and I departed on icy roads to head back home. Now we're back to reality (boo!) and still a little weary from all of the festivities. A new week, however, means new recipes, and new adventures! Starting off with our weekly look at the news 'Around The Culinary World'. There isn't a whole lot of big, breaking stories this week - but the few I've found are worth a read. (Quality over quantity right?) So, here's what's happening in the culinary world this week:

Amazing, intricate and overly embellished cakes have become all the rage of late. Some of the more eccentric cake designers have earned their own TV series over the phenomenon. Shows like 'Ace Of Cakes' (now cancelled) and the 'Cake Boss' shine a light on the world of overly creative and unique bakery delights. Disney has begun taking steps to 'one-up' even the mighty cake boss. How does one top a cake that looks like a bucket of popcorn? By making your cake interactive of course! While it's only in the early stages - it sure looks like creative cakes are going to be getting more creative in the future! Check out the full story HERE

One of the biggest complaints leveled at fresh, homemade cooking is the cost. I won't deny it - eating healthy has the potential to be extremely more costly than simply filling your plate with Cheetos and frozen pizza. Eatingwell.com has 6 tips to help you save at the grocery store this year. While you may not try them all (after all, everyone has a 'I won't cut out that!' line) it is worth a read. Check out the interesting ideas HERE

For our, "Wow - that's...odd" story of the week - an artist in Brooklyn has recreated a whole collection of death row inmate's final meals (complete with pictures). Why? Well... she's making a book - titled 'Today's Special' - get a sneak peek at the book (and the sort of creepy photos) HERE

This story is for the lazier readers out there. Every year, chefs create, recreate and perfect recipes - constantly striving for culinary perfection. If you are an amateur chef (like myself) you are eager to follow along and try these recipes for yourself. If you're not as enthusiastic - or just plain lazy - you wait until Eatingwell.com puts out their 'Best Recipes Of 2010' list and simply make the dishes deemed to be the cream of the crop. Check out the best recipes of 2010 HERE ...cheater

A couple of weeks ago - we touched on the Food Safety Modernization Act that was recently passed in Congress. While it is understood that the bill is much needed - given the global nature of produce and food products (and the lack of 'global' vision in the current standards) - some may not understand what exactly the new bill does. The Huffington Post broke down the act into 18 simple to digest parts. To get a summary of what the new bill will change on you dinner table - check out the full story HERE

Finally tonight, we come full circle. We shared the best recipes of 2010 - now here's the worst. The Stir (Blog) has created a list of the 10 worst culinary creations unleashed on the world this year. Not surprisingly - they are all fast food menu items. (Also not surprising - the KFC Double Down makes the list)

Aaaaah! It's a heart attack waiting to happen! RUN AWAY!! 
Check out the 10 items you should be sure to avoid HERE


And that's what's new in the culinary world for Monday, December 27th 2010. We've got an exciting week lined up - tomorrow we finally reveal what our big announcement (teased a few weeks ago) will be - we will be dedicating the entire blog tomorrow to this particular announcement (so be sure to watch our Facebook page for the blog post). Wednesday, I'll be tackling a recipe revisit (of sorts) and Thursday, Maggie is getting creative with some typical kitchen standbys. It's all shaping up to be an exciting week - starting off with tomorrow's big announcement. Be sure to stop back tomorrow night! Until then,

~Cheers

Thursday, December 23, 2010

A Return To Dutch Dishes!

Good evening everyone! You know, sometimes, this blog is a lot of fun. Every time you start to feel like you've tried just about everything a new recipe, cooking technique, kitchen gadget or ingredient comes across your radar and revolutionizes cooking all over again. These changes keep our hobby fresh - but they also keep the blog fresh. Just when you think you've got us figured out - BAM - breaded chicken with almonds in the breading. Bet you didn't see that one coming! Tonight, we're following up that unexpected recipe with yet another unexpected dish - an we're leaving the country to do it. I'll turn the keyboard over to Maggie and let her share the culinary journey across the sea.

The Recipe:  Dutch Farmer's Cheese Soup
Original Recipe Found In:  Bon Appetit Tastes of the World Cookbook

What You'll Need:

1/4 Cup Butter
1 1/2 Pounds Russett Potatoes, Peeled, Diced
1 1 1/2 Pound Cauliflower, Trimmed, Cut Into Florets
1 Pound Carrots, Peeled, Sliced
1 Large Onion, Chopped
4 Cups Canned Vegetable Broth
6 1-Inch-Thick French Bread Slices
12 Ounces Gouda Cheese, Wax Removed, Cheese Sliced


As formidable doom snowstorm approaches our neck of the woods, I am reminded of a warmer time.  Summer.  But not this the coming summer; the summer of 2007.  As seen on the pannekoken blog, I have a great love for a tiny country named the Netherlands.  It's people, the scenery, the food.  Albeit, I didn't actually have this dish while I was over there (and maybe someday I will make the dish that was "real Dutch",) tonight's recipe is in homage of those whom I know in the Netherlands.


2007's Trip To Europe - The Netherlands Edition


Begin by peeling the potatoes, carrots, and cauliflower and chopping them into smaller sections. Roughly chopping the vegetables is okay here. Next, chop the onion either by hand or with a food processor (no watery eyes that way).  


Next, begin to melt the butter in a heavy, large, oven safe Dutch oven over medium high heat.  Add the vegetables and saute until the onion is golden brown, about seven minutes.  Next, add four cups of the vegetable broth and bring to boil.  Reduce heat to medium low and simmer until vegetables are tender, about thirty minutes.  Season to taste with salt and pepper.


Finally, preheat your oven to 375 degrees.  Slice french bread loaf into 1/4 to 1/2 inch sections and place the slices on top of the soup.  Place cheese slices over the bread until each slice is completely covered.  Place the Dutch oven in (actual) oven and cook until the cheese is melted, about five minutes.  Serve immediately and enjoy!


The Results: 


The end results was a delicious, almost rustic dish that burst with amazing natural flavors. Sometimes, people are a little too eager to hide veggies under multiple layers of flavorings and spices. It's easy to forget that yes, veggies have their own flavor too - and in most cases (with the exception of broccoli - which is nasty and poisonous!) taste great! This one is worth a shot for those who follow along at home - simply to be reminded of the great, natural flavors out there. (Although, I'm not sure what makes this recipe Dutch? The gouda?) 

That's all we have for you this week. Here's hoping everyone has a very happy, safe and enjoyable holiday. Safe travels, and may all of your family reach you safely. (As an aside, here's hoping the snowstorm bearing down on us is only going to be the 3 to 5 inches predicted and not anything worse!) Merry Christmas and happy holidays to all of our great readers and your families! We're back on Monday, December 27th with another full week of recipes - so be ready to come back from Christmas and get cooking again! Until then,

~Cheers

Wednesday, December 22, 2010

Slightly Nutty

Good evening everyone! Christmas is growing closer and closer. It just hit me today that the holiday was only three days away! It's hard to believe? Where has the year gone? If you live in the greater Iowa region - your holiday has the potential to be not so great, however, thanks to mother nature. That frosty ***** has another round of winter weather lined up for the 23rd and 24th and it has left all of our great meteorological minds befuddled on exactly what is going to happen. This leaves the holiday traveler (Maggie and myself) left wondering what exactly is going to happen to their holiday plans. I think Maggie and I are operating on a few contingency plans - just in case. In fact, tonight we're making the rounds to the stores buying up some supplies for the 'it snowed so much we're stuck at the apartment for Christmas' plan. Hopefully we won't have to use that plan - but you never know.

When your mind is bogged with weather patterns, travel itinerary and just why people are so absolutely rude this time of year - (Seriously, if this is some people's 'Christmas spirit' I'd hate to see their Grinch!) - it always helps to have a little comfort food or spend some time with your favorite hobby. Luckily for me, my favorite hobby directly leads to creating my favorite comfort food - breaded chicken.

I've tried multiple breaded chicken recipes in the past, all with varying degrees of success or failures (mostly failures). In fact, in my last breaded chicken recipe, I declared that if I did not succeed, I would never make the dish again. Thankfully, the fine folks at America's Test Kitchen delivered a great breaded chicken recipe and the dish (finally) turned out fabulously. Tonight, armed with another breaded chicken recipe (once again from America's Test Kitchen) I am ready for a little comfort food and relaxation in the kitchen.

The Recipe: Nut-Crusted Chicken Cutlets
Original Recipe Found In: Cook's Illustrated January/February 2011 Issue

What You'll Need:

2-4 Boneless, Skinless Chicken Breasts
1 Cup Roughly Chopped Almonds
4 Tablespoons Unsalted Butter (Cut into 1 tablespoon sections)
1 Medium Shallot (Minced)
1 Cup Panko (Japanese style bread crumbs)
2 Teaspoons Finely Grated Zest From 1 Lemon
1 Teaspoon Minced Thyme
1/8 Teaspoon Cayenne Pepper
2 Teaspoons Dijon Mustard
1/4 Teaspoon Black Pepper
1 Cup All Purpose Flour

Begin by adjusting your oven rack to the center position and preheat the oven to 350 degrees. Next, pat your chicken breasts dry with a paper towel and poke 4 to 6 holes (with a fork) into the thickest part of the chicken breast. Season with salt and set aside in the refrigerator until needed.

Using a food processor, pulse the almonds until they are chopped up into a coarse meal. Warning this will be UNBELIEVABLY loud! You may want to keep things to short bursts until the nuts begin to break down - I fear that anyone who tries to do this in one shot will no longer be able to hear without the aid of listening devices.

It was a loud process - but that's the end result 

Meanwhile, heat the butter in a large (12 inch) non-stick skillet (medium heat). Swirling the butter frequently, cook until the butter begins to turn golden brown and develops a nutty aroma - this should take about 4 to 5 minutes. Next, add the shallot and 1/4 teaspoon salt and cook until the shallot turns golden brown - an additional 3 to 5 minutes. Reduce the heat to medium low and add the panko and the almonds. Cook, stirring frequently, until the mixture is a deep golden brown. This should take about 10 to 15 minutes. Transfer this bread crumb mixture to a plate to cool. Once cooled, mix in the lemon zest, thyme and cayenne pepper.


In a shallow dish or bowl, lightly beat the eggs, mustard and black pepper. (I'm not sure if it was my particular ingredients or if this is a chemical reaction of sorts- but my mustard and egg did not want to combine. Even after some vigorous whisking, I still had a fairly gelatinous blog of egg and mustard. I remedied this by simply dipping the chicken completely into the mixture so all of the components coated the breasts.)

Arrange your dishes, assembly line style, with a plate of flour first, followed by the egg mixture and ending with the bread crumbs. Begin breading the chicken by dredging the breasts in the flour (make sure to shake off the excess). Dip the breasts into the egg mixture and allow the excess to drip off. Finally, roll the breast in the crumb mixture until completely coated. Feel free to add extra bread crumbs to the top and sides - or anywhere that looks a little bare.


Move the chicken breast to a wire rack placed on top of a baking sheet. Repeat the process until all the breasts are breaded. Place the wire rack/baking sheet combo in the oven and cook for 25 to 30 minutes, or until the center of the chicken reaches 165 degrees on an instant read thermometer. Let the breasts rest for five minutes before serving. Serve with wedges from the zest lemon and enjoy!


The Results:


Once again, Cook's Illustrated delivered a breaded chicken dish that was almost fool proof. No breading lost, no naked pieces and the chicken wasn't overly done or way under cooked. With this basic formula - the common errors that breaded chicken can cause are essentially wiped out.

The chicken itself was full of amazing, unique flavor. The panko and almonds combined for a great - slightly crunchy, but incredibly flavorful bite. The chicken pulled in the dijon flavoring from the egg bath - which caused a zesty little undertone - a great companion to the lemon juices on the outside of the chicken. All in all, this flavorful little dish is extremely delicious and incredibly easy to make. Certainly worth a try for those following along at home.

That's all we have for you this evening, Maggie is taking to the kitchen tomorrow night with an incredibly unique dish that I had not heard of until this very week - it should be interesting! Be sure to stop back tomorrow evening to see what she's got cooking. Until then,

~Cheers

Tuesday, December 21, 2010

Florida Toast

Good evening everyone! Tonight, I'm falling victim to one of the longest running foodie epidemics - cravings. You all know what I'm talking about, it all starts off innocently enough, you see a TV ad for a certain food item, or you read about a food item in a magazine. The next thing you know, you're thinking "I wonder if I have a recipe for X" one thing leads to another, and before you know it, you're at the store, buying the necessary components for whatever innocuous thing crossed your vision a few days before.

This week, my 'item X' was french toast. (Which by the way, doesn't french toast deserve a spot in the craving hall of fame? It's not usually a 'standard' on the breakfast menu - but it always seems to be made following the "I haven't had french toast in a long time" thought. That sort of regular appearance on the craving list deserves recognition!) I read a recipe for the breakfast delight online and thought to myself - "Hey, I haven't had french toast in a long time" Mistake number one. The "I haven't had X in a long time" is another way to tell your brain "I should have item X soon". Being the avid chef that I am, I naturally had to look up some other french toast recipes, you know - just to see what's out there. One thing led to another and, well, here we are. I'm typing up a french toast recipe and pretty soon, you'll be thinking "I haven't had french toast in a long time" and in a few short days - wham - you're making french toast. I tell you, it's like the gateway drug of food cravings. I apologize in advance for bringing french toast into your homes. If you have small children, you may want to usher them out of the room - All kidding aside, here's this week's first recipe:

The Recipe: Grand Marnier French Toast
Original Recipe Found In: Multiple Online Sources Including Jaime Oliver and Epicurious

What You'll Need:

4 Large Eggs
3/4 Cup Half And Half
1/4 Cup Grand Marnier (or comparable orange liquor) or Frozen Orange Juice (Concentrated - Thawed)
2 Tablespoons Sugar
1 Tablespoon Grated Orange Peel
1/2 Teaspoon Vanilla Extract
8 - 3/4 Inch French Bread Slices (Texas Toast is an optional replacement)
1 Tablespoon Butter

Begin by mixing the eggs, half and half, frozen OJ, sugar, orange peel and vanilla extract in a large bowl. Whisk well until everything is combined. Next, dip each slice of bread into the egg mixture, making sure each side is well coated. Place the bread into a 13 X 9 dish or any large pan. Once all of the pieces have been dipped, pour the remaining egg mixture over the bread and allow to rest for about 5 minutes. This allows the mixture to absorb into the bread - greatly enhancing the flavor with every bite!


I found it was helpful to preheat the oven to 350 degrees and warm a large baking sheet in the oven. This baking sheet will allow you to store the cooked pieces of french toast, while you're cooking the others. If you're using an electric griddle or a very large skillet - you may not need this option.


After 5 minutes, or when the liquid is completely absorbed into the bread, whatever comes first, melt the butter in a large skillet over medium high heat. Cook the toast for about 5 minutes per side (or until nice and golden brown). Place the finished pieces on the baking sheet in the oven to keep warm until everything is finished and ready to serve. Serve with maple syrup or powdered sugar and enjoy!

The Results:


Since I had seen so many variations of this recipe across the web, I knew the flavoring had to at the very least be decent. It was actually a very tasty dish. The subtle undertone of oranges accompanied every bite of the toast (so those who are not citrus fans may want to sit this one out). In fact, it tasted less like french toast and more like toast from a more 'orange centric' state - Florida. (Thus the name of tonight's blog!) All in all, this is an extremely simple and delightfully satisfying dish that the whole family is sure to enjoy. Certainly worth an attempt for those following along at home.

That's all we have for you tonight, I'm back in the kitchen once again tomorrow night with ANOTHER variant on breaded chicken - but this breading is not at all what you'd expect. Be sure to stop in tomorrow evening to see what I've got cooking. Until then,

~Cheers

Monday, December 20, 2010

Around The Culinary World

Good evening everyone and welcome to a new week here at Out Of The Culinary! It's Monday once again, and we're counting down the days until Christmas - (for those who are numerically challenged or just lazy - we're at 5). We've got another full week of recipes planned before the big holiday kickoff - so were not slacking off for the holidays just yet. Of course, it isn't officially a start of a new week until we've gone 'Around The Culinary World' and shared the latest and greatest in the world of food with you. As it turns out, last week was sort of a snoozer for food related news - but the stories I do have a great ones.

We'll begin in Iowa - where the locally distributed Templeton Rye has become big business. For some reason that hasn't fully been explained or figured out - the local whiskey is selling like hot cakes from any grocery store that can get their hands on it. Long lines and high demand have kept this beverage in scarce supply for a solid month now. Naturally, when the something becomes hard to find and you manage to find it - what is the first thing you do? Ebay. (For example, the unbelievable pries the Nintendo Wii commanded a few years ago). Not so fast, say state officials. Technically, selling any alcoholic beverage without a license is a form of bootlegging - which comes with a heft price in Iowa. Check out the full details HERE

Eggs - the culinary (and scientific) world has had a love/hate relationship with the round little chicken deposits for years. Eggs are bad, eggs are good, parts of the egg are bad, but the other parts are really good. Brown eggs are better, white eggs are better, free range eggs are better. It seems whenever something about an egg is declared to be good for you - another study immediately follows suit that claims that the very same part of the egg will kill you in your sleep* The Huffington Post has a story breaking down some of the biggest egg myths. It's worth a read - especially if you're not sure what the difference between a free range and cage free eggs are. Check it out HERE

*Slight exaggeration

Has anyone seen the countless Activia and Dannon yogurt commercials that tote the product's amazing ability to regulate your digestive system and bowel movements (gross) as well as keep you healthy, fit, happy and able to run freely in a pasture of daisies without a care in the world? It turns out, the FTC says Dannon cannot make those claims any longer. The reason? Well, it turns out that their claims are not...true. Or backed any basis of fact...oops. It's a goof that has cost Dannon $21 million in claims and a whole lot of other legal trouble. Read the full details HERE

Still have a foodie on your Christmas list that you need to buy for? How about a novice chef that could use a few beginning tools for getting off the ground (cooking wise). HERE'S yet another list of kitchen gadgets - this time all of these gadgets come under $25.

The public water supply has always been a hot topic among health activists and marketing firms. Marketing firms would have you believe that publicly funded water (I.E. 'tap water') is going to kill you and suggest you purchased bottled or filtered water instead. Health activists and many local governments point out that public water is actually just as good if not better than the bottled water alternative. It turns out, in some cases, the marketing professionals may have a point. Read the startling story on the Washington Post.

And there you have it. That's what's new and exciting 'Around The Culinary World' for Monday, December 20th 2010. We're back tomorrow night with another new recipe. Be sure to stop back in tomorrow evening to see what we've got cooking. Until then,

~Cheers

Thursday, December 16, 2010

Salmon So Good, It Should Be On A Menu

Good evening everyone! Welcome back to Out Of The Culinary! Tonight, we're wrapping up the 'anti-Christmas meal' week with a return visit to salmon. As I mentioned yesterday, I've tried multiple different versions of salmon on the blog - each time learning a little something new about the fish (mostly things that fall under the 'what not to do' category - but all experience is good experience right?) I recently came across an article in the December issue of Cook's Illustrated that shined a little more lite on the aquatic treat. Armed with this knowledge and an interesting recipe - I set off to make tonight's dish.

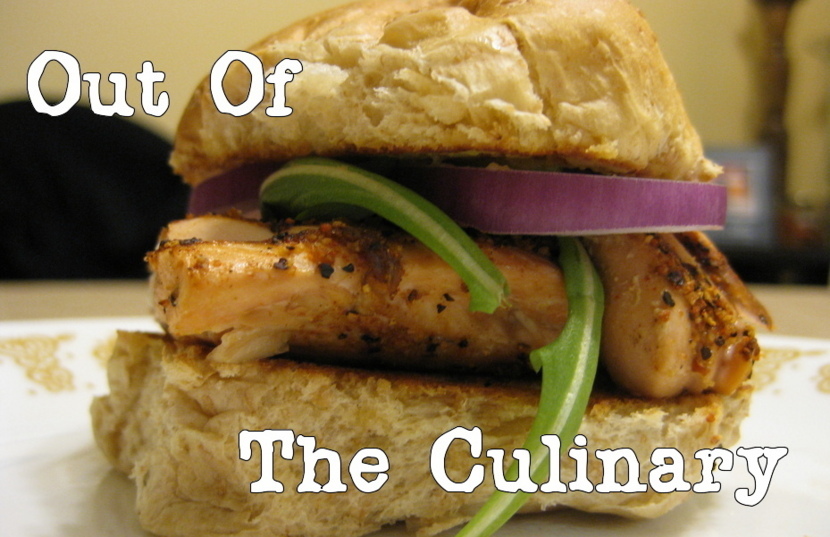
The Recipe: Grilled Cajun Salmon
Original Recipe Found In: EatingWell.com

What You'll Need:

2 Salmon Fillets (Skin removed)
2 Whole Wheat Buns
1 Avocado*
1 Small Red Onion
1 Small Tomato (Optional)
2 Tablespoons Light Mayonnaise
Cajun Seasoning (Or Blackening Rub)
Arugula

*There are two options for the avocado portion of this dish. You can either purchase a whole avocado and then slice, pit and mash the avocado - OR you can purchase some all natural ready made guacamole - which, as you all are aware, is mostly avocado with a few extras (jalapeno or a little onion). The advantage of guacamole (as long as it's natural, pure guacamole - without a lot of additives) is that you don't have to pit or slice an avocado - and you don't have to mash the avocado with any mayonnaise as the guacamole already has the properties you are trying to achieve when you combine the mayo and avocado. Since I had very little interest in slicing and coring an avocado - I chose to use light, natural guacamole (which only had jalapeno and a touch of garlic as additives).

As I mentioned in the opening, I picked up an interesting piece of knowledge this week about salmon. As anyone who has cooked salmon in the past is aware of - the fish has an interesting 'side effect' of being cooked. Most cuts of salmon come off the grill or out of the pan oozing a white goo that is not appetizing or visually appealing...at all. This 'goo' is a result of the protein in the fish coming to the surface and oxidizing. Essentially, when this moisture rich protein hits the right temperature, it is pushed from the muscle fibers in the fish to the surface where it instantly turns to a white, unappealing goo. I used to think this was just an unfortunate side effect of cooking salmon. However, December's Cook's Illustrated pointed out a simple fix. Reduce the heat. It turns out that this ooze only results when the salmon's proteins hit a certain temperature - by reducing the heat and increasing the cooking time - you can avoid this ooze and, in turn, keep more of the moisture in the fish.

Armed with this knowledge, I made a slight adjustment to the directions in tonight's recipe. The original recipe called for a grill pan to be placed on high heat and cook the salmon for 3 minutes per side. Hot and fast, as we established, will result in the unsightly goo. As such, I'm lowering the temperature to medium heat and cooking for about 7 minutes per side. Low and slow - and hopefully less goo.

Begin by bringing your grill pan up to medium heat. Rub the salmon fillets with a generous helping of blackening powder or with cajun seasoning. Place the fillets in the grill pan and cook, undisturbed, for about 5 to 7 minutes per side. The salmon should be a lighter pink all the way through.

On a (lightly toasted) wheat roll, spread a thin layer of the guacamole or the avocado / mayonnaise mixture. Top the salmon fillet with a few leaves of arugula and a thin slice of red onion. Serve and enjoy!
Gotta love the grill marks! 

The Results:


I love it when the end result looks like a 'real' cookbook photo!

This may be one of the best fish dishes we've ever made on the blog! We're not exaggerating when we say that this dish could easily be on a menu of any restaurant right now - it is that good (and it's low calorie too! Win Win!) Absolutely amazing flavor burst forth with every bite! The spicy kick of the cajun seasoning was neutralized by the smooth flavor of the guacamole. I have to admit, I wasn't expecting this dish to blow my taste buds away like it did - but I am pleasantly surprised by the end result...now, to find my taste buds again...

Oh, and as an aside - the low and slow cooking technique? Worked perfectly. I ended up with perfectly grilled salmon fillets that lacked any goo whatsoever. Success!

That's all we have for you this week! Thank you, as always, for stopping by and sharing our cooking experiences with us. We're back on Monday with another 'Around the Culinary World' so be sure to stop by Monday evening to see what's new and exciting in the world of food. Until then,

~Cheers

Wednesday, December 15, 2010

Good Day, Good Dish!

Good evening everyone! Today was a good day. A very good day in fact! On a personal level, Maggie learned today that she has a clean bill of health - there was a little concern for a while with us that she may need a major surgery, but results came back today that indicated that surgery is 99.99% unlikely and nothing major is wrong - always a good thing. Secondly, I received a promotion today! It's a nice boost up the corporate ladder - and it has better hours too - that means more time to cook! Finally, we finalized something big for the blog - something that our fans are going to love - something that Maggie and I are extremely excited to share...but we can't yet. Rest assured, it's a very exciting and very impressive for a little blog - but we can't disclose what it is until after the new year. And mom(s) - that means you too. You can call and ask all you want - but we cannot disclose this announcement until 2011. Stay tuned for that!

Back to the reason why you are all here - Maggie took to the kitchen tonight continuing the health focused recipe week (we're calling the anti-Christmas meal week) with a very unique dish. Clocking in at just over 200 calories per serving, this savory and delicious dish is certain to become a household favorite both for your tummy and your waistline. I'll turn the keyboard over to Maggie and let her share tonight's recipe:

The Recipe: Tortellini Florentine Soup
Original Recipe Found In: The Food section of yahoo.com

What You'll Need:

9 Ounces Refrigerated Three Cheese Tortellini
14 Ounces Reduced Sodium Chicken Broth
10 Ounce Refrigerated Light Alfredo Pasta Sauce
2 Cups Shredded Deli-Roasted Chicken (Roasted is key)
1/2 Cups Oil-Packed Dried Tomato Strips, Drained
3 Cups Lightly Packed Packaged Fresh Baby Spinach
1 Ounce Parmesan Cheese, Shredded

Hi all!  As Tyler mentioned, it was a very exciting day in the Trimble household for a lot of reasons, and it didn't snow either, so the Great Day quotient was bumped up a little bit more.  But back to our cooking, I found this recipe about two weeks ago and I thought it sounded really delicious.  I am a huge fan of tortellini - I find the concept really stellar: stuffed pasta that isn't too heavy with ingredients, like ravioli.  That and you can have tortellini by itself or use it in a recipe like this - it's a great item to have in the fridge/pantry for a quick fix.


I started this evening by cooking the tortellini in a four quart Dutch oven, according to package directions (about nine minutes for mine.)  Drain and set aside.  In the same Dutch oven, combine the chicken broth and alfredo sauce.  Stir in the chicken and tomato strips.  Heat to just boiling; reduce heat.  Simmer uncovered for five minutes.


Add the cooked tortellini and spinach to chicken/broth/sauce combination.  Cook for 1-5 minutes (I left it on the heat for 4 minutes) to heat through and wilt spinach.  Sprinkle with parmesan cheese and serve!


The End Result:


The flavors of the tortellini, chicken, and the broth/alfredo sauce worked superbly.  It was an incredibly tasty dish and not much cooking time was involved (30 minutes all together.)  Also, it's only 286 calories so it was easy meal on the tummy.  It's definitely something quick, easy, flavorful, and yields leftovers if cooking for less than three people.


Thank you Maggie. There is a lot of room for creativity with this dish as well. As always, we like to follow the original recipe (with a few deviations here and there as necessary) on the first go-round - that way we can see if the concept is something we want to further pursue. Now that we know this is a solid dish - we could get creative and add some bacon bits or a little red pepper. I'd like to add flour to the broth and make the soup more of a thick stew - essentially turning the cheese into a sauce. The possibilities are endless - you can bet that we will be returning to this dish in the future.

 That's all we have for you tonight. The anti-Christmas meal week continues tomorrow night as I take to the kitchen and attempt yet another variation of a dish I've made at least three different ways on the blog already. (No, it's not potato soup this time!) Tune in tomorrow night to see what I've got cooking. Until then,

~Cheers


Tuesday, December 14, 2010

Trending Healthy

Good evening everyone! Welcome back to a new week of recipes here at Out Of The Culinary. With the holidays (and the never ending onslaught of delectable delights) approaching, Maggie and I thought it would be wise for us to take a little 'preventative action' with our recipes this week. Although we always try to keep health conscious with our recipes - and cooking fresh is always better for you than a frozen meal, we still can try a recipe or two that is more 'delicious' and less 'healthy'. Somewhere in between is the common ground that we all strive to find. Delicious and healthy. Working our way back to the original reason we started this blog - to share healthy and tasty meals with the world - we decided to focus on a little healthier bend for the coming weeks. My two recipes this week are especially health focused. Let's get started cooking!

The Recipe: Turkey & Tomato Panini
Original Recipe Found In: EatingWell.com

What You'll Need: ***

3 Tablespoons Reduced Fat Mayo
2 Tablespoons Non-Fat Plain Yogurt
2 Tablespoons Shredded Parmesan Cheese
2 Tablespoons Chopped Basil
1 Teaspoon Lemon Juice
Fresh Ground Black Pepper (To Taste)
8 Slices Whole Wheat Bread
8 Slices Fresh Tomato
8 Ounces Thinly Sliced Deli Turkey
Canola Oil

*** Revised ingredients below!

Begin by mixing the mayo, yogurt, parmesan, basil, lemon juice and pepper in a small bowl. Stir until combined well. Spread this mixture onto one slice of bread (per sandwich) and top with a generous helping of turkey slices. Add two slices of tomato apiece and top with another slice of bread.


In a grill pan, pour roughly 2 tablespoons of the canola oil and bring to medium heat. Place the panini in the pan and rest a heavy skillet or pot on top of the panini. If the skillet is quite heavy enough to thoroughly squish the bread down, add a couple of cans of soup, vegetables or really anything heat resistant and heavy to the skillet.

Cook for about 3 to 5 minutes, or until the bread becomes golden brown and the grill marks are well defined and crispy. Flip the panini over and place the skillet (and cans) on top. Cook for an additional 3 to 5 minutes. Serve immediately and enjoy!


The Results:


I took a few wrong turns with this recipe tonight. First, I couldn't find a fresh loaf of wheat bread at our local grocery store. They had every other variety of bread known to man made fresh in the bakery but wheat was not to be found. As such, I went with a marble rye bread in its place. A poor decision on my part. The rye was not a natural companion to the turkey and mayo combination and it just threw the flavor off a little. Wheat bread would have been the perfect companion to this dish - it's too bad I didn't get the opportunity to try.

The second goof I made was cutting the bread a little too thick. I was imagining 'texas toast' size slices of bread for the panini - but regular old sandwich bread would have worked better. Smaller slices of bread would have allowed the turkey to be cooked all the way through - or additional cooking time would also have done the trick.

Finally, I'd make a little tweak to the recipe on a second visit. Lose the mayo/yogurt combination. I understand that the yogurt is to give more volume to the spread - but it takes away flavor - it essentially neutralizes the lemon juice/pepper and basil. Instead, I'd use 3 tablespoons reduced fat mayo - 2 teaspoons lemon juice - 1 tablespoon chopped basil, 1/2 teaspoon black pepper and a healthier dose of parmesan cheese (which is lost in the original version of the recipe). Finally, I top the whole thing with a slice of swiss cheese - which isn't going to ruin anyone's diet by any means. So, in the end, I'd reinvent the whole thing!

My version looks like this:

3 Tablespoons Reduced Fat Mayo
2 Teaspoons Lemon Juice
1/2 Teaspoon Black Pepper
3 Tablespoons Parmesan Cheese
1 Tablespoon Chopped Basil
1 Slice Swiss Cheese
8 Ounces Deli Turkey
8 Slices Whole Wheat Bread
4 Slices Fresh Tomato

All in all, the sandwich wasn't bad - but it could have been so much better. It is a great base for any form of panini recipe, however, and it is incredibly fast and simple to make. Using this recipe as a starting point, you could certainly get creative and run wild with fast panini ideas for the whole family!

That's all we have for you tonight, Maggie is in the kitchen tomorrow evening cooking up something very unique. Be sure to stop back tomorrow night to see what she's got cooking. Until then,

~Cheers

Monday, December 13, 2010

Around The Culinary World

Happy Monday everyone! If you reside in the greater midwest - maybe it's not such a happy Monday. Much of the midwest, including the greater Des Moines metro, was pounded by our first major snowstorm of the year over this past weekend. When the words 'blizzard waring' scroll across your television screen, it's never a good thing! As such, Maggie and I spent the weekend curled up inside only venturing out to scrape off our cars and take out the garbage. At -14 below windchill and 40 mph winds - you didn't really have any other options to try anything else.

With the weather being as horrid as it was, I was able to read a lot more stories and news feeds this past week, generating some more material for this week's around the culinary world. So, here's an (extra beefy) around the culinary world for December 13th, 2010.

Pop quiz - what's the fastest selling Non-Fiction book of all time? No matter how many guesses you take, I bet you'd wouldn't come up with this answer: THE FASTEST SELLING NON FICTION BOOK OF ALL TIME - as an aside congrats to my culinary hero on this impressive achievement! 

Do you have a foodie on your christmas list? Here's a few gift references for those chefs, food lovers or fine wine drinkers on your gift giving list. Idea List 1 List 2 

With the onset of a blustery and cold winter - fruit has become scarce and expensive right? Wrong. Eatingwell.com has a list of the most cost effective and abundant fruit for the winter season. Check out the list HERE

As you know if you're a regular reader of the blog - we're fans of the humble sweet potato. We've put in in soups, mashed it, casseroled it and turned it into fries. You'd think we've tapped out all of our options when it comes to one potato - you'd be wrong. HERE is a list of over 100 ways to cook and use a sweet potato. That should keep you busy with the spud for a long time! 

I've never been surprised about what people will find to use as a drug substitute. It seems like people everywhere are just grinding up, huffing, smoking or otherwise abusing everyday objects in hopes that something will give them a 'high'. The newest trend for everyday item abuse is a common spice in nearly every kitchen read about the way nutmeg is being abused HERE

The media seems to have a love/hate relationship with tuna. One minute it's great for you, the next, it's full of poison and should only be fed to your enemies* Well, a new report throws another check into the 'not great for you' column. It turns out that canned tuna may have higher mercury levels than originally thought. Check out the full details HERE

*That MIGHT be an over exaggeration

There isn't a specific story to share here, but I've been hearing all week about how the battle for better nutrition in our schools has turned into warfare between the Republicans and Democrats. The Dems want healthier food options in our schools - the Republicans, including tea party 'hero' Sarah Palin make ignorant comments like "Don't tell parents how we should raise our kids?" REALLY? I can't imagine people are that thick headed that they believe this is an inditement on how parents are raising their kids (Which by the way, there are some parents that think a large Wendy's burger and a Frosty are a 'balanced meal' for their kids everyday -but let's not dive into that debate today.) This has nothing to do with telling you how to raise your children Sarah, it has everything to do with providing young children a good meal. It's as simple as this - here are two meals that both meet the requirements for a healthy meal: 


Which would you rather have your kids eat? Exactly. It's just that simple. By changing the standards for school food - what they are allowed to use their federal spending for (frozen, breaded, heavily salted chicken is okay, fresh, locally raised, free range chicken- nope. THAT NEEDS TO CHANGE) you can provide a better meal and a better, healthier lifestyle for children. Stop the stupid political fighting and make an informed decision for the better of the country for once. 

That's what's happening around the culinary world for December 13th, 2010. We've got a full week of recipes lined up for you in the coming days, starting with my turn in the kitchen tomorrow night. Be sure to stop by tomorrow evening to see what we've got cooking. Until tomorrow, 

~Cheers

Wednesday, December 8, 2010

French Technique, American Ingenuity

Good evening everyone! Tell me, dear readers, have you ever been browsing a bookstore's cookbook/cooking magazine section and come across a recipe that looked so good you stopped in your tracks and read eagerly read the recipe? No? Just me then? Oh...Well, that very thing happened to me last weekend as we were browsing cooking magazine at our local Barnes & Noble. I was flipping through the pages of a slow cooker magazine and spotted tonight's recipe. It's a hard feeling to explain unless cooking its your hobby. It's like the final minutes before Christmas morning...like finding rare gold with a metal detector...like stitching that final stitch (for those cross-stitch fans out there). It's pure, unfiltered excitement. The best part is, with this blog, I get to live the excitement all over again as I share the recipe with you! Are you ready? Prepare for joy:

The Recipe: Cheeseburger Stew
Original Recipe Found In: Cuisine Magazine - Slow Cooker Issue

What You'll Need:

1 Pound Lean Ground Beef
4 Tablespoons Unsalted Butter
1 Small Onion (Diced)
1 Celery Rib (Diced)
1 Carrot (Diced)
1 Garlic Clove (Minced)
1 Teaspoon Dried Basil
1/4 Cup All Purpose Flour
1 1/2 Cups Milk
3 Cups Low Sodium Chicken Broth
3 Large Russet Potatoes
2 Cups Shredded Cheddar Cheese

This recipe uses a cooking process known as mirepoix - which is a French term applying to the combination of onions, carrots and celery being cooked with butter. This flavor combination creates a base for many French dishes. While I'm not going to sit here and argue that 'cheeseburger stew' is a classic French dish, I just find it interesting that something so timeless and traditional as mirepoix can be used in such a modern and conventional dish as 'cheeseburger stew'.

That's why it's important (and fun!) to cook recipes across multiple regions and techniques. You'd never think that a technique you used to make a labor intensive French duck would come in handy while making quick Spanish style tacos - but it could. Experience is experience is experience - no matter if you think you're going to use it later or not. (Remember that kids asking 'When will I use Algebra again!? You never know - but it's a good thing to have in your toolkit of knowledge).

Anyway - random tangent aside... Begin by melting the butter in a large skillet. Once melted, add the hamburger and cook until fully browned. Once browned, add the onion, carrot, garlic and celery to the skillet and cook for five minutes. Stir occasionally.

Mirepoix - in action

After the onions have softened slightly, stir in the flour, making sure that it's fully incorporated before moving on to the next step. Next, add the milk to the skillet and stir until everything is mixed well. This recipe didn't specify what type of milk was preferred, but given the nature of the stew and the thick, creamy base you're trying to form - I'd wager that whole milk would be your best bet. However, if you like your arteries and are trying to stay a little bit healthy - you can do what we did and use skim milk. Allow the mixture to cook until the milk begins to boil - this should take about 2 minutes. By now, the mixture so be very thick and stew like - if not, allow it to simmer for a few more minutes to thicken up.

Doesn't look too appetizing here - but it smells great! 

In a 3 to 4 quart slow cooker, add the chicken broth and potatoes. Next, pour the hamburger mixture directly from the skillet into the slow cooker. Mix everything well with a spoon and cook on low for 3 to 4 hours. The time really doesn't make that big of a difference here, however, as I cooked my stew for upwards of 8 hours and everything turned out just fine! If you need to make this and then leave for work for the day - no worries - you should be just fine.

It's looking a little better now..
After the cooking time is up, add 2 cups of shredded sharp cheddar cheese to the slow cooker and mix until the cheese is completely melted and combined with the stew. Season with a little salt and pepper and enjoy!

The Results:

Now it looks delicious! 


There was good reason to be excited for a dish like this - it was fantastic. The flavor, while not quite like a cheeseburger, was still very, very good. The technique of mirepoix allowed for the base of the stew to have great onion and garlic infused flavor, which really came out in every bite. The nice blending of potatoes and beef set the 'tone' of the dish and the sharp cheddar cheese finished each bite off nicely. In short - this is one dish you're going to want to try!

That's all we have for you this week. With my work schedule in disarray - we only have time to blog two recipes worth this week. We'll be back on Monday with our 'Around The Culinary World' feature and with two or three delicious dishes to share. Have a great weekend everyone (remember, only two shopping weekends left before Christmas - the malls are going to be crazy!). Until Monday,

~Cheers

Tuesday, December 7, 2010

Tagala-what??

Good evening everyone! It's hard to believe that it's December 7th already isn't it? It seems like this year has just flown by and now December is shaping up to cruise on past too! It was almost a month ago already that we saw Curtis Stone give his cooking demonstration at the Iowa Food & Wine Expo. Since that time, Maggie has been patiently waiting to try her hand at cooking the dish we saw Curtis make in person. Tonight, the wait is over -

The Recipe:  Tagliatelle with Crab, Cherry Tomatoes, Garlic, and Chili
Original Recipe Found In:  Food.com / As Seen By Curtis Stone

What You'll Need:

3/4 Cup Light Olive Oil
4 Garlic Cloves (Crushed then chopped)
1/2 Red Chili Pepper
9 Ounces Cherry Tomatoes
1 Onion (Small)
10 Ounces Fresh Tagliatelle (Or Fettuccine Noodles)
9 Ounces Fresh Crab Meat
1 Tablespoon Flat Leaf Parsley (Chopped)
2 Teaspoons Lemon Juice

Good evening everyone!  Tonight, we're doing another recipe inspired by the Food and Wine Expo.  You got a little sample of this dish a couple of weeks ago when Tyler posted a video of Curtis Stone making this dish.  My version is slightly different, but all the same principals apply.  Oh, and did I mention neither of us have had crab before?  This will definitely be an experience tonight!  Let's begin:


Pour the olive oil into a deep, heavy frying pan and heat until shimmering.  Add the garlic, chili, and onion.  Allow the garlic and chili to infuse for three minutes then remove and discard the chili.  If you don't want your dish to be super hot from the chili, add a dash of red pepper flakes or red pepper seasoning in place of the chili.  Add the tomatoes and simmer for 10 minutes, until they begin to soften and the oil takes on a golden orange hue.  


Meanwhile, bring a large pot of salted water to a boil.  Add the tagliatelle and cook for three minutes and return to saucepan. Remember, since the noodles are fresh, the cooking time is greatly reduced. Mix the crab with the tomato mixture over a medium heat and cook briefly, stirring gently, until just warmed through. Since most packaged crab is already cooked (via flash steaming) all you really have to do is heat the crab. Season with salt and pepper - and a splash of white wine, just  enough for seasoning.


Add the sauce to the tagliatelle and stir off the heat for one to two minutes.  Season with salt and pepper, add a squeeze of lemon juice and a little of the parsley and serve immediately, topping each portion with a further sprinkling of parsley.  Enjoy!


The End Result:


As Maggie mentioned, neither of us had tried crab in our lifetime. I have tried other forms of shellfish and found myself to be indifferent to them. Don't hate them, don't love them. That's sort of where tonight's dish falls. Didn't hate it, didn't love it. If you are a big fan of crab or seafood in general, you're going to love this dish. The crab's flavor infuses with the garlic, onion and tomatoes to create a very flavorful (and aromatic) dish.

If you're like us, however, and are not all that fond of crab - you're simply going to enjoy the dish (As I put it - "It's good, but I wouldn't order it off a menu") After all, crab is the dominant flavor in the dish and if all you can muster when someone says crab is 'meh' then you're probably not the target audience for this particular recipes. Sometimes you win, sometimes you make a great dish that your audience doesn't exactly have taste buds for. Tonight, Maggie hit on the latter.

That's all we have for you this evening. I will be taking to the kitchen tomorrow evening with a dish that I'm very eager to try. It should be interesting (as always right?) so be sure to stop by tomorrow night to see what I've got cooking. Until next time,

~Cheers