I'm always intrigued with the term "one pot wonder", because, more often than not, these recipes involve more than one pot. The following recipe falls under that category. While it doesn't deter the flavor of the dish, the allure of one pot is quickly fallen short.
The Recipe: Ground Beef & Pasta Casserole
Original Recipe Found In: Cooking Light, March 2016 Issue
What You'll Need:
2 small White Onions, peeled and quartered
2 large Carrots, peeled and cut into 3-inch pieces
1 Tablespoon Olive Oil
4 Garlic cloves, minced
1 Tablespoon dried Italian Seasoning
1/2 Teaspoon crushed Red Pepper
1/2 Teaspoon Salt, divided
1 Pound extra-lean ground Sirloin
3 1/2 Cups unsalted Chicken Stock
6 Tablespoons sliced fresh Basil, divided
2 Tablespoons unsalted Tomato Paste
1 Tablespoon Red Wine Vinegar
12 Ounces uncooked Whole-Wheat Rigatoni
1 (26.46 Ounce) carton Strained Tomatoes
4 Ounces fresh Mozzarella cheese, cut into 1/8-inch thick slices
1 Ounce Parmigiano-Reggiano cheese, grated
To start, place the onions in a food processor; pulse until finely chopped. Add carrots; pulse until finely chopped.
Meanwhile, preheat an oven to 350 degrees. Heat a large high-sided saute pan (or Dutch oven) over medium heat. Add the oil to the pan and swirl to coat. Add the onion mixture and cook for four minutes. Add the garlic, cook for two minutes. Add the Italian seasoning, red pepper, and 1/4 teaspoon salt. Add the beef and cook for five minutes. Add the chicken stock, four tablespoons basil, tomato paste, vinegar, pasta, and tomatoes. Bring the mixture to a boil and cook for 13 minutes, or until the pasta is almost done, stirring frequently. Add the remaining 1/4 teaspoon salt.
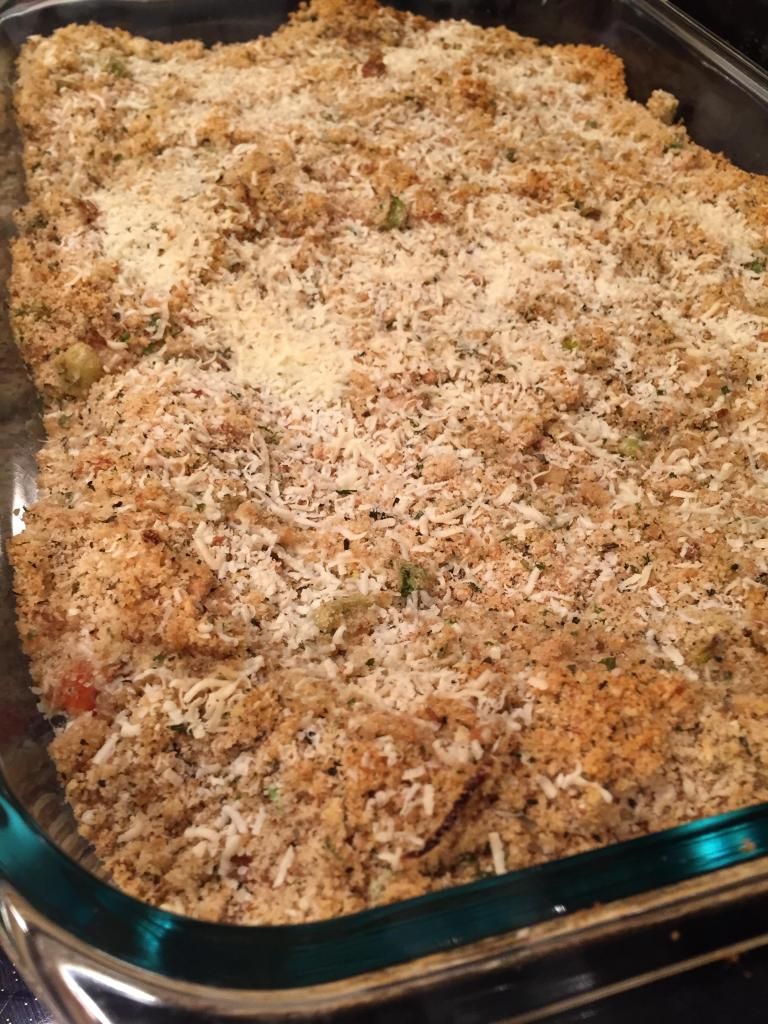
Next, arrange the mozzarella over the pasta mixture, along with the Parmigiana-Reggiano. Place the pan in the oven and bake at 350 degrees for 15 minutes or until the pasta is done. Sprinkle with the remaining two tablespoons basil. Serve and enjoy!
The End Result:
A super saucy mixture, added with pasta and ground beef, makes for a delightful, not so Italian dish. The fresh cheeses and basil adds brightness, not to mention a stringy mess! But, nevertheless, a hearty "one pot" pasta dish that will satisfy any pasta need.
Keep seeking culinary adventures, friends, you'll never know where you will be surprised. Until the next update,
~Cheers~
Thursday, April 28, 2016
Wednesday, April 13, 2016
Pica-what??
Good evening everyone! The mind and pallet of a foodie always wants to try new flavors and dishes. As a self-proclaimed foodie, I'm always gamete find new tastes and to see what appeals to me; life is too short to be picky. If I don't like a dish, I learn from it. Knowing I don't like it, I won't try it again. I'm not apt to do this is restaurants, but I am willing to try it at home. The following recipe is one of those dishes. Not that I didn't completely hate it, but it was a new style of food that I was ready to explore.
The Recipe: Mexican-Style Picadillo
Original Recipe Found In: America's Test Kitchen: The Best Mexican Recipes
What You'll Need:
1 White Onion, cut into 1-inch pieces
1 Red Bell Pepper, stemmed, seeded, and cut into 1-inch pieces
6 Ounces Red Potatoes, unpeeled, cut into 1-inch piece
2 Carrots, peeled and cut into 1-inch pieces
1 1/2 Pounds Tomatoes, cored and quartered
3 Corn Tortillas, torn into 1-inch pieces
1 Jalapeno, stemmed, halved, and seeded
1 Tablespoon Vegetable Oil
1 1/2 Tablespoons Chili Powder
3 Garlic Cloves
1 Pound 85% lean Ground Beef
1/4 Cup fresh Cilantro, chopped
To start, pour the onion and bell pepper into a food processor and pulse until broken down into rough, 1/4-inch pieces, about 12 pulses. If the ingredients become too stuck to the sides of the processor, scrap down with a spatula. Transfer this mixture to a large mixing bowl. Next, add the potatoes and carrots to the empty food processor and pulse down the same way as the onion and bell pepper. Transfer this mixture into another mixing bowl. Add the tomatoes, corn tortillas, jalapeƱo, and 1 1/2 teaspoon salt into the now empty food processor and pulse until smooth, about one minute.
Heat a large non-stick skillet over medium heat and add the oil until it shimmers. Add the onion mixture and cook until softened, about five minutes. Add the chili powder and garlic and cook until the garlic becomes fragrant, about 30 seconds. Stir in the ground beef and cook, breaking up the meat with a spatula. Cook until the meat is no longer pink, about five to ten minutes.
Stir in the potato mixture and the tomato mixture and bring the entire skillet to a simmer. Cover with a lid and reduce the heat to low. Simmer gently for 30 minutes or until the potatoes and carrots are tender. Stir in cilantro and season with salt and pepper. Serve and enjoy!
The End Result:
With all the ingredients that were put together to concoct this recipe, I somewhat expected a flavor fest. Instead, my tongue left unimpressed. Judging by the quantity of how much this recipe produced (I filled up one 7 cup and one 4 cup container,) any sort of flavor didn't disperse evenly. The spices could have been almost doubled, because any flavor that might have been in the recipe might have gotten lost. While I was impressed with the different ingredients and mixing them into a flavor slurry, I wasn't impressed with the lack of flavor and that could have swayed this recipe in a totally different direction.
Watch for updates on the social media fronts as when the next edition of culinary exploration will be posted. Until then,
~Cheers~
Wednesday, March 30, 2016
Brewery Review: Madhouse Brewery
Good evening!
I am delighted I live in a state that supports local business, that also happens to be local breweries. There are plenty to choose from in the central Iowa region. One we recently visited is Madhouse Brewery, on the southern end of the East Village in Des Moines.
When you walk in, the first thing that hits you is how industrial the space looks; I believe this was done on purpose. Also, make sure to come at a less popular time (like 2:00 PM on a Saturday,) because there is only seating for maybe 30 folks? But enough about the space, more about the brew!
Madhouse proudly presents their five "flagship beers" flight on a treated wood board, that is in the shape of Iowa. If you are lucky, one of the brewmasters will describe each beer and talks to you about the process of how each is made. If one of them aren't available, a handy dandy cheat sheet will do just the same.
Their first on the flagship flight is a Honey Pilsner, which is very light on the pallet and good for anyone who favors lighter beers. This one is personally my favorite and I love the sweet notes it leaves when you are done drinking it.
The second is a Pastime Ale, which is a little bit stronger than the pilsner and more hearty. If you are a fan of any kind of ale beers, this might suit your pallet.
The third on the flight is the Hopburst IPA. Some of you steer clear of the IPA's because of the strong hoppy-ness they tend to have. Not this one - the hops are toned down and don't kick you in the face. If you want an IPA to change your mind about typical IPA's, this one will do the trick.
The fourth is the Oak-Aged Imperial Red. This one has been Tyler's favorite red beer for quite some time. For a bolder taste, without going completely to the dark beer spectrum, I'd recommend this. Not as hoppy, but a smooth texture goes down easy.
The fifth and final on the flight is a Sumatra Coffee Stout. Really dark beers aren't my thing, and this one would qualify as a really dark beer. One sip and it further proved my point that I am not a fan. But, if you enjoy this style, you will really appreciate the smoothness and bold flavor.
After our flight, we got a tour of the brewery and upcoming brews. I always find it interesting when a brewmaster takes the time to educate regular folk about their beers.
If you are looking for a quiet, well rounded brewery, I would recommend Madhouse Brewery in Des Moines. You will not be disappointed!
As we visit more breweries, I hope to enlighten you all on our craft beer journey. And if it's not your thing, it ain't no thing! Until next time,
~Cheers~
Wednesday, March 23, 2016
Got an Afternoon? Good, Because You're Going to Need It
Greetings one and all! I thought I was going to post last week, but a late winter/early spring cold/sinus infection hit me pretty hard, and thus no recipe. But never fear! I'm finally starting to feel like myself and ready to take on the kitchen again.
The following recipe I'll be sharing with you is not for the faint of heart. Not because of the ingredient list, but because there is quite a bit of preparedness you will need. You might be thinking I'm joking when I say you'll need an afternoon to cook this recipe, but I'm not. But once it's finally finished, you will be blown away at one of the most flavorful Mexican recipes you'll come across.
The Recipe: Beef Enchiladas
Original Recipe Found In: America's Test Kitchen, The Best Mexican Recipes
What You'll Need:
2 Pounds boneless Beef Chuck-Eye Roast, trimmed and cut into 1 1/2-inch cubes
3 Tablespoons Vegetable Oil
2 White Onions, chopped fine
3 Tablespoons Chili Powder
2 Teaspoons ground Cumin
2 Teaspoons ground Coriander
1/4 Teaspoon Cayenne Pepper
4 Garlic cloves, minced
2 (15 Ounce) cans Tomato Sauce
1/4 Cup Red Wine
8 Ounces Cheddar Cheese, shredded
12 (6-inch) Corn Tortillas
To begin this recipe, adjust the rack found in an oven to the lower-middle positions and heat oven to 300 degrees. Pat the beef dry with paper towels and season with salt and pepper. Heat one tablespoon of oil in a Dutch oven over medium-high heat, until the oil just begins to smoke. Brown half of the beef well on all sides, about seven to ten minutes and transfer to a bowl. Lightly tent the bowl with aluminum foil, to keep the beef warm. Add the remaining beef to the Dutch oven and brown on all sides.
Once the beef is cooked, pour off all but one tablespoon of fat from the pot. Add the onions and 1/2 teaspoon salt. Cook the onions over medium heat until they are softened, about eight minutes. Stir in the chili powder, cumin, coriander, cayenne pepper, 1/4 teaspoon pepper, and cook until fragrant, about 30 seconds. Stir in the tomato sauce, wine, and browned beef and any accumulated juices and bring to a simmer. Once this has reached simmering, cover with a lid, transfer to the oven, and cook until the meat is fork-tender, 2 to 2.5 hours.
Once cooked, transfer the beef to a large bowl and let cool slightly. Shred the beef into bite-size pieces using two forks. Put the bowl in the refrigerator and chill for 20 minutes. Strain the remaining sauce through a fine-mesh strainer, discarding any solids. Once the beef has chilled, combine one cup of cheddar cheese, and 1/4 cup of the reserved sauce.
Once again, adjust the rack in the oven to the middle position and increase the oven temperature to 450 degrees. In a 13 by 9 baking dish, spread 3/4 cup of the sauce over the bottom. Prepare the tortillas to cook, by brushing both sides with the remaining two tablespoons of oil. Stack the tortillas, cover with a damp dish towel, and place on a plate. Microwave until the tortillas have become warm and pliable, about one minute.
Working with one warm tortilla at time, spread 1/3 cup beef filling across the center of the tortilla. Roll it tightly around the filling and place seam side down in the baking dish. Repeat with the remaining tortillas and beef mixture. Arrange the enchiladas in two columns across the width of the dish.
Pour the remaining sauce over top of the enchiladas to cover completely and sprinkle the remaining one cup cheddar cheese over the sauce. Cover the baking dish tightly with a greased aluminum foil sheet. Place in the oven and bake until the enchiladas are heated through and the cheese has melted, about 15 to 20 minutes. Remove from the oven and let the dish cool for five minutes. Serve the enchiladas individually and enjoy!
The End Result:
If you are a fan of Mexican food, this is the recipe for you! The beef slow cooked in spices became incredibly flavorful and not at all spicy. Each enchilada is a pop of smoky goodness, with a touch of cheese that pulls it all together. My mouth just waters thinking about these enchiladas. Sure it's quite a bit of work to achieve this recipe, but the work is well worth it. You'll almost feel a sense of accomplishment just completing this recipe; a labor of love, if you will. I've always been impressed with America's Test Kitchen and they have proved it yet again with this amazing Mexican dish!
The next food post you will be notified about, will be posted on Facebook or be tweeted via Twitter. Keep on the food journey, my friends! Until then,
~Cheers~
Wednesday, March 9, 2016
I'll Take Bowl over Pan Any Day of the Week
Good evening! Typically, before I even start to cook, I like to review the ingredient list and /or the cooking methods. Call it being prepared, but I like to give it a good study before the recipe is created. When I found this recipe, I did a double take at he ingredient list: 8 to 10 cups for broth?? 'No way can that be right', I told myself. That is an obscene amount of broth, especially for a soup.
As I review this recipe with Tyler, he told me 'You might want to condense the amount of broth. Unless you are preparing to feed the masses, you won't need that amount of broth;. As you'll see, packing all those ingredients into a humble Dutch oven, got quite a bit cramped.
The Recipe: Lasagna Soup
Original Recipe found from www.pinterest.com
What You'll Need:
1 Pound lean Ground Beef
1 Yellow Onion, diced
4-5 Garlic cloves, minced
1/4 to 1/2 Teaspoon Red Pepper Flakes
1 (24 ounce) jar Prego Traditional Italian Sauce
8-10 Cups Lower-Sodium Chicken Broth, divided
1 (14 Ounce) can crushed Tomatoes
2 Tablespoons Tomato Paste
2 Teaspoons Balsamic Vinegar
1 1/2 Teaspoons Sugar
1 Tablespoon dried Basil
1 Teaspoon dried Parsley
1 Teaspoon dried Oregano
1 whole Bay Leaf
1 Teaspoon Salt
1/2 Teaspoon Pepper
10 Uncooked Lasagna Noodles, broken into 1/2 in pieces
For the cheese garnish, any desired amount of shredded Mozzarella Cheese & finely grated Parmesan Cheese.
To start, heat a large Dutch oven over medium high heat. Add ground beef and onion. Cook until the beef has browned, about 10 minutes, stirring occasionally. Add the garlic and red pepper flakes and saute for 30 seconds, until the garlic has become fragrant. Pour the beef/onion mixture into a colander and rinse to drain any excess fat.
Next, add the Prego sauce, 6 cups chicken broth, crushed tomatoes, tomato paste, balsamic vinegar, sugar, basil, parsley, oregano, bay leaf, and lasagna noodles. Stir and bring the Dutch oven to a boil. Reduce the heat to a simmer, cooking until the noodles have become tender, about 20-30 minutes, stirring occasionally.
Uncover the lid after cooking and remove the bay leaf. If the soup is plenty liquid-y for you, do not add the remaining 2-4 cups of chicken broth. Ladle each serving of soup into soup bowls and top with desired amount of cheese. Serve and enjoy!
The End Result:
I'm glad I listened to Tyler, because I ended up using about six cups of broth and the soup turned out beautifully. Cutting the broth down actually turned out to be a more cohesive soup. The flavors were sharper, yet it was nice to actually have that flavor within the soup, instead of it being watered down. The lasagna noodles were a bit large and made it difficult to eat. But having the convenience of lasagna dish in a soup bowl was worth it and a recipe I'm willing to try again.
Keep checking Facebook or Twitter for the next featured segment of Out of the Culinary. Until then,
~Cheers~
Wednesday, March 2, 2016
That's Some Gosh Darn Good Soup, Don'tcha Know?
Welcome all! A bit of a history lesson: Tyler and I grew up in the same hometown about 15 minutes south of the Minnesota border. When you're that close to a state, you tend to pick up some of the dialect, cuisine traditions, and more. While I realize the title of today's blog is not from Minnesota (a Fargo, North Dakota phrase,) many of those who aren't from Minnesota generalize and say it with some sort of north woods dialect.
But that's beside the point of tonight's recipe Many culinary exploits have traveled south of this great state: tater-tot hot dish, lutefisk, and jello salads. One dish that has its roots firmly in Minnesota needs to find its way into every home and it will delightfully warm up any soul.
The Recipe: Minnesota Wild Rice Soup
Original Recipe Found In: Cooking Light's Lighten Up, America!
What You'll Need:
2 Leeks
1 Tablespoon Unsalted Butter
2 Celery Stalks, finely chopped
10 Ounces Button or Cremini Mushrooms, sliced
7 Cups fat-free, lower-sodium Chicken Broth, divided
3/4 Cup uncooked Wild Rice
1 Teaspoon Kosher Salt
1/2 Teaspoon dried Thyme
1/2 Teaspoon freshly ground Black Pepper
2.25 Ounces All-Purpose Flour (about 1/2 cup)
2 Cups Chicken Breast, cooked and chopped
1 Cup Half and Half
3 Tablespoons dry White Wine
1 Tablespoon Dijon Mustard
To start, prepare the leeks: remove roots, outer leaves, and tops of leeks. Cut the leeks in half, lengthwise, then cut into 1/4 slices. Place the chopped leeks in a colander and rinse thoroughly with cold water. Drain thoroughly.
Meanwhile, in a large Dutch oven, melt the butter over medium heat. Once the butter has melted, add the leeks, celery, and mushrooms. Saute this mixture for 10 minutes, or until all the ingredients are tender. Pour in six cups of the broth. Next, add the wild rice, salt, thyme, and pepper, Bring the ingredients to a boil, then cover the Dutch oven, reduce the heat to a simmer, and cook for 45 to 55 minutes, or until the rice has "popped".
During the last 10 minutes of cooking the soup, measure out the flour and pour into a dry measuring cup. In a small bowl, combine the flour and one cup of broth. Using a whisk, stir until the mixture becomes smooth. Add the broth mixture to the soup and cook over medium heat for two minutes, or until the soup has thickened.
Bring the heat back to low and add the chicken, half and half, wine, and mustard. Cook the final soup mixture for two minutes or just until thoroughly heat (but do not boil.) Ladle into soup bowls and enjoy!
The End Result:
Well, I wish I could show you the end result, but this soup was so darn tasty, we gobbled it all up! So, here's a stock photo of Minnesota Wild Rice Soup (and it actually looked pretty similar to it:)
The broth was incredible creamy, thanks to the flour/broth slurry and half and half additions. To house wild rice, chicken, and mushrooms, you need a creamy, thick vessel, so definitely take the time to thicken the broth up when you can, because it'll turn out to be a runny mess. For all the years I lived near Minnesota, I've never had wild rice nor wild rice soup. But I can definitely tell you that this soup will be passed down and become a tradition.
That's all I have for you today. Thanks for taking the time to join in on our culinary fun. Stay tuned for further food exploits. Until then,
~Cheers~
Tuesday, March 1, 2016
We're Baaaaaaaack!
Welcome back, foodies and friends alike! After almost a year, Out of the Culinary has made its valiant return!
Quite a lot has happened over the last year: Tyler worked really hard to receive an accreditation for his job (currently, working on a second one) and I (Maggie) have changed jobs to shift more towards my career goal. With all this, life became more busy. We also celebrated our five year wedding anniversary, which (six months later) is still hard to believe that we've been married that long. Trust me, it was strange not celebrating that huge milestone will all of you, our followers, but you weren't far from our hearts!
But we didn't go too far; we're still here: loving life, celebrating the journey, and enjoying whatever food that life presents itself with. After all, that is one of our passions in life: food. And while the busyness of life tends to get in the way, we always take the time to enjoy ourselves by savoring the moment.
With that being said, the blog will be changing slightly. As you'll notice, it looks a little different since the last time you saw it. An updated picture: our engagement picture, which was taken almost six years ago, is a relatively new one of us. And the blog's voice has changed. Yes, the blog has shifted more towards my cooking capabilities and perspectives.
While the concept behind the blog is still relatively the same, a more predominant, but different view will be presented...that's all! I don't plan on having a set schedule of the recipes I post, but I do plan on posting updates on Facebook and Twitter when updates happen. I hope to be more interactive on those media fronts also. I guess it's a hodge lodge of all sorts of things, but it boils down to one thing: the love of food and cooking.
We've got some great things in the hopper just waiting for you. There's a whole slew of recipes, lined up that I can't wait to share with you. Plus reviews of restaurants and breweries will be adding to the fun.
Before I go, I can't forget to mention our loyal readers. Without your support of the blog throughout these years, we don't know where it might have ended up. You will never know how much that means to us! We appreciate all love we have received and can't wait to share in this new path in the journey.
As I mentioned before, stay tuned on Facebook and Twitter to see when the next update will be showcased. Until then,
~Cheers~
Friday, December 11, 2015
We're Still Here!
Hello everyone! It's been... a while. See, we hit a spell this spring where things just got too hectic and something had to give - and that something was the day in and day out of managing the blog. We were still cooking, just not posting things here.
Our hiatus will end soon, however. We're planning on coming back in the New Year with a different format and more new recipes. Keep your eyes on our page as the calendar turns to 2016 - we'll be back at it!
Wednesday, March 25, 2015
Perfect Pilaf
Good evening everyone! The premise behind Chef Zakarian's latest book is that to create a delicious meal is lurking just inside your pantry. He lists 50 readily available ingredients and creates a multitude of recipes from these. One of these ingredients is long-grain brown rice. While most of us serve it as an afterthought, Chef Zakarian uses it to create a filling, yet delicious meal, with some vegetable goodness.
The Recipe: Brown Rice Pilaf
Original Recipe Found In: Geoffrey Zakarian's My Perfect Pantry
What You'll Need:
1/4 Cup Extra-Virgin Olive Oil
1 Cup finely chopped Bell Pepper (green or red will do just fine)
1 Cup finely chopped Carrot
1 Cup finely chopped Onion
2 Garlic cloves, finely chopped
2 Teaspoons chopped fresh Oregano
2 Teaspoons chopped fresh Thyme
1 Cup long-grain Brown Rice
2 1/2 Cups Chicken Stock
2 dried Bay Leaves
1 Cup chopped Scallions (white and green parts)
2 Tablespoons unsalted Butter, cut into pieces
To start, place the oil in a medium-sized Dutch oven and heat over medium heat. When the oil is hot, add the bell pepper, carrot and onion. Cook these vegetables until they begin to soften, about seven to eight minutes. Add the garlic, oregano, and thyme and cook until the fragrances release themselves, about one minute.
Next, add the rice and stir to coat with the ingredients in the Dutch oven, insuring the rice begins to toast in the oil, about two minutes. Add the chicken stock and bay leaves and bring to a boil. Once at a boil, bring the heat to a bare simmer, cover the Dutch oven, and cook until the rice is just tender, and still a little chewy, about 45 minutes. Remove the pot from the heat and let sit, covered, for about ten minutes.
Uncover the pot and fluff the rice with a fork. Add the scallions and the butter, stir to combine to melt the butter. Once the butter is melted, remove the bay leaves and season with salt and pepper. Serve and enjoy!
The End Result:
While it's hard to ignore all the beautiful colors in this dish, the rice remains the star. Perfectly seasoned in chicken stock, it almost melts on your tongue with each bite. But all the ingredients have taken on that stock flavor and have harmonized together. While this dish might not be a week-night favorite (since it does take over an hour to cook,) it's something delicious to try using the resources that might be in your pantry!
Wednesday, March 18, 2015
Bountiful (Meat-Free) Burritos
In the endless pursuit that is my obsession with Mexican food, I found this little gem. While it may not be an overly complicated recipe and packed to the gills with meat, its simplicity won me over and what a delicious delight this dish turned out to be!
The Recipe: Cheesy Baked Bean and Rice Burritos
Original Recipe Adapted from a Recipe Found On: www.pinterest.com
What You'll Need:
1 (16 Ounce) can of Refried Beans
2 Tablespoons of jarred Salsa (your favorite will suffice)
1 Teaspoon packaged Taco Seasoning Mix
1 (10 count) package medium soft, taco-sized flour Tortillas
1 Cup prepared Mexican Rice
1 Cup shredded Sharp Cheddar Cheese
1 Cup shredded Monterey Jack Cheese
To start, preheat an oven to 400 degrees and prepare a baking sheet by covering it with foil and top with non-stick cooking spray. In a small mixing bowl, add the refried beans, taco seasoning, and salsa and thoroughly mix. Set the bowl aside.
Warm the entire stack of tortillas in the microwave for 20 seconds, just to slightly warm them. Place a tortilla on a cutting board and place a couple of tablespoons of the refried bean mixture in the center of the tortilla. Next, layer a couple of tablespoons of the rice and finally top with some cheddar and Monterey Jack cheeses. Fold in both sides and then roll the tortilla up. Place seam side down on the prepared baking sheet. Continue the process with the remaining tortillas. Coat the tops of the burrito with additional cooking spray.
Once all the burritos have been prepared, bake at 400 degrees for ten minutes. Remove the baking sheet from the oven and using tongs, very carefully flip each burrito over to brown the other side. Return the baking sheet to the oven for an additional five to ten minutes or until each sides has browned slightly. Serve and enjoy!
The End Result:
If you are looking for a quick, simple, meatless Mexican dish to whip up, this recipe is for you! Sometimes, it's nice to go au natural when creating a timeless dish. This dish, packed with cheesy, protein-rich goodness is delightful, and never heavy. If you want to serve with addition salsa or sour cream, be my guest. But this one is best left alone and you will be rewarded!
The Recipe: Cheesy Baked Bean and Rice Burritos
Original Recipe Adapted from a Recipe Found On: www.pinterest.com
What You'll Need:
1 (16 Ounce) can of Refried Beans
2 Tablespoons of jarred Salsa (your favorite will suffice)
1 Teaspoon packaged Taco Seasoning Mix
1 (10 count) package medium soft, taco-sized flour Tortillas
1 Cup prepared Mexican Rice
1 Cup shredded Sharp Cheddar Cheese
1 Cup shredded Monterey Jack Cheese
To start, preheat an oven to 400 degrees and prepare a baking sheet by covering it with foil and top with non-stick cooking spray. In a small mixing bowl, add the refried beans, taco seasoning, and salsa and thoroughly mix. Set the bowl aside.
Warm the entire stack of tortillas in the microwave for 20 seconds, just to slightly warm them. Place a tortilla on a cutting board and place a couple of tablespoons of the refried bean mixture in the center of the tortilla. Next, layer a couple of tablespoons of the rice and finally top with some cheddar and Monterey Jack cheeses. Fold in both sides and then roll the tortilla up. Place seam side down on the prepared baking sheet. Continue the process with the remaining tortillas. Coat the tops of the burrito with additional cooking spray.
Once all the burritos have been prepared, bake at 400 degrees for ten minutes. Remove the baking sheet from the oven and using tongs, very carefully flip each burrito over to brown the other side. Return the baking sheet to the oven for an additional five to ten minutes or until each sides has browned slightly. Serve and enjoy!
The End Result:
![]() |
| I realize refried beans aren't the best to photograph after I took this picture! |
Sunday, March 15, 2015
Perfect Pulled Pork
Hello again everyone! Spring appears to have finally arrived in the midwest, as the past week has seen temperatures in the 50's, 60's and even 70's. As to be expected, the warm weather has brought the grills from the garage back to the patio - we've already fired ours up as well!
Yes, warm weather means grilling and BBQ, but the downside with these early spring days is that the temperature isn't consistently warm. So, what are you to do when you want great BBQ flavor but the outdoor temps aren't cooperating? Turn to the slow cooker, of course!
The Recipe: Barbecue Pulled Pork
Original Recipe Found in: Food Network Magazine (January / February 2015 Issue)
What You'll Need:
1/4 Cup Dark Brown Sugar
1 Tablespoon Chili Powder
2 Teaspoons Ground Cumin
1 Teaspoon Ground Mustard
1/2 Teaspoon Ground Allspice
1/2 Teaspoon Cayenne Pepper
4 Pounds Boneless Pork Shoulder (Excess fat trimmed)
1 Tablespoon Vegetable Oil
1 Onion (Chopped)
4 Cloves Garlic (Chopped)
1 Tablespoon Tomato Paste
2 Cups Low Sodium Chicken Broth
1/2 Cup Ketchup
1/4 Apple Cider Vinegar
In a medium bowl, combine the brown sugar, chili powder, cumin, ground mustard, allspice, cayenne pepper, and a pinch of salt and pepper. Once combined, rub this spice mixture all over the pork shoulder, making sure to get the spices into every crevice of the meat. Once completely covered, tightly wrap the shoulder in plastic wrap and store it in the refrigerator for 1 to 4 hours (the longer the better - feel free to leave it for up to 8 hours, if you can).
Next, set a large skillet over medium high heat and add the vegetable oil. Once the oil is shimmering, add the onion and garlic and cook until softened. Add a pinch of black pepper along with the tomato paste, chicken broth, ketchup and cider vinegar and a cup of water. Bring the mixture to a simmer and allow to thicken slightly.
Transfer the pork shoulder to a slow cooker, and cover with the BBQ sauce. Set the slow cooker to low and allow it slow roast for 5 to 7 hours. After the initial roast, use a part of tongs or forks (whatever you feel most comfortable with) to tear apart the pork. Serve on fresh buns with a pickle and enjoy!
Wednesday, March 11, 2015
Dessert for Breakfast? Yes, Please!
Need a brunch idea fast, but in not a lot of time? These pancakes will be sure to delight and will make you crave for some more!
The Recipe: Carrot Cake Pancakes
Original Recipe Found In: Cooking Light 350 Calorie Dishes
What You'll Need:
5.6 Ounces All-Purpose Flour (about 1 1/4 cups)
1/4 Cup chopped Walnuts
2 Teaspoons Baking Powder
1 Teaspoon ground Cinnamon
1/4 Teaspoon Salt
1/8 Teaspoon freshly ground Nutmeg
Dash of ground cloves
Dash of ground ginger
1/4 Cup Brown Sugar
3/4 Cup Low-Fat Buttermilk
1 Tablespoon Canola Oil
1 1/2 Teaspoons Vanilla Extract
2 Large Eggs, lightly beaten
2 Cups finely grated Carrot (about 1 pound)
To start, weigh or lightly spoon 5.6 ounces of flour into dry measuring cups and level with a knife. Combine the flour, walnuts, baking powder, cinnamon, salt, nutmeg, cloves, and ginger in a large mixing bowl. Stir these ingredients with a whisk until well combined. In a medium mixing bowl, add the brown sugar, buttermilk, oil, vanilla extract, and eggs. Thoroughly mix until all the ingredients have incorporated themselves. Slowly pour the sugar mixture into the flour mixture and stir until just moist. Fold in the carrot until it has incorporated itself into the batter.
Next, heat a large, nonstick skillet over medium heat. Coat the pan with cooking spray. Once the pan has heated, spoon a 1/4 cup portion of the batter into the skillet, leaving room for three more pancakes. Gently spread the batter, but don't overcrowd the pan. Cook each pancake for two minutes or until the tops have begun to bubble and the edges look colored. Very carefully turn the pancakes over and cook for another minute, or until lightly browned. Repeat this procedure with the remaining batter. Serve with butter and/or syrup or nothing at all and enjoy!
The End Result:
These little pancakes are the most decadent, moist pancakes you will ever meet! The carrots will make it taste like carrot cake, and if you are a fan of it (but not the amount of time it takes to make it,) you will love these pancakes! You will have to be very careful on latter batches of the pancakes, because they will cook very quickly, if you aren't watching. The original recipe called to serve with the honey and butter, but I stuck with good ol' maple syrup and it tasted delicious. You could serve it with a multitude of sweet toppings, or, like Tyler did, ate them by themselves and the delicious factor was still in place. Give these pancakes a try, you will NOT be disappointed!
Wednesday, February 25, 2015
Carrots...Who Knew?
Good evening everyone! Tonight, I introduce a new chef to our kitchen. No, we're not adding another writer to the blog. I'm talking about another influence to our cooking abilities. Chef Geoffrey Zakarian might not be a household name, but if you are a fan of Food Network (especially the show Chopped,) the name you'll immediately recognize. His old-school, traditional recipes definitely add a bit of style to the modern kitchen, but he has some true talent that cannot be overshadowed. Tonight, I'll be showcasing one of those dishes and it will not disappoint!
The Recipe: Roasted Carrots with Provencal Breadcrumb Crust
Original Recipe Found In: Geoffrey Zakarian's My Perfect Pantry
What You'll Need:
2 Pounds Baby Carrots with tops, trimmed to leave a small tip of green at the top
1/4 Cup Extra-Virgin Olive Oil
2 Cups unseasoned Bread Crumbs
2 small Shallots, finely chopped
1/2 Cup chopped fresh Basil
1/2 Cup chopped Scallions, white and green parts
2 Garlic cloves, finely chopped
1/4 Cup freshly grated Parmigiano-Reggiano cheese
To start, preheat an oven to 375 degrees. In a large pot, fill with water and bring to a boil over high heat. Add the carrots to the boiling water and cook until just tender, about four minutes. Drain the carrots in a colander and place in a ice bath. Bring the carrots out of the ice bath and onto paper towels to pat dry. In a large glass or ceramic baking dish, arrange the carrots in a single layer and drizzle with some olive oil. Season with salt and pepper.
Next, in a large mixing bowl, add the bread crumbs, shallots, basil, parsley, scallions, and garlic and throughly combine. Season with salt and pepper. Drizzle the mixture with olive oil and toss well with a fork to combine.
Sprinkle the bread crumb mixture over the carrots, so that that carrots are completely covered. Sprinkle the cheese and drizzle with a bit more olive oil. Place the baking dish in the oven and roast until the carrots are browned and the crumbs are crisp and golden, between 20 to 25 minutes. Serve and enjoy!
The End Result:
Even though this recipe could call itself a "side dish", there's no dish that could call itself the main course over these carrots! Once the carrots are nice and tender, the bread crumb topping just melts into the carrots. There's a host of flavors that have added themselves nicely to this dish and makes it quite delectable. While this does take a bit more time than my usual week night meals, it well definitely be worth it and you're eating healthy too!
Keep checking back for recipes that are sure to entice and get your mouth watering! Until then,
~Cheers!
Sunday, February 22, 2015
Chickpea & Spiced Pita Soup
Hello again everyone! While the calendar may be creeping toward spring, the reality is, winter still has a vicious hold upon most of the region. While that is bad news for most things (the air HURTS YOUR FACE! Why do we live in a region where the air hurts you face?!) it does mean that soup season is still very much in place - which is always a welcome thing.
So, let's take full advantage of soup season by cooking up a healthy, filling and most importantly - warm - soup.
The Recipe: Chickpea Soup With Spiced Pita Chips
Original Recipe From: Food Network Magazine - January 2015 Issue
What You'll Need:
1/4 Cup Extra-Virgin Olive Oil
2 Stalks Celery (Chopped)
2 Carrots (Chopped)
1 Large Onion (Chopped)
2 x 15 Ounce Can Chickpeas (Drained, rinsed)
1 x 15 Ounce Can Diced Fire Roasted Tomatoes with Green Chiles
1 Tablespoon Cumin
1 1/2 Teaspoons Ground Coriander
2 Pocketless Pitas (In a pinch, pita pockets work as well)
Juice of 1/2 a lemon
Preheat your oven to 325.
Heat 2 tablespoons of olive oil in a large dutch oven over medium high heat. Once the oil begins to shimmer, add the onion, celery and carrots along with a pinch of salt and pepper. Cook, stirring occasionally, until the veggies have softened.
Next, add 6 cups of water, the chickpeas, tomatoes, 2 teaspoons cumin, 1 teaspoon coriander and 1/2 teaspoon of salt. Cook, stirring occasionally until the mixture has thickened (this takes roughly 20 minutes). After 20 minutes, mash the chickpeas with the back of a large spoon - you don't have to mash them all or evenly completely mash them - just look to "break" them down a bit.
Meanwhile, slice your pita bread into wedges and toss them with the remaining 2 tablespoons of olive oil, 1 teaspoon of cumin, 1/2 teaspoon coriander and 1/2 teaspoon salt. Spread the wedges in a single layer on a rimmed baking sheet. Bake until the wedges are golden brown and crispy (roughly 8 to 10 minutes).
Just before serving, stir in the lemon juice and top with the pita chips. Enjoy!
The Results:
This recipe is a perfect example of a symbiotic culinary relationship. On its own, the soup is a bit bland, with lackluster texture - while on their own, the pita chips are a bit pungent and a little intense - together, however, the two make a beautifully balanced soup that finds great harmony in both flavor and texture. In short, this is a tasty soup that keeps the calorie count low. Just don't skip the pita chips - you'll be sorry!
Wednesday, February 18, 2015
Steak, Onion, and Pepper - A Classy Dinner Move
Good evening everyone! It's nice to add a bit of decadence to the standard evening meal. There are numerous options when this is the case. Nothing says it more than steak. While the meat itself is pretty bland, the possibilities of how you serve it and what you serve it with is what defines it. Tonight, I'll be creating a delicious steak, served with some veggie options that are out of the norm.
The Recipe: Strip Steak with Onions and Poblanos
Original Recipe Found In: Cooking Light, November 2014 Issue
What You'll Need:
2 (10 Ounce) New York Strip Steaks, trimmed
3/8 Teaspoon Smoked Paprika
1 1/2 Tablespoons Sesame Oil, divided
1 (12 Ounce) Yellow Onion, cut into 12 wedges
2 Poblano Peppers, seeded and cut into 1/2-inch strips
4 Lime Wedges
To start, heat a large, cast-iron skillet over medium-high heat. On a clean plate, position the steaks. Sprinkle the steaks evenly with the paprika, salt, and freshly ground black pepper. Add 1 1/2 teaspoons of oil to the pan and swirl to coat. Carefully place the steaks to the pan and cook for four minutes on each side, or until desired degree on doneness. Once cooked, remove the steaks from the pan on a cutting board, cover with aluminum foil, and let stand for ten minutes.
Meanwhile, add the remaining tablespoon of oil to the pan swirl to coat once more. Add the onion wedges and cook for two minutes on each side. Make room in the pan and add the poblanos. Saute the ingredients for four minutes, stirring occasionally. Remove the skillet from the heat, cover, and let stand for five minutes. Season with salt and pepper.
Prepare a clean platter and arrange the onion mixture on top. Remove the foil from the steak and cut the steak across the grain into thin slices. Arrange the steak over the onion mixture and sprinkle with salt. Serve with lime wedges and enjoy!
The End Results:
While the onions look a bit charred, trust me, it only adds more complexity to the dish. The steak is cooked perfectly, while resting it gives it more juice that would be lost if it was cut into right after cooking. The poblanos lost most of their heat while deseeding and cooking, which ended up being a a great pepper add in. The lime juice (we used bottled) spritzed on the meat and veggies added a bright note to the ingredients. Overall, a great, simple, and a hint of class dinner option that will leave you hungry for more.
That's all we have for you this week. Continue to check back with great options to try in your kitchen. Until then,
~Cheers!
Sunday, February 8, 2015
Brilliant Blueberry Cakes
Hello again everyone! We've all been told countless times, "Breakfast is the most important meal of the day" - doctors, dietitians and anyone associated with keeping you healthy and happy have long repeated that mantra. The issue that many folks have is typically twofold - first "lack of time" and secondly "lack of options". In short, we're all in a hurry in the morning and the options set out for express breakfast are either poor in quality or not filling enough to last you all morning.
So, what are we, the at home chef, to do?
In short, address the week ahead on the weekend. Yes, with a bit of time investment on Sunday afternoon, you can prepare a week's worth of delicious breakfast treats that are not only satisfyingly tasty - they're also nutritious and filling. Sounds pretty good right? Then let's get cooking!
The Recipe: Blueberry-Oatmeal Cakes
Original Recipe From: Eatingwell.com
What You'll Need:
2 1/2 Cups Old Fashion Rolled Oats
1 1/2 Cups Low Fat Milk
1 Large Egg (Beaten)
1/3 Cup Pure Maple Syrup
2 Tablespoons Canola Oil
1 Teaspoon Vanilla Extract
1 Teaspoon Ground Cinnamon
1 Teaspoon Baking Powder
1/4 Teaspoon Salt
3/4 Cup Blueberries (Fresh or frozen)
Combine the oats and milk in a large bowl. Cover and place in the refrigerator for 8 to 12 hours.
After the initial soak, set your oven to 375 degrees and coat a 12 cup non-stick muffin tin with non-stick spray (yes, you'll need non-stick spray for non-stick pan - experience has shown that non-stick pans are not exactly non-stick...avoid a mess, use some spray!)
Next, stir in the egg, maple syrup, vanilla, cinnamon, baking powder and salt into the soaked oats. Mix until well combined. Portion the mixture into 1/4 cup increments, into each muffin cup. Top each cup with 1 to 2 tablespoons of blueberries and pop the muffins into the oven for 25 to 30 minutes, or until the muffins are springy to the touch.
Allow the muffins to cool for 10 to 15 minutes before eating. Best of all, these muffins can be stored in the refrigerator (tightly wrapped) for a week or frozen for 3 months.
Yes, these muffins can be frozen, which makes this recipe ideal for "make ahead" planning. You see, you can cook up a big batch of these muffins - pop the extras in the freezer and then simply microwave them for 30 seconds to 1 minute come weekday morning and - ta da! One delicious, filling and healthy breakfast.
The best part is, these little morsels are quite tasty (especially if you're a fan of blueberries!)
Wednesday, February 4, 2015
Stuffed with Spaghetti Squash?
Good evening everyone! It is no secret that I love Mexican food. I'm quite keen to the burritos and enchiladas of the world. But most Mexican dishes are pretty calorie ridden and it's tough to find recipes that keep the flavor and loose the bulk. Tonight, I'm sharing a pretty tasty Mexican recipe that won't break the calorie bank and will definitely be a fan favorite at your house.
The Recipe: Chicken Enchilada Stuffed Spaghetti Squash
Original Recipe Adapted From: www.pinterest.com
What You'll Need:
1 Large Spaghetti Squash, cut in half and seeded
1 Tablespoon Oil
1/2 Pound Boneless, Skinless Chicken Breast, cooked and shredded
2 Cups Enchilada Sauce
1/2 Cup Black Beans
1/2 Cup Corn
1/4 Cup Cilantro, torn (optional)
1/2 Cup shredded Sharp Cheddar Cheese
1/2 Cup shredded Monterey Jack Cheese
To start, prepare the spaghetti squash. Preheat an oven to 400 degrees. Brush in the inner flesh of the spaghetti squash with the oil and season with salt and pepper. Place the squash on a heavy baking sheet, skin side up, and cook until tender, about 30 minutes.
While the squash is cooking, prepare the "inner" ingredients. In a medium mixing bowl, combine the chicken, enchilada sauce, beans, corn, and cilantro and mix well. Once the squash has cooled enough to touch, divide the mixture between the two halves. Top the squash and ingredients with equal amounts of cheese.
Place the squash back in the oven and cook until the cheese has began to melt and turn a light golden brown, about three to five minutes. Place the cooked squash on clean plates, serve, and enjoy!
The End Result:
Using a spaghetti squash makes this a much healthier alternative to the traditional Mexican fare. The portions are smaller, but yet in equal parts, so it's a good way to eat sensibly. Also, when you mix all the ingredients (the chicken portion with the spaghetti squash flesh,) it tastes incredible! I'm a big fan of spaghetti squash already and this is a great recipe to incorporate a healthy take into a favorite type food!
That's all we have for you tonight. Keep checking back for more delicious ideas to bring into your kitchen. Until then,
~Cheers!
Wednesday, January 28, 2015
Lickety-Fast, Finger Licking Pasta
Good evening everyone! At some point, every family (or couple) needs a dinner that meets three criteria: lightning fast to prepare, appealing to every pallet, and not too complicated ingredients. If it's healthy for you too, that's an added bonus. Tonight, I'm creating a dish that meets all FOUR of those cooking criteria and produces some delicious results.
The Recipe: Two-Cheese Penne with Chicken and Spinach
Original Recipe Found In: Cooking Light, December 2015 Issue
What You'll Need:
8 Ounces uncooked, quick-cooking Penne
12 Ounces Boneless, Skinless Chicken Cutlets
1 Tablespoon Extra-Virgin Olive Oil
7 Ounces fresh Spinach
1/4 Teaspoon crushed Red Pepper Flakes
2 Garlic Cloves, minced
1 Tablespoon Lemon Juice
2 Ounces fresh Pecorino Romano Cheese, shredded (about 1/2 Cup)
2 Ounces 1/3-Less-Fat Cream Cheese (about 1/4 cup)
To start, bring a large saucepan of water to a boil and cook pasta according to cooking directions. Once cooked, drain in a colander over a bowl, reserving 1/4 cup of pasta cooking water.
Next, heat a large skillet over medium-high heat and coat the pan with cooking spray. Place the chicken on a clean plate and sprinkle both sides of the chicken with salt and pepper. Once the skillet is heated, add the chicken. Cook for three minutes on each side, or until the chicken is just done. Remove the chicken from the skillet and thinly slice against the grain.
Return the skillet to the stovetop and reheat again the medium heat. Add the oil and swirl to coat. Add the spinach, red pepper flakes, and garlic. Cook for three minutes, or until the spinach begins to wilt. Add the cooked pasta, reserved pasta water, chicken pieces, lemon juice, and cheeses to the skillet. Toss to coat and cook until the cheese begins to melt, between one to three minutes. Serve and enjoy!
The End Result:
The cheeses used are very light on the tastebuds, but does add some substantial flavor. While a thicker sauce or even oil could be used, it's best to use the cheese mixture and it won't disappoint. The chicken adds a mean portion of protein and the spinach also amps up the vitamin quota. But the true, shining point of this recipe is that it takes no time flat to create, which is great when there's not a lot of time to slave over a stovetop.
Thanks for joining us tonight! Keep checking back for more delicious dishes that will surely inspire the cook in you. Until then,
~Cheers!
Wednesday, January 21, 2015
More Soup to Shake a (Soup) Spoon At!
Good evening everyone! Continuing on my soup conquest, I bring you a fall/winter time favorite ingredient, that might not be used as often as anticipated. Granted, there's a whole menagerie of squashes out there, but to use one in a soup like this is quite tasty. Plus, it's paired with a cheesy crouton that evens out all the flavors.
The Recipe: Butternut Squash Soup
Original Recipe From: My Fitness Pal app
What You'll Need:
Two Tablespoons Olive Oil
1 Large White Onion, chopped
2 Medium Carrots, chopped
1/2 Medium Butternut Squash, cut into 1/4-inch pieces
6 Cups Low-Sodium Chicken Broth
2 Sprigs of fresh Rosemary
1/2 Small Baguette, sliced
4 Ounces of Sharp Cheddar Cheese, shredded
2 Scallions, thinly sliced
To start, head the oil in a large saucepan over medium heat. Add the chopped onion and season with salt and pepper. Stir all the ingredients together and cover, cooking for six minutes, stirring occasionally.
Once the onions have cooked, add the carrots and the squash, stir and cover. Cook this mixture for five more minutes, stirring occasionally also. Add the chicken broth and the rosemary and bring the mixture to a boil. Once at a boil, drop the heat and let simmer for 12-15 minutes, or until the vegetables are tender.
While the vegetables are cooking, heat the oven broiler. Place the sliced baguette pieces on a foil lined baking sheet and sprinkle with the shredded cheddar cheese. Place the baking sheet in the oven and broil under the cheese has melted, about one to two minutes. Remove from the oven and set aside.
Once the vegetables have cooked, remove and discard the rosemary. If you are using a stainless steel saucepan, use a corded immersion blender and blend until all the ingredients are thoroughly mixed. If you used a nonstick saucepan, carefully pour the ingredients in a blender and pulse to puree the ingredients. Pour into serving bowl, top with scallions and the cheese croutons, and enjoy!
The End Result:
The soup will be surprisingly sweet, as the butternut squash is naturally that way. The carrots help to enhance that flavor and no onion can be found. But the cheese croutons, as I have so lovingly named them, will add a depth to the soup that can't be found elsewhere. While they might look pretty on top the of the soup, submerge them in the liquid and add with your slurps of soup. The bread will give the soup something to cling to and the sharp cheddar cheese is a nice contrast with the squash flavor. Overall, a great, fresh soup recipe to add to your soup arsenal!
That's all we have for you this week. Check back frequently for more tasty additions to your recipe book. Until then,
~Cheers!
Thursday, January 15, 2015
Mighty Fine Meat
Good evening everyone! There are often times where becoming a vegetarian wouldn't be so bad of an idea. Promote a more healthful status while giving new fruits and veggies I've never heard of before a shot. While I romanticize the idea, it's recipes, like this one tonight, that make me think otherwise and remember that I like being an omnivore.
The Recipe: Roast Beef Tenderloin with Cognac Butter
Original Recipe Found In: Cooking Light, November 2014 Issue
What You'll Need:
For the Tenderloin:
1 Tablespoon Dijon Mustard
2 Teaspoons Honey
1 Teaspoon Lower-Sodium Soy Sauce
3/4 Teaspoon Salt
1/2 Teaspoon Black Pepper
1 (2 Pound) Beef Tenderloin, trimmed
2 Tablespoons chopped fresh Thyme
For the Cognac Butter:
1 1/2 Teaspoons Butter
3 Tablespoons minced Shallots
3 Tablespoons Cognac
6 1/2 Tablespoons Butter, softened
1 Tablespoon fresh Thyme leaves
1/8 Teaspoon Black Pepper
Start by preheating an oven to 425 degrees and prepare the cognac butter: melt 1 1/2 teaspoons butter in a small, nonstick skillet over medium-low heat. Next, add the shallots and cook for two minutes or until tender, stirring shallots occasionally. Carefully stir in the cognac and cook for one minute or until the liquid has reduced by about one-third. Remove the skillet from the heat and cool.
Next, place the 6 1/2 tablespoons butter in a small bowl and stir in the cooled cognac mixture, one tablespoon thyme leaves and 1/8 teaspoon black pepper. Cover with plastic wrap and chill in the refrigerator for ten minutes. Bring the mixture from the fridge and divide it in half. Scrape each half of the butter mixture onto a piece of plastic wrap. Shape each portion into a four-inch long log. Wrap each butter log in plastic wrap and refrigerate or freeze one log for another use.
To prepare the tenderloin, combine the mustard, honey, soy sauce, 3/4 teaspoon salt, and 1/2 teaspoon of pepper in a medium mixing bowl and stir with a whisk. Spread the mustard mixture over all the sides of the tenderloin and sprinkle with two tablespoons of thyme. Place the tenderloin in a shallow roasting pan. Place the pan in a 425 degree oven and cook for 38 minutes or until a thermometer inserted reads 135 degrees. Cover the tenderloin with foil and let stand for ten minutes.
Remove the tenderloin from the roasting pan and onto a cutting board. Cut the tenderloin crosswise into 16 slices. Arrange the slices on a serving plate and cut one butter log into eight slices and top each serving with one butter slice. Serve and enjoy!
The End Result:
I've been raised to like my meat at just under well done to well done, but lately I have been enjoying my cooked meat to still have some pink in the middle. But for this recipe, it's well worth it. I've never cooked with a beef tenderloin, but it is, by far, the best meat you can purchase and cook yourself. Served with a wee bit of a boozy butter, it's quite fantastic. If you don't like your meat that undercooked, you are welcome to cook it for longer, but just remember to let it rest once it is done cooking - your pallet will thank you!
Thanks for joining us and we continue to share our culinary adventures. Until next time,
~Cheers!
Subscribe to:
Comments (Atom)


